background image

ENGLISH

EN

2 - VG RVC 3000

IMPORTANT SAFEGUARDS

Please read these instructions carefully before using the appliance, 

and always follow the safety and operating instructions.

Important: This appliance can be used by children over 8 years 

old and people with reduced physical, sensory or mental capacities 

or with a lack of experience or knowledge if they have been given 

supervision or instructions concerning the safe use of the appliance 

and the risks involved. Children should not play with the appliance. 

Cleaning and user maintenance should not be done by children 

unless they are older than 8 years and supervised. Never leave 

the appliance and its power cord unsupervised and within reach of 

children less than 8 years old or irresponsible persons when it is 

plugged into the wall or when it is cooling down.

   Check that your mains voltage corresponds to that stated on the 

appliance.

   From time to time check the appliance for damage. Should it 

be damaged, have it checked by a competent and qualified 

electrician (*).

   Only use the appliance for domestic purposes and in the way 

indicated in these instructions.

   Never immerse the appliance in water or any other liquid for any 

reason whatsoever. Keep it dry.

  Never use the appliance near hot surfaces.

   Unplug or switch off the appliance before cleaning it. Never use 

the appliance with its adapter outside and always place it in a 

dry environment.

   Never use accessories or an adapter that are not recommended 

by the producer. They could constitute a danger to the user and 

a risk of damage to the appliance. 

   Never use the appliance to vacuum matches, pointed objects, 

cigarette butts or other flammable objects. 

   Pay attention to babies, children or pets when using this 

product, in order to avoid danger.

   Never move the appliance by pulling the power cord. Make sure 

the power cord cannot get caught in any way. Do not use the 

power cord to hang your appliance. Do not wind the power cord 

around the appliance and do not bend it.

VG RVC 3000_[IB]-7L_NEW.indd   2

VG RVC 3000_[IB]-7L_NEW.indd   2

14/04/22   16:41

14/04/22   16:41

Summary of Contents for VG RVC 3000 BK

Page 1: ...n 2600mAh I B V 211123 Robot vacuum cleaner 2 Roboterstaubsauger 18 Aspirateur robot 34 Robot aspirador 50 Robot aspirapolvere 66 Robotstofzuiger 82 Robot sprz taj cy 98 EN DE FR ES IT NL PL VG RVC 30...

Page 2: ...r damage Should it be damaged have it checked by a competent and qualified electrician Only use the appliance for domestic purposes and in the way indicated in these instructions Never immerse the app...

Page 3: ...the good quality and placement of the filter Never replace the batteries yourself If they are to be replaced please contact a competent and qualified electrician When you decide to throw away the app...

Page 4: ...and it will get tangled in them In the same way do not let your robot access to long haired carpets The RVC 3000 navigation system consists of a series of programs to move in space It may pass over th...

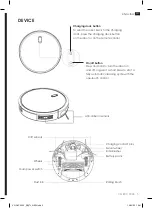
Page 5: ...on Press and hold to turn the robot on and off or give it a short press to start a fully automatic cleaning cycle with the one touch control Anti collision sensors Cliff sensors Wheels Main power swit...

Page 6: ...k Charging indicator Signal transmitter Charging contact pins Remote control with batteries Side brushes Cleaning tool Rolling brush Adapter HEPA filter Foam filter Mops Remote controle holder VG RVC...

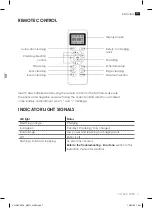
Page 7: ...ly charged Solid orange Low power and returning to charging dock Off Robot is off Flashing Solid red Beeping An error has occured Refer to the Troubleshooting Error Tone section in this instruction ma...

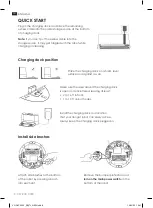
Page 8: ...on a hard level surface and against a wall Make sure the area around the charging dock is open and uncluttered leaving at least 2 m 6 ft in front 1 m 3 ft on both sides Install the charging dock in a...

Page 9: ...tart a fully automatic cleaning cycle with the one touch control Plug and play simple as that To pause the robot press the button on the robot or press the button on the remote control To resume the c...

Page 10: ...s Edge cleaning mode the robot cleans along walls and around furniture legs When you select spot cleaning the robot cleans a defined area by spiraling about 1 metre in diameter outwards and then back...

Page 11: ...tank that enables it to mop floors Attach the cloth and fill the tank with water Remove the dust bin Place back the water tank and start the desired cleaning mode When finished empty the water tank r...

Page 12: ...minute or hour section Then press the button Make sure the robot beeps to confirm the schedule It will start the automatic cleaning mode every day at the scheduled time 3 Canceling a cleaning schedul...

Page 13: ...sh guard Once every month When the silicone rubber strip on the brush guard becomes visibly worn Charging pins Once every month Swivel wheel Once every month A spare parts kit is available on Amazon u...

Page 14: ...e the side brushes use a cloth to remove the dust from the brushes 4 Pull out the swivel wheel then clean it with the cleaning tool 5 Dust off the cliff and anti collision sensors to maintain optimal...

Page 15: ...e suction pipe or the filters are clogged Remove and empty the dust bin Clean the suction pipe Clean the filters BEEP Four Times The rolling brush can t rotate Remove and clean the robot s rolling bru...

Page 16: ...g the suction inlet Empty the dust bin Clean the filters with a vacuum cleaner or with the cleaning tool Check if the filters are wet due to water or other liquids on the floor Air dry the filters com...

Page 17: ...ERP DECLARATION REGULATION 1275 2008 EC We TKG SRL hereby confirm that our product meets the requirements of regulation 1275 2008 EC Admittedly our product does not dispose of a function to minimize t...

Page 18: ...mit der auf dem Ger t vermerkten Spannung bereinstimmt berpr fen Sie das Ger t regelm ig auf Besch digungen Sollte es besch digt sein lassen Sie das Ger t durch qualifiziertes Fachpersonal pr fen Ben...

Page 19: ...odenreiniger usw Stellen Sie sich nicht auf das Ger t und setzen Sie sich nicht darauf Wird das Ger t mit besch digtem Filter verwendet kann dies zu weiteren Sch den am Ger t f hren Vergewissern Sie s...

Page 20: ...es Saugroboters keine Kabel befin den Kabel sind zu d nn um von einem Saugroboter erkannt zu werden Das Ger t k nnte sich darin verfangen Halten Sie das Ger t daher ebenfalls fern von Hochflorteppiche...

Page 21: ...n Aus Taste Ber hrungssensor gedr ckt halten um den Roboter ein und auszuschalten oder kurz dr cken um das automatische Reinigungsprogramm zu starten Kantensensoren Bodensensoren R der Netzschalter St...

Page 22: ...eige Signal bertr ger Ladekontakte Fernbedienung mit Batterien Seitenb rsten Reinigungswerkzeug pinsel B rstenrolle Netzkabel stecker HEPA Filter Schwammfilter Reinigungs t cher Fernbedienungshalterun...

Page 23: ...ndig aufgeladen Die LED leuchtet orangefarben Niedriger Akkustand und R ckkehr zur Ladestation aus Der Saugroboter ist ausgeschaltet Die LED leuchtet oder blinkt rot Signalton Am Ger t ist ein Fehler...

Page 24: ...eine ebene frei zug ngliche Fl che befindet die folgende Mindestma e aufweist 2 m Freifl che vor der Station 1 m Freifl che auf jeweils beiden Seiten der Station Platzieren Sie die Ladestation an eine...

Page 25: ...Aus Taste erneut um den automatischen Reinigungsbetrieb zu starten Plug Play so einfach Um den Roboter w hrend des Reinigungsvorgangs kurz anzuhalten dr cken Sie die Taste am Roboter oder die Taste au...

Page 26: ...st cke ab und reinigt Ecken und Kanten In diesem Programm reinigt der Saugroboter einen ausgew hlten Bereich Bei der Reinigung dreht sich der Roboter zuerst spiralf rmig bis zu einem Durchmesser von e...

Page 27: ...gungstuch am Roboter und f llen Sie Wasser in den Wasserbeh lter Entfernen Sie den Staubbeh lter Setzen Sie den gef llten Wasserbeh lter in das Ger t ein und starten Sie das gew nschte Reini gungsprog...

Page 28: ...em Signalton meldet der Roboter dass der Timer eingestellt wurde Die automatische Reinigung startet nun jeden Tag zur eingestellten Uhrzeit 3 Timer Einstellung l schen Halten Sie die Taste auf der Fer...

Page 29: ...at Wenn der Silikongummistreifen am B rstenhalter sichtlich abgenutzt ist Ladekontakte Einmal pro Monat Schwenkrad Einmal pro Monat Ein Ersatzteil Set ist bei Amazon erh ltlich unter der Bezeichnung S...

Page 30: ...b rsten und verwenden Sie ein Tuch zur Reinigung der B rsten 4 Nehmen Sie das Schwenkrad ab und reinigen Sie es mit dem Reinigungspinsel 5 Befreien Sie die Boden und Kantensensoren von Staub damit das...

Page 31: ...ter Reinigen Sie den Filter des Roboters Klopfen Sie den Staubbeh lter einige Male ab um eventuelle Restverschmutzungen zu l sen Vier Signalt ne Die B rstenrolle dreht sich nicht mehr Entfernen und re...

Page 32: ...rper die Ansaugung blockieren Leeren Sie den Staubbeh lter Reinigen Sie die Filter mit einem Staubsauger oder dem Reinigungspinsel Pr fen Sie ob die Filter durch Wasser oder andere Fl ssigkeiten auf...

Page 33: ...der VO 1275 2008 EG entspricht Unser Produkt verf gt zwar nicht ber eine Funktion zur Minimierung des Stromverbrauchs die das Produkt nach Beendigung der Hauptfunktion gem EU Verordnung 1275 2008 EG...

Page 34: ...l tat de votre appareil et de son adaptateur et si l un d eux est endommag de quelque fa on que ce soit faites le v rifier et r parer par un service qualifi comp tent afin d viter tout danger Ne rempl...

Page 35: ...areil ou lorsque vous d cidez de le jeter veuillez extraire les batteries et les recycler en les d posant dans un point de collecte ou un centre de tri D branchez toujours l appareil avant de retirer...

Page 36: ...eur et il pourrait s y emm ler Dans la m me id e ne laissez pas votre robot acc der un tapis franges tr s longues Le syst me de navigation RVC 3000 se compose d une s rie de programmes pour se d place...

Page 37: ...t Appuyez et maintenez enfonc pour allumer ou teindre ou appuyez une fois dessus pour commencer le nettoyage automatique Capteurs anticollisions Capteurs antichute Roues Interrupteur principal Bac po...

Page 38: ...moin de charge Zone de transmission du signal Fiches de chargement T l commande avec batteries brosses lat rales Outil de nettoyage Brosse rotative Adaptateur filtre HEPA Filtre mousse Lingettes Port...

Page 39: ...charge Vert fixe Veille nettoyage recharg Orange fixe Batterie faible et retour la station de charge teinte Le robot est teint Rouge clignotant fixe bip Le robot est en erreur Se reporter la section D...

Page 40: ...ur Assurez vous que la zone autour de la station soit ouverte et d gag e en laissant au moins 2 m tres devant 1 m tre des deux c t s Installez la station de charge dans un endroit facilement accessibl...

Page 41: ...nterrupteur nouveau pour lancer un cycle de nettoyage automatique Plug and play aussi simple que a Pour mettre le robot en pause appuyez sur le bouton du robot ou appuyez sur le bouton de la t l comma...

Page 42: ...des murs et autour des pieds des meubles Lorsque vous s lectionnez Nettoyage localis le robot nettoie une zone d termin e en spirale de l int rieur vers l ext rieur sur un diam tre d environ 1 m tre p...

Page 43: ...ngette et remplissez le r servoir d eau Retirez le bac poussi re Mettez le r servoir d eau la place et d marrez le mode de nettoyage souhait Lorsque le nettoyage est termin videz le r servoir rincez l...

Page 44: ...ouhait s Appuyez sur les boutons ou pour s lectionner la section des minutes ou des heures Ensuite appuyez sur le bouton Le robot mettra un signal sonore lorsque le r glage sera termin 3 Annuler la pl...

Page 45: ...es 3 6 mois ou si visiblement us es Capot de la brosse rotative Une fois par mois Lorsque la bande de caoutchouc sur le devient visiblement us e Fiches de chargement Une fois par mois Roue pivotante U...

Page 46: ...lisez un chiffon pour enlever la poussi re des brosses 4 Retirez la roue pivotante puis nettoyez la avec l outil de nettoyage 5 D poussi rez les capteurs anti chutes pour maintenir les meilleures perf...

Page 47: ...BIP 3 fois Le conduit d aspira tion ou les filtres sont bouch s Retirez et videz le bac poussi res Nettoyez le conduit d aspiration derri re la brosse rotative BIP 4 fois La brosse rotative du robot...

Page 48: ...as l entr e d aspiration Videz le bac poussi re Nettoyez les filtres avec un aspirateur ou une brosse de nettoyage V rifiez que les filtres ne sont pas mouill s cause de l eau ou d un autre liquide su...

Page 49: ...a directive D CLARATION ERP DIRECTIVE 1275 2008 CE Nous TKG SRL confirmons par la pr sente que notre produit correspond aux exigences de la directive 1275 2008 CE Certes notre produit n est pas quip d...

Page 50: ...da ado y no utilice su aparato si el cable o el aparato est n da ados por el motivo que sea Cualquier reparaci n debe ser realizada por un servicio cualificado competente Utilice el aparato solamente...

Page 51: ...o se utiliza este producto para evitar el peligro Cualquier utilizaci n con un filtro defectuoso puede da ar el aparato Compruebe por lo tanto la calidad del filtro y su correcta colocaci n No sustitu...

Page 52: ...er detectados por un robot aspirador y se enredar en ellos Del mismo modo no deje que su robot acceda a alfombras de pelo largo El sistema de orientaci n RVC 3000 consiste en una serie de programas pa...

Page 53: ...para encender y apagar el robot o bien pulse brevemente para iniciar un ciclo de limpieza totalmente autom tico Sensores anticolisi n Sensor antica das Ruedas Interruptor principal encendido apagado R...

Page 54: ...Carga rea de transmisi n de se al Pines de contacto de carga Control remoto 4 x cepillos laterales Cepillo Cepillo giratorio Adaptador Filtro HEPA Filtro de espuma 2 x trapos de limpieza Soporte para...

Page 55: ...a Limpieza completamente cargado Color naranja continuo Baja potencia y regreso a la base de carga Apagado El robot est apagado Parpadeo rojo continuo pitido Ha ocurrido un error Consulte la secci n S...

Page 56: ...e de que el rea alrededor de la base de carga est abierta y despejada dejando al menos 2 m 6 pies en el frente 1 m 3 pies a ambos lados Instale la base de carga en una ubicaci n a la que pueda acceder...

Page 57: ...ciar un ciclo de limpieza totalmente autom tico con el control de una sola pulsaci n Enchufar y usar as de sencillo Para pausar el robot pulse el bot n o pulse el bot n del mando a distancia Para rean...

Page 58: ...go de las paredes y alrededor de las patas de los muebles Cuando se selecciona la limpieza puntual el robot limpia una zona definida desplaz ndose en espiral hacia el exterior de aproximadamente 1 met...

Page 59: ...mite fregar los suelos Coloque el pa o y llene el dep sito de agua Retire el dep sito de polvo Vuelva a colocar el dep sito de agua e inicie el programa de limpieza deseado Cuando termine vac e el dep...

Page 60: ...o para seleccionar la secci n de minutos u horas Luego presione el bot n el robot emitir BIP cuando se complete el ajuste del reloj Iniciar el modo de limpieza autom tica cada d a a la hora programad...

Page 61: ...s Cuando la tira de goma de silicona en el protector del cepillo est visiblemente desgastada Pines de carga una vez al mes Rueda giratoria una vez al mes Hay un kit de piezas de repuesto disponible en...

Page 62: ...cci n 3 Retire los cepillos laterales use un pa o para quitar el polvo de los cepillos 4 Saque la rueda giratoria luego limpie la rueda giratoria con el pa o de limpieza 5 Desempolve los sensores para...

Page 63: ...re lancar el robot BIP tres veces El tubo de aspir aci n o los filtros est n obstruidos Retire y vac e el dep sito de polvo Limpie el tubo de aspiraci n Limpie los filtros BIP quatro veces El cepillo...

Page 64: ...robot es demasiado baja para comenzar a limpiar La potencia de succi n es d bil Compruebe si alguna obstrucci n est bloqueando la entrada de succi n Vaciar el recipiente de basura Limpie los filtros c...

Page 65: ...confirmamos que nuestro producto cumple con los requisitos del Reglamento 1275 2008 CE Es cierto que nuestro producto no dispone de una funci n para minimizar el consumo de energ a lo que deber a de a...

Page 66: ...parecchio Di tanto in tanto verificare che l apparecchio non sia danneggiato e non utilizzare l apparecchio Eventuali riparazioni devono essere eseguite da un servizio qualificato competente per evita...

Page 67: ...l dispositivo Se si utilizza l apparecchio con un filtro dell aria danneggiato l apparecchio potrebbe danneggiarsi Assicuratevi di controllare la buona qualit e il posizionamento del filtro Non sostit...

Page 68: ...va ti da un robot aspirapolvere e si aggroviglieranno in essi Allo stesso modo non lasciare che il robot acceda a tappeti a pelo lungo Il sistema di orientamento del robot RVC 3000 consiste in una ser...

Page 69: ...robot o premerlo brevemente per avviare un ciclo di pulizia completamente automatico con il controllo one touch Sensori anti collisione Sensore anti caduta Ruote Interruttore principale acceso spento...

Page 70: ...Indicatore di carico Area di trasmissione del segnale Carica pin di contatto Telecomando 4 x spazzole laterali Spazzola Spazzola rotolante Adattatore Filtro HEPA Filtro schiuma 2 x panni per la pulizi...

Page 71: ...tandby Pulizia Completamente carica Colore arancione continuo Bassa potenza e ritorno alla base di ricarica Spento Il robot spento Rosso lampeggiante continuo segnale acustico Si verificato un errore...

Page 72: ...ro una parete Assicurarsi che l area intorno alla base di ricarica sia aperta e sgombra lasciando almeno 2 m 6 piedi davanti 1 m 3 piedi su entrambi i lati Installare la base di ricarica in una posizi...

Page 73: ...ione per avviare un ciclo di pulizia completamente automatico con il controllo one touch Collegare e avviare cos semplice Per mettere in pausa il robot premere il pulsante o premere il pulsante sul te...

Page 74: ...di il robot pulisce lungo le pareti e intorno ai piedi dei mobili Quando si seleziona la pulizia puntuale il robot pulisce un area definita procedendo a spirale verso l esterno di circa 1 metro di dia...

Page 75: ...il panno e riempire il serbatoio d acqua Rimuovere il contenitore della polvere Rimettere il serbatoio dell acqua e avviare il programma di pulizia desiderato Al termine svuotare il serbatoio dell acq...

Page 76: ...mere il tasto o o per selezionare la sezione dei minuti o delle ore Quindi premere il tasto Il robot emetter BIP quando l impostazione dell orologio completata Avvier la modalit di pulizia automatica...

Page 77: ...mese Quando la striscia di gomma siliconica sulla protezione della spazzola visibilmente consumata Perni di caricamento una volta al mese Ruota girevole una volta al mese Un kit di pezzi di ricambio d...

Page 78: ...spazzole laterali utilizzare un panno per rimuovere la polvere dalle spazzole 4 Rimuovere la ruota girevole quindi pulire la ruota girevole con il panno per la pulizia 5 Spolverare i sensori per mante...

Page 79: ...di aspirazione o i filtri sono intasati Rimuovere e svuotare il contenitore di polvere Pulire il tubo di aspirazione Pulire i filtri BIP quat tro volte La spazzola rotante del robot non pu ruotare Ri...

Page 80: ...one Svuotare il contenitore dei rifiuti Pulire i filtri con un aspirapolvere o una spazzola per la pulizia Controllare se i filtri sono bagnati a causa di acqua o altro liquido sul pavimento Asciugare...

Page 81: ...riciclato o utilizzato per altre applicazioni alla direttiva DICHIARAZIONE ERP DIRETTIVA 1275 2008 CE Noi TKG SRL confermiamo che il nostro prodotto conforme ai requisiti della direttiva 1275 2008 CE...

Page 82: ...nneer het aan het afkoelen is Voor het gebruik controleer of de netspanning overeenkomt met de spanning die op het apparaat is genoteerd Als het laadkabel of het apparaat beschadigd is stop dan onmidd...

Page 83: ...g van het filter controleert Vervang de batterijen nooit zelf Als de batterijen moeten worden vervangen neem dan contact op met een bekwame en gekwalificeerde dienst Als u besluit het apparaat weg te...

Page 84: ...en erin verstrikt raken Houd uw robot om dezelfde reden weg bij langharige tapijten Het navigatiesysteem van de RVC 3000 bestaat uit een reeks programma s om in de ruimte te bewegen De robot kan meerd...

Page 85: ...iening Aan uitknop Houd ingedrukt om de robot aan en uit te zetten of druk kort om een volautomatische reinigingscyclus te starten met de eenknopsbediening Antibotsingssensoren Klifsensoren Wielen Hoo...

Page 86: ...oir Oplaadindicator Signaaltransmitter Laadcontacten Afstandsbediening met batterijen Zijborstels Schoonmaak tool Rolborstel Adapter HEPA filter Schuimfilter Dweilen Houder voor afstandsbediening VG R...

Page 87: ...ranje Laag stroomverbruik en aan het terugkeren naar het oplaadstation Uit Robot staat uit Knipperend vast rood piepen Er is een fout opgetreden Raadpleeg de sectie Probleemoplossing Fouttoon in deze...

Page 88: ...tegen een muur Zorg ervoor dat het gebied rond het oplaadstation open en rommelvrij is en zorg voor een vrije ruimte van ten minste 2 m aan de voorkant 1 m aan beide zijkanten Installeer het oplaadst...

Page 89: ...ngscyclus te starten met de eenknopsbediening Plug en play zo simpel is het Om de robot te pauzeren drukt u op de knop op de robot of drukt u op de knop op de afstandsbediening Druk nogmaals op dezelf...

Page 90: ...gen Randreinigingsmodus de robot reinigt langs muren en rond meubelpoten Wanneer u plaatselijke reiniging selecteert reinigt de robot een bepaald gebied door ongeveer 1 meter in diameter naar buiten t...

Page 91: ...de doek vast en vul het reservoir met water Verwi jder de stofbak Plaats het waterreservoir terug in de robot en start de gewenste reinigingsmodus Als u klaar bent maakt u het waterreservoir leeg spoe...

Page 92: ...ecteren Druk vervolgens op de knop Controleer dat de robot piept om het schema te bevestigen Hij zal de automatische reinigingsmodus elke dag op het geplande tijdstip starten 3 Een reinigingsschema an...

Page 93: ...neer de siliconenrubberen strip op de bor stelbeschermer zichtbaar versleten raakt Laadcontacten Maandelijks Zwenkwiel Maandelijks Een kit met reserveonderdelen is verkrijgbaar op Amazon onder de naam...

Page 94: ...stels gebruik een doek om het stof van de borstels te verwijderen 4 Trek het zwenkwiel eruit en reinig het vervolgens met de reinigingstool 5 Stof de klif en antibotsingssensoren af om optimale presta...

Page 95: ...de robot opnieuw te starten PIEPT driemaal De zuigpijp of de filters zijn verstopt Verwijder en leeg de stofbak Reinig de zuigpijp Reinig de filters PIEPT vier keer De rolborstel kan niet draaien Verw...

Page 96: ...ie de zuiginlaat blokkeren Maak de stofbak leeg Reinig de filters met een stofzuiger of met de reinigingstool Controleer of de filters nat zijn door water of andere vloeistoffen op de vloer Laat de fi...

Page 97: ...NING EU RICHTLIJN 1275 2008 Wij TKG SRL bevestigen hierbij dat ons product voldoet aan de vereisten van richtlijn 1275 2008 EU Ons product beschikt dan wel niet over een functie om het stroomverbruik...

Page 98: ...urz dzenie pod k tem uszkodze W przypadku uszkodzenia zle sprawdzenie urz dzenia kompetentnemu i wykwalifikowanemu elektrykowi U ywaj urz dzenia wy cznie do cel w domowych oraz w spos b wskazany w nin...

Page 99: ...rz dzeniu Je li u ywasz urz dzenia z uszkodzonym filtrem powietrza mo e ono ulec uszkodzeniu Upewnij si e filtr jest czysty dobrej jako i w a ciwie umiejscowiony Nigdy nie wymieniaj baterii samodzieln...

Page 100: ...udost p nia robotowi dywan w z d ugim w osiem System nawigacji RVC 3000 sk ada si z serii program w do poruszania si w przestrzeni Mo e przechodzi kilka razy t sam cie k i stwarza wra enie e omija nie...

Page 101: ...aby w czy lub wy czy zasilanie Naci nij kr tko aby za pomoc jednego dotkni cia rozpocz w pe ni automatyczny cykl sprz tania Czujniki antykolizyjne Czujnik kraw dzi K ka G wny wy cznik zasilania Pojem...

Page 102: ...adowania Obszar transmisji sygna u Styki adowania Pilot zdalnego sterowania z bateriami Strona szczotki Czyszczenie narz dzie Rolling szczotka Adapter Filtr HEPA Filtr g bkowy Mopy Uchwyt na zdalnego...

Page 103: ...towo ci Sprz tanie W pe ni na adowany Sta y pomara czowy Niska moc i powr t do stacji adowania Wy czony Robot jest wy czony Migaj cy sta y czerwony sygna d wi kowy Wyst pi b d Zapoznaj si z sekcj Rozw...

Page 104: ...ar wok stacji adowania jest dost pny i uporz dkowany i pozostaje wolna przestrze co najmniej 2 metry przed stacj aduj c 1 metr po obu stronach stacji aduj cej Zainstaluj stacj aduj c w miejscu do kt r...

Page 105: ...ponownie aby rozpocz w pe ni automatyczny cykl sprz tania sterowany jednym dotkni ciem Pod cz i gra to proste Aby wstrzyma dzia anie robota naci nij przycisk na robocie albo przycisk na pilocie Aby wz...

Page 106: ...owo w r nych kierunkach Tryb sprz tania kraw dzi robot sprzata wzd u cian i wok n g mebli Po wybraniu sprz tania punktowego robot czy ci okre lony obszar wykonuj c spiral o rednicy oko o 1 metra na ze...

Page 107: ...t ry umo liwia mycie pod g Za ciereczk a zbiornik nape nij wod Wyjmij pojemnik na kurz Umie na miejscu zbiornik z wod i uruchom dany tryb sprz tania Po zako czeniu opr nij zbiornik na wod wyp ucz go c...

Page 108: ...godzin Nast pnie naci nij przycisk Robot zasygnalizuje d wi kiem gdy ustawianie zegara zostanie zako czone 3 Anulowanie harmonogramu sprz tania Naci nij i przytrzymaj przycisk na pilocie przez oko o 4...

Page 109: ...czotki Raz w miesi cu Lub gdy pasek gumy silikonowej na os onie szczotek jest wyra nie zu yty Styki adowania Raz w miesi cu Ko o zwrotne Raz w miesi cu Zestaw cz ci zamiennych jest dost pny na Amazon...

Page 110: ...owoli 3 Zdejmij szczotki boczne u yj szmatki aby usun kurz ze szczotki 4 Wyjmij ko o zwrotne a nast pnie wyczy je za pomoc dostarczonego narz dzia do czyszczenia 5 Odkurz czujniki kraw dzi aby utrzyma...

Page 111: ...przycisk zasilania aby ponownie uruchomi robota Potr jny sygna d wi kowy Rura ss ca lub filtry s zatkane Wyj i opr ni pojemnik na kurz Wyczy rur ss c Wyczy filtry Czterokrotny sygna d wi kowy Ruchoma...

Page 112: ...ie blokuje wlotu ssania Opr nij pojemnik na kurz Wyczy filtry odkurzaczem lub szczotk do czyszczenia Sprawd czy filtry nie s mokre z powodu wody lub innego p ynu na pod odze Przed u yciem ca kowicie w...

Page 113: ...ngu zu ytego sprz tu elektrycznego Przestrzeganie zasad selektywnej zbi rki sprz tu ma zapewni w a ciwy poziom ochrony zdrowia ludzkiego i rodowiska naturalnego DEKLARACJA ERP ROZPORZ DZENIE KOMISJI W...

Page 114: ...vengaelectrics com Chauss e de Hal 158 1640 Rhode Saint Gen se Belgium 32 2 359 95 13 sav vengaelectrics com VG RVC 3000_ IB 7L_NEW indd 114 VG RVC 3000_ IB 7L_NEW indd 114 14 04 22 16 43 14 04 22 16...

Reviews: