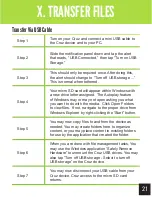
Step 1
Turn on your Cruz and connect a mini USB cable to
the Cruz device and to your PC.
Step 2
Slide the notification panel down and tap the alert
that reads, “USB Connected,” then tap “Turn on USB
Storage.”
Step 3
This should only be required once. After doing this,
the alert should change to “Turn off USB storage ...”
This is normal when tethered.
Step 4
Your micro SD card will appear within Windows with
a new drive letter assigned. The Autoplay feature
of Windows may or may not open asking you what
you want to do with the media. Click Open Folders
to view files. If not, navigate to the proper drive from
Windows Explorer by right-clicking the “Start” button.
Step 5
You may now copy files to and from the device as
needed. You may create folders here to organize
content, or you may place content in existing folders
for use by the application that created the folder.
Step 6
When you are done with file management tasks, You
may use the Windows application “Safely Remove
Hardware” to unmount the Cruz USB drives. You may
also tap “Turn off USB storage - Select to turn off
USB storage” on the Cruz device.
Step 7
You may now disconnect your USB cable from your
Cruz device. Cruz access to the micro SD card
returns.
21
Getting Started
X. TRANSFER FILES
Transfer Via USB Cable

