background image

26

Information about the lithium ion battery:

 The lithium ion battery can only be 

charged within a temperature range of 0-45 °C. It takes approximately 5 hours to fully 
charge the battery. Please note the safety instructions when operating the battery! 
The battery life without an external power source is approx. 4 hours when the device 
is being used for navigation and approx. 5 hours when the device is being used as an 
MP3 player . 
In many countries it is forbidden to dispose of empty batteries with normal household 
waste. Please find out the regulations that apply in your area regarding the disposal 
of used batteries.

Assembly and Mounting

On no account should the screen be adjusted by moving the device itself.

Dismounting:

 To detach the device, switch the pressure lever in the opposite direc-

tion and carefully pull the transparent rubber end of the suction cup to remove it from 
the window.

Initial Setup

When you switch on the navigation system for the first time,
you must firstly deactivate the transport safety switch. This can
be done by performing the following steps:

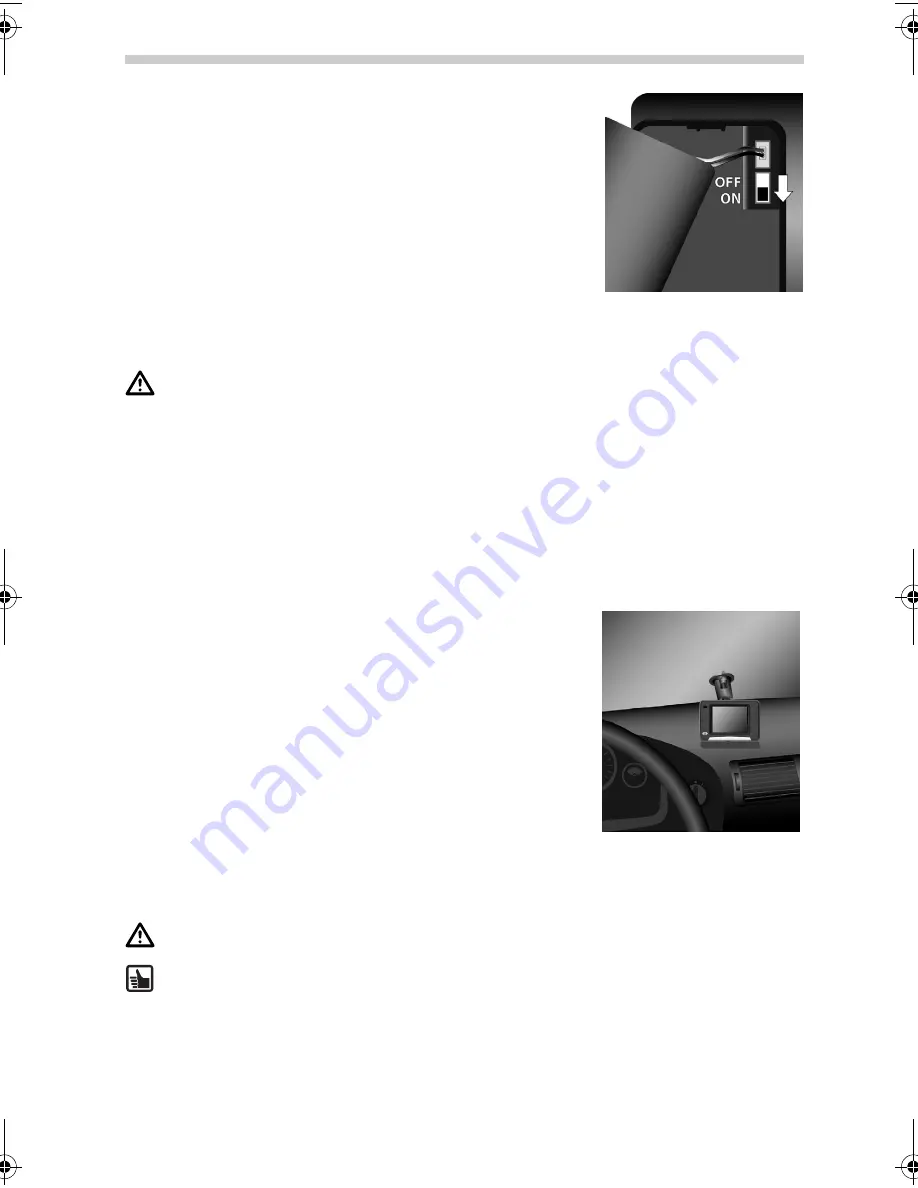
Open the battery compartment and lift up the battery. Here 
it is important that the connecting cable is not unplugged. 

Next to the cable socket, you will see a small switch. Move 
the switch downwards in order to activate the power sup-
ply.

Connect the navigation system to the 12V/24V power supply 
in your vehicle. The battery will then start to charge.

To mount the device in the vehicle, proceed as follows:

Find a suitable place in the vehicle for mounting the mount. 
The screen be must be clearly visible from the driver's seat 
but the device should not obscure the driver's view. 

Please note the safety instructions when choosing the loca-
tion page 21. 

Attach the navigation system near to the dashboard so that 
it will not cause any damage if it falls down. 

Clean the area of the windscreen that you wish to stick the 
suction cup to. This is to remove grease and dust from the 
area.

Press the suction cup against the glass in a free sky viewing 
position and move the pressure lever towards the glass until it locks into place.

Attach the navigation system to the mount and make sure it is firmly locked in place.

Setup and Mounting

QSG-EHV-2.book  Seite 26  Donnerstag, 27. April 2006  12:02 00

Summary of Contents for MS 2010 -

Page 1: ...d wichtige Hinweise First Steps and Important Notes Premiers pas et instructions importantes Primeros pasos y advertencia importante Primi passi e avviso importante Primeiros passos e avisos important...

Page 2: ...o install the device in your vehicle using a mount please be aware of the following On no account should the screen be adjusted by moving the device it self Position the screen so that you are able to...

Page 3: ...navigation system from getting wet if you are on a motorcycle bicycle or in a convertible car This is because the device is not splash proof Avoid touching the screen with sharp or rough edged objects...

Page 4: ...p 4 TMC antenna only for traffic product version for receiving traffic information 5 DC cable 12V 24V to power the navigation system from within the vehicle adapter for cigarette lighter You should no...

Page 5: ...gation system will be completely restarted The status LED can display the following colours Green Battery fully charged The navigation device is being powered by the battery or the power cable Yellow...

Page 6: ...d 10 Headphone socket 11 Connection for TMC antenna only for traffic product version 12 Connection for 100V 240V mains adapter optional or 12V 24V cigarette lighter Left Side Right Side 12 11 9 10 Und...

Page 7: ...transport safety switch This can be done by performing the following steps Open the battery compartment and lift up the battery Here it is important that the connecting cable is not unplugged Next to...

Page 8: ...u The following functions are available in the Main Menu Destination page 32 Tap the Destination button to select the destina tion if you want the navigation system to guide you from your present loca...

Page 9: ...itched Off the map is shown with north up the car travels in all directions Screen Tap this option to set e g Day or night Colour scheme and Brightness Status bar The status bar is visible on the bott...

Page 10: ...es the latest TMC traffic information in the background provided that this information is available in the part of the country you are in Alert points Alert points can give visible and audible notific...

Page 11: ...umber of roads and addi tional information e g hotels restaurants as well as the high density housing areas Furthermore it may take longer to establish the GPS reception if you have just driven out of...

Page 12: ...ceive TMC the name of the provider is shown green in the status bar If TMC is switched Off no provider is shown and a narrow line is visible When TMC is switched On and you receive traffic information...

Page 13: ...ience Home and Work are directly accessible from the main menu Just by tapping the Home and Work button on the screen you will be navigated to these destinations You can enter an address Address or se...

Page 14: ...a list with all known POI categories After selecting Hotel the navigation systems shows a list of all known hotels in the area The hotel nearest to your cur rent position will be at the top of the lis...

Page 15: ...you have entered the destination all ele ments for the desired destination appear on the Confirmation screen the system will confirm your selection Additionally you have the possi bility to store the...

Page 16: ...tructions e g a dotted arrow representing Follow the road The map itself shows different elements witch can be switched on and off You can do this by tapping Map display in the Toolbar or in Settings...

Page 17: ...er Tap the MP3 Player button The MP3 player s Music menu appears Using the symbols in the menu you can perform the follow ing functions 1 Jump to previous tile 2 Jump to next title 3 Switch to previou...

Page 18: ...zz Classic Rock Tap the Random and Repeat buttons to activate or deactivate the corresponding functions To return to the Music menu tap the Back button The folder selection screen appears Tap the up a...

Page 19: ...menu appears Using the symbols in the menu you can perform the following functions 1 Jump to previous picture 2 Jump to next picture 3 Switch to previous folder 4 Switch to next folder 5 Start slide...

Page 20: ...oesn t start screen remains blank Make sure that the battery is fully charged and or that the device is connected to a power source If you are using the DC cable check that the plug is securely and co...

Page 21: ...documentation is protected by copyright Subject to technical and optical changes as well as printing errors The information contained in this document is subject to change at any time without prior no...

Reviews: