background image

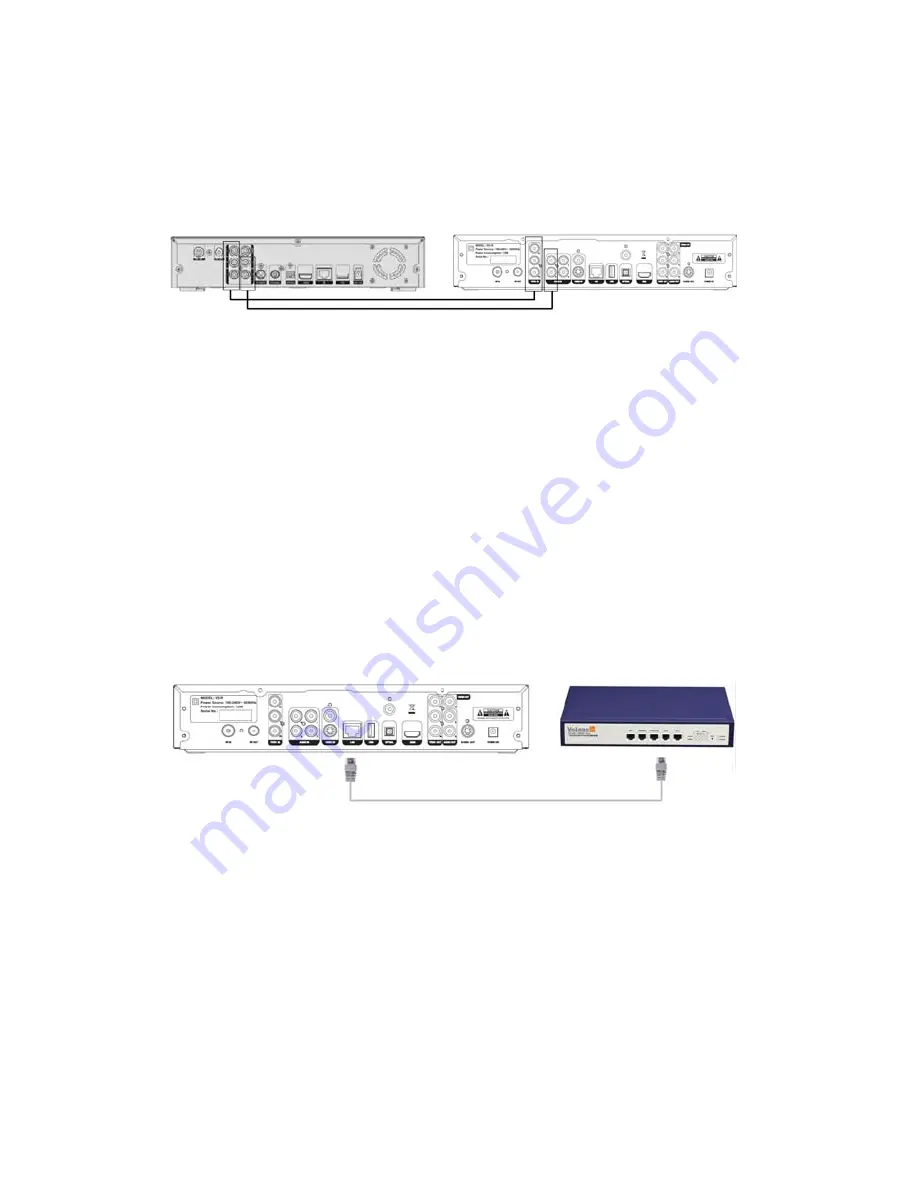
Output of other external device. As Component Video does not convey audio 

signal, a separate connection is needed to connect the Audio/L/R Input from VD-R 

to the external device’s Audio/L/R Output.                                                             


Other external device (HDTV decoder)               VD-R 

3.9  Other Setup Options 

Network Connection for Interactive Services 

Some of the features present in the new MHEG-5 Interactive 

Services broadcasts require an internet connection (competition 

entries, voting, subscribing and purchasing for example). An existing 

Ethernet Network is needed. Simply use a CAT-5 cable to connect 

the Network Port of VD-R to the network router or hub.   


3.10  Power Connection 

Connect the power cable to the suitable A.C. power socket and plug 

12V D.C. power into VD-R. Do not unplug or cut off power supply or 

before all the connections are made. 

  56 / 81


Summary of Contents for VD-R

Page 1: ...VD R U Us se er r M Ma an nu ua al l Winning Perfect Limited...

Page 2: ...Winning Perfect Ltd 833 506 Room 506 5 f Tower 2 Cheung Sha Wan Plaza 833 Cheung Sha Wan Rd Kowloon Hong Kong Tel 852 28611109 Fax 852 24116625 Email info vdigi com hk Web site www vdigi com hk...

Page 3: ...1 81 1 5 2 VD R 5 2 1 5 2 2 6 2 3 8 2 4 10 3 11 3 1 11 3 2 HDMI 11 3 3 12 3 4 S 12 3 5 13 3 6 13 3 7 13 3 8 14 3 9 16...

Page 4: ...2 81 3 10 16 4 17 4 1 17 4 2 17 5 18 5 1 19 5 2 21 5 3 28 5 4 29 5 5 31 5 6 PIP 35 5 7 TIMESHIFT 36 6 VD R 37 6 1 37 6 2 41 6 3 VDIGI 42 7 42...

Page 5: ...nt Panel Display 49 3 Connection and Installation 50 3 1 Antenna Connections 50 3 2 HDMI Television Connection 51 3 3 Composite Video Connection 51 3 4 S Video Connection 52 3 5 Component Video Connec...

Page 6: ...57 4 2 Channel Scanning 57 5 Features of VD R 58 5 1 Viewing TV 58 5 2 Recording 61 5 3 Channel 68 5 4 Programmes transfer 69 5 5 Files editing 71 5 6 Picture in picutre PIP 74 5 7 TIMESHIFT 75 6 Sett...

Page 7: ...5 81 8 Troubleshooting 80 1 2 VD R 2 1...

Page 8: ...6 81 VD R DMBT H 2 2 VD R AAA LED...

Page 9: ...VD R 3 2 LED 7 81...

Page 10: ...LED LED 2 3 VD R 8 81...

Page 11: ...Input1 YPbPr Audio L R VD R Input2 VD R VD R USB VD R USB USB VD R HDMI HDMI HDMI HDMI YPbPr HDMI YPbPr 9 81...

Page 12: ...S Video 100 240 2 4 10 81...

Page 13: ...3 3 1 3 1 1 VD R Ant IN 3 1 2 VD R DVD VD R Loop OUT Ant IN VD R 3 2 HDMI HDMI VD R VD R HDMI VD R HDMI HDMI 11 81...

Page 14: ...3 3 HDMI YPbPr VD R VD R Video L R Video L R 3 4 S S Video HDMI VD R S Video S Video S Video S Video VD R S Video 12 81...

Page 15: ...3 5 HDMI VD R YPbPr VD R YPbPr YPbPr 3 6 L R VD R Audio out 3 7 VD R 3 7 1 VD R COAXIAL COAXIAL 13 81...

Page 16: ...3 7 2 VD R 3 8 YPbPr Audio IN Video IN VD R L R S Video V L R 14 81...

Page 17: ...Video L R VD R 3 8 1 S S Video VD R S V S Video VD R L R VD R 3 8 2 VD R V VD R L R 15 81...

Page 18: ...VD R 3 8 3 YPbPr YPbPr VD R L R VD R 3 9 MHEG 5 5 VD R 3 10 12V VD R VD R 16 81...

Page 19: ...4 VD R 4 1 4 2 OFTA 17 81...

Page 20: ...47MHz 101 list 5 18 81...

Page 21: ...5 1 5 1 1 CH CH LIST 5 1 2 EPG VD R 19 81...

Page 22: ...EPG EPG EPG 20 81...

Page 23: ...EPG 5 1 3 5 2 VD R 5 2 1 21 81...

Page 24: ...5 2 2 22 81...

Page 25: ...5 2 3 23 81...

Page 26: ...1 2 info 5 2 4 MENU 24 81...

Page 27: ...5 2 5 VD R VD R BACK 5 2 6 25 81...

Page 28: ...5 VD R VD R 5 2 7 5 2 8 26 81...

Page 29: ...27 81 DIGITAL ANALOG INPUT1 YPbPr INPUT2 S Video INPUT3 VD R XP SP SLP SEP HDD VD R VD R USB REC REC REC...

Page 30: ...5 3 5 3 1 VD R 474MHz 858MHz EXIT MENU 5 3 2 5 3 3 47MHz 5 3 4 Y 28 81...

Page 31: ...LIST LIST 5 4 MENU 5 4 1 20 5 4 2 USB1 USB USB2 USB 20 29 81...

Page 32: ...5 4 3 5 4 4 5 4 5 30 81...

Page 33: ...10 10 5 5 MENU 31 81...

Page 34: ...32 81...

Page 35: ...15 31 33 81...

Page 36: ...OK OK 34 81...

Page 37: ...5 6 PIP 35 81...

Page 38: ...5 7 TIMESHIFT 36 81...

Page 39: ...6 VD R MENU VD R V Digi 6 1 6 1 1 50Hz 37 81...

Page 40: ...38 81 50Hz 50Hz 60Hz S Video 576i50Hz 576p50Hz 720p50Hz 720p60 Hz 1080i50 Hz 1080i60 Hz 1080i 1080i_60Hz HDMI 480p 576p HDMI 1080P_50Hz 1080P_60Hz RGB YPbPr YPbPr RGB 16 9...

Page 41: ...39 81 4 3 ASPECT 6 1 2 HDMI HDMI PCM hdmi SPDIF AV S PDIF PCM PCM Bitstream 6 1 3 ENGLISH CHI 5 10 15 20 25 30 OSD MENU X Y...

Page 42: ...SD X Y MHEG5 MHEG5 MENU 85 MENU USB extern ttf 40 81...

Page 43: ...41 81 USB OK EPG 6 1 4 VD R VD R ON OFF VD R VFD 6 1 5 VD R 6 2 6 2 1 MAC 6 2 2...

Page 44: ...42 81 MCU LOADER LOADER 6 3 VDIGI VDIGI 7 VD R www vdigi com hk USB VD R USB VD R 8 i VD R VFD VD R ii a b VD R c iii a b VD R iv a b c VD R d VD R...

Page 45: ...Make sure the power adaptor is disconnected before cleaning the unit Do not touch the power cord with wet hand Use a slightly damp lint free cloth to clean the unit Do not use chemicals like benzene a...

Page 46: ...such as fire or direct sunlight Keep the unit away from strong magnetic and electric field 2 Understanding VD R 2 1 Features of VD R VD R is capable of processing and recording various audio and video...

Page 47: ...Inserting the Batteries into the Remote Control Push in the ridged area of the battery cover and slide the cover down Insert 2 AAA batteries supplied by matching the and marks on the batteries to the...

Page 48: ...Control Step 1 Place the VD R Remote Control and the TV remote control on the same surface 3cm apart and with the emitters facing each other Step 2 Press and hold the button for 2 seconds until the LE...

Page 49: ...rresponding button on your TV remote control the power button in this case until the LED Indicator turns on Step 5 Repeat steps 3 and 4 for each button you want to programme Step 6 When finish program...

Page 50: ...s Audio Video Input2 This allows VD R to receive play and record analogue signals Ethernet Network This connection links VD R to your home network reserve for future s use USB This supports exporting...

Page 51: ...d Composite Video Output This output is the most basic video connections and is Standard Definition only S Video Output This output offers a higher quality signal than composite for Compatible equipme...

Page 52: ...3 1 1 Direct Antenna Connection Connect VD R to your antenna using the Ant In connector A roof mounted antenna is recommended for best reception 3 1 2 Antenna Loopthrough Connection VD R supports ant...

Page 53: ...supports HDMI Output which is the highest quality video output Simply connect the HDMI Output from VD R directly to one of the TV s HDMI Input 3 3 Composite Video Connection In order to get Standard...

Page 54: ...nnection is needed to connect the Audio L R Output from VD R to the TV s Audio L R Input 3 5 Component Video Connection To obtain a very high quality High Definition image from VD R without HDMI Compo...

Page 55: ...xial and Optical Digital Audio Outputs Use whichever is more convenient 3 7 1 Connecting to Amplifier Coaxial Audio Output Connect the Coaxial Output from VD R to the Coaxial Input of the amplifier wi...

Page 56: ...bPr Audio IN and Video IN on the rear panel are for VD R s Audio Video Input They are separated into 2 groups Component Video and Audio L R Inputs are in 1 group on the left namely Input 1 S Video V a...

Page 57: ...ternal device s Audio L R Output Other external device HDTV decoder VD R 3 8 2 Composite Video Connection Input 3 Connect the Composite Video Input from VD R V to the Composite Video Output of other e...

Page 58: ...s Some of the features present in the new MHEG 5 Interactive Services broadcasts require an internet connection competition entries voting subscribing and purchasing for example An existing Ethernet N...

Page 59: ...ge immediately according to the setting 4 2 Channel Scanning Channel scanning starts right after language setting This can be done by auto DTT channel scan or manual analogue channel scan DTT channels...

Page 60: ...s then resumes and switches to auto mode in order to speed up the process Manual analogue channel scan starts at frequency 101 Enter the channels after the channel scan Note Select list to display all...

Page 61: ...Use the built in Electronic Programme Guide EPG to browse and select a channel Press the list button to select different channel 5 1 2 EPG The EPG provides an easily understandable guide to what s sh...

Page 62: ...ormation on the previous and the coming days Channel up down on the EPG Menu Confirm Channel Switch Go to the previous page of the Programme List Go to the next page of the Programme List or Press and...

Page 63: ...D R you can easily record a programme by Instant recording adding Scheduled Recording task on Main Menu or EPG Menu 5 2 1 Instant Recording To record the programme currently being viewed simply press...

Page 64: ...Menu To record a future programme the easiest way is to select the preferred programme on the EPG Menu and press or A Recording Sign will be displayed next to the selected programme To cancel a Sched...

Page 65: ...Recording can be applied to both DTT and analogue TV programmes Programmes input from other external devices can also be recorded On different interfaces you can decide the channel recording date and...

Page 66: ...be modified Selected Scheduled Recordings can be modified These modifications include input source channel start time length of recording extend start time delay end time image quality video format le...

Page 67: ...mber of recording tasks at a time The Recording Conflicts Manager will check if any new recordings or changes to a Scheduled Recording cause an overlap If an overlap or conflict is detected a message...

Page 68: ...an absence of recording device a message will appear asking you to insert the necessary device or cancel the Recording Remove HDD To prevent any damages to VD R or the HDD itself unload the HDD before...

Page 69: ...ifferent types of recording mode with different picture quality XP represents High Picture Quality recording mode SP represents Standard Play mode SLP represents Super Long Play Mode and SE represents...

Page 70: ...nning for DTT channels Frequency range from 474MHz to 858 MHz will be scanned Press the Exit button to quit the Main Menu when scanning is done The scanned channel will be broadcast automatically 5 3...

Page 71: ...be displayed nex as t to the selected channel BLUE Channel Editing Press the button List on the Channel List Interface to view the channel information Pres fer When users select to import programmes t...

Page 72: ...k Users can select up to 20 programmes to transfer Export programmes When users select to export programmes the menu will show all the recorded programmes of the internal hard disk Then users can sele...

Page 73: ...ogrammes after recording such as delete the e Mode There are sche Schedule time Users are able to edi commercial period Th buttons for files editing and editing method are as below When playing back t...

Page 74: ...72 81 program...

Page 75: ...Press blue key to delete the edit setting In the playlist press file button or press stop button when playing back the recorded programmes press green button and confirm to start editing 73 81...

Page 76: ...5 6 Picture in picutre PIP Press key to open or close PIP function In the PIP status Press red button to adjust the size of PIP screen 74 81 Press green button to adjust the transparency of PIP screen...

Page 77: ...of PIP screen 5 7 TIMESHIFT When users are not able to keep watching a programme for a while user can use this function to pause the programme The buttons to use this function are as below When watchi...

Page 78: ...You can also browse the product information including including user setting and details of VD R On the Configuration interface the Remote Control performs these functions Press these buttons to go t...

Page 79: ...Video and Composite Video Output only support Standard Definition Output Please select 576i50Hz 576p50Hz 720p50Hz 720p60Hz 1080i50Hz and 1080i60Hz mode if you are using either one of these Outputs Co...

Page 80: ...o Output HDMI Audio HDMI is unique that it can transmit both video and audio along the same cable It is very commonly used among HDTV users as it offers high quality audio output and is convenient to...

Page 81: ...User Setting Interface MHEG 5 When there is a red or yellow logo on upper left corner of Interactive News or HD Jade channel press red button or yellow button to open the MHEG 5 menu Press button or b...

Page 82: ...e process Download and unzip the latest firmware of VD R through www vdigi com hk Then move the xml and bin files onto the roof of the USB flash drive Insert the USB flash drive to one of the USB port...

Page 83: ...ctly and firmly to Antenna In port of the receiver c Check whether the antenna cable to VD R is too long d Change an antenna cable with better quality e Check with building service agent if needed v R...

Reviews: