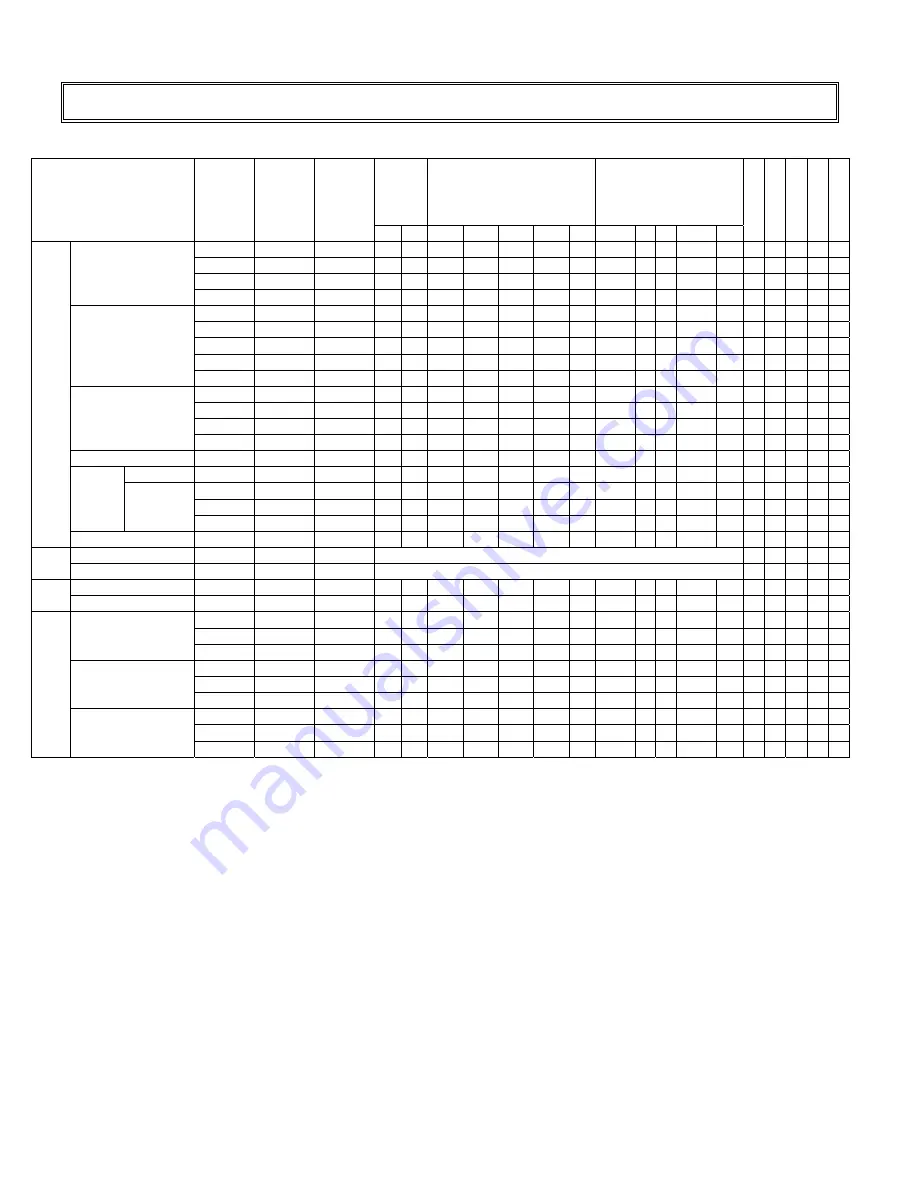
background image

20

Supported Timing 

Sync 

polarity

Horizontal (dot) 

Vertical (line) 

Video Mode 

fH

 (k

H

z

fV (

H

z)


Dot

 cl

ock


(M

Hz

H

V

A B C

D

E

O P Q

R S

A

nal

og 

Di

gi

tal


Com

ponent

S

-V

ideo 

Com

pos

it

e

31.469

59.940

25.175

N

N

800

96

48

640

16

525

2 33

480

10

O

O

37.861

72.809

31.500

N

N

832

40

128

640

24

520

3 28

480

9

O

O

37.500

75.000

31.500

N

N

840

64

120

640

16

500

3 16

480

1

O

O

VGA 640x480 

43.269

85.008

36.000

N

N

832

56

80

640

56

509

3 25

480

1

O

O

35.156

56.250

36.000

P

P

1024

72

128

800

24

625

2 22

600

1

O

O

37.879

60.317

40.000

P

P

1056

128

88

800

40

628

4 23

600

1

O

O

48.077

72.188

50.000

P

P

1040

120

64

800

56

666

6 23

600

37

O

O

46.875

75.000

49.500

P

P

1056

80

160

800

16

625

3 21

600

1

O

O

SVGA 800x600 

53.674

85.06 56.250

P

P

1048

64

152

800

32

631

3 27

600

1

O

O

48.363

60.004

65.000

N

N

1344

136

160

1024 24

806

6 29

768

3

O

O

56.476

70.069

75.000

N

N

1328

136

144

1024 24

806

6 29

768

3

O

O

60.023

75.029

78.750

P

P

1312

96

176

1024 16

800

3 28

768

1

O

O

XGA 1024x768 

68.677

84.997

94.500

P

P

1376

96

208

1024 48

808

3 36

768

1

O

O

WXGA1360x768 47.712

60.015

85.5 P

P

1792

112

256

1360 64

795

6 18

768

3

O

O

1152x864

67.500

75.000

108.000

P

P

1600

128

256

1152 64

900

3 32

864

1

O

O

63.981

60.020

108.000

P

P

1688

112

248

1280 48

1066

3 38 1024

1

O

O

79.976

75.025

135.000

P

P

1688

144

248

1280 16

1066

3 38 1024

1

O

O

SXGA

1280x1024

91.146

85.024

157.500

P

P

1728

160

224

1280 64

1072

3 44 1024

1

O

O

VESA

UXGA 

1600x1200 75.00 60.00  162 P

P

2160

192

304

1600 64

1250

3 46 1200

1

O

O

NTSC 15.734

29.97 

13.500

O

O

O

SDTV

PAL 15.625

25.00 

13.500

O

O

O

480p 31.500

60.00 

27.03 

N

N

858

62

60

720

16

525

6 30

480

9

O

O

EDTV

576p 31.250

50.00 

27.00 

N

N

864

64

68

720

12

625

5 39

576

5

O

O

37.500

50 74.25 

N

N

1980

40

220

1280 440

750

5 20

720

5

O

O

45.000

60 74.250

P

P

1650

40

220

1280 110

750

5 20

720

5

O

O

720p 

1280x720 

44.995

59.94 74.176

P

P

1650

40

220

1280 110

750

5 20

720

5

O

O

28.13 50.00 74.25 P

P

2640

44

148

1920 528 1125

5 38 1080

4

O

O

33.716

59.94 74.176

P

P

2200

44

148

1920 88

1125

5 38 1080

4

O

O

1080i 

1920x1080 

33.750

60 74.25 

P

P

2200

44

148

1920 88

1125

5 38 1080

4

O

O

56.250

50.00 148.500

P

P

2640

44

148

1920 528 1125

5 36 1080

4

O

O

67.433

59.94 148.352

P

P

2200

44

148

1920 88

1125

5 36 1080

4

O

O

HDTV

1080p 1920x1080 

67.500

60.00 148.500

P

P

2200

44

148

1920 88

1125

5 36 1080

4

O

O

Summary of Contents for VT520

Page 1: ...User s Guide Industrial CRT and Flat Panel Displays VARTECH S Y S T E M S I N C VT520 Large Screen Series 52 0 Large Screen Series LCD Monitors Solutions for Demanding Applications...

Page 2: ...tion 9 Power Input 9 Power Interface 9 Connection 10 Single Source Input 10 Operating The Monitor 11 The Side Controller Of The Monitor 11 The Remote Controller RCU Instructions 11 Change The RCU Batt...

Page 3: ...is still used in this condition it may cause a fire or an electrical shock Contact your dealer for inspection If water is spilled or objects are dropped inside the monitor remove the power plug from t...

Page 4: ...c shock Don t use a damaged power plug or worn outlet Don t insert the improper power plug it may cause a fire and an electric shock Don t place the monitor on an unstable shelf or desk such as a shak...

Page 5: ...old the plug don t revolve Don t sprinkle any kind of liquid on the monitor If the monitor is sprinkled by any kind of liquid please be sure to take off the power plug and ask a qualified service pers...

Page 6: ...he moving of long distance please wrap the monitor with blanket to avoid damages Please be careful not to bump to the monitor Don t expose in the rubber or vinyl for a long time It will damage the coa...

Page 7: ...b 15pin RGB DIGITAL DVI ID 24pin RS 232C in D sub 9pin Option Other functions Building the light sensor inside the monitor will adjust the brightness according to the surrounding light intensity There...

Page 8: ...set VT520 1 pcs DVI D 24 pin cable 1 pcs Power cord 1 pcs D SUB 15pin cable 1 pcs User s manual 1 pcs S VIDEO Mini Din 4 pin cable 1 pcs Remote controller 1 pcs Component Mini Din 8 pin cable 1 pcs R...

Page 9: ...8 Dimension Front Back...

Page 10: ...of the LCD monitor and the wall outlet Connect the power cord into main power of the monitor is power on is power off Input 100 240V 3A 50 60Hz Power Interface Main interface switch AC socket Please...

Page 11: ...tically selected RGB inputting You can select RGB input for 2 connections as below RGB signals Connection type Signal RGB Analog VGA 15 pins RGB Analog RGB Digital DVI D DVI D 24 pins RGB Digital Comm...

Page 12: ...urce selection Activate selection 3 Menu right Value increasing 4 Menu left Value decreasing 5 Menu down 6 Menu up 7 MENU Enter OSD menu Exit menu or select No Key Description 1 POWER Power ON OFF 2 M...

Page 13: ...atteries inside the remote control causing leakage of internal liquid resulting metal rust or fatal damage to the remote control hand unit vi Battery to be used according to the instruction Risk of ex...

Page 14: ...on the remote control turn on PIP function and press source to select PIP input source There is no PIP button on side controller of the monitor The sub source changes as the main source changes Pictu...

Page 15: ...IGP mode enable only 0 255 Clock Adjust the monitor clock IGP mode enable only 0 255 Automatic Auto Adjust Select the auto adjust function On Off Noise Reduction Select the noise reduction mode IGP mo...

Page 16: ...6500K 7500K 9300K Red Adjust red color 0 255 Green Adjust green color 0 255 COLOR Blue Adjust blue color 0 255 OSD Vertical Adjust the OSD menu V position 0 255 OSD Horizontal Adjust the OSD menu H p...

Page 17: ...ter to save the setting Press Exit to exit the item Main Setting On side of controller 1 Press MENU to enter OSD Menu 2 Press Enter to enter and select sub item Display Position IMAGE COLOR by or then...

Page 18: ...djusting 4 Press MENU to exit the item On RCU 1 Press MENU to enter OSD Menu 2 Press twice then press Enter to enter sub item PiP setting DISPLAY PiP CTRL COLOR by Z Z Z Z or Y Y Y Y then press or Ent...

Page 19: ...e select items then press Enter to save the setting when finished adjusting 4 Press EXIT to exit the item Other Setting On side of controller 1 Press MENU to enter Main Menu press 5 times and press th...

Page 20: ...19 Default Setting Item Default Brightness 80 Contrast 50 Color temp User Red 255 Green 255 Blue 255 Language English Light sensor Off Source Auto Detection On Monitor ID 00...

Page 21: ...5 85 5 P P 1792 112 256 1360 64 795 6 18 768 3 O O 1152x864 67 500 75 000 108 000 P P 1600 128 256 1152 64 900 3 32 864 1 O O 63 981 60 020 108 000 P P 1688 112 248 1280 48 1066 3 38 1024 1 O O 79 976...

Page 22: ...Graphic Input Connector D Sub 15 pins DVI D 24 pins Component Composite S Video RS 232C option Auto Adjust Clock Phase H Position V Position Screen Scaling VGA SVGA XGA SXGA WXGA Full Screen Display...

Page 23: ...ty to adjust If you are using YUV terminals make sure cables are correctly connected Compliance FCC Compliance Statement This equipment has been tested and found to comply with the limits for a Class...

Page 24: ...t Moving shipping the monitor please hold the white handles and be sure to make the bundle If not it may drop and a serious injury may result Please see as below pictures Carrying Notice This monitor...

Reviews: