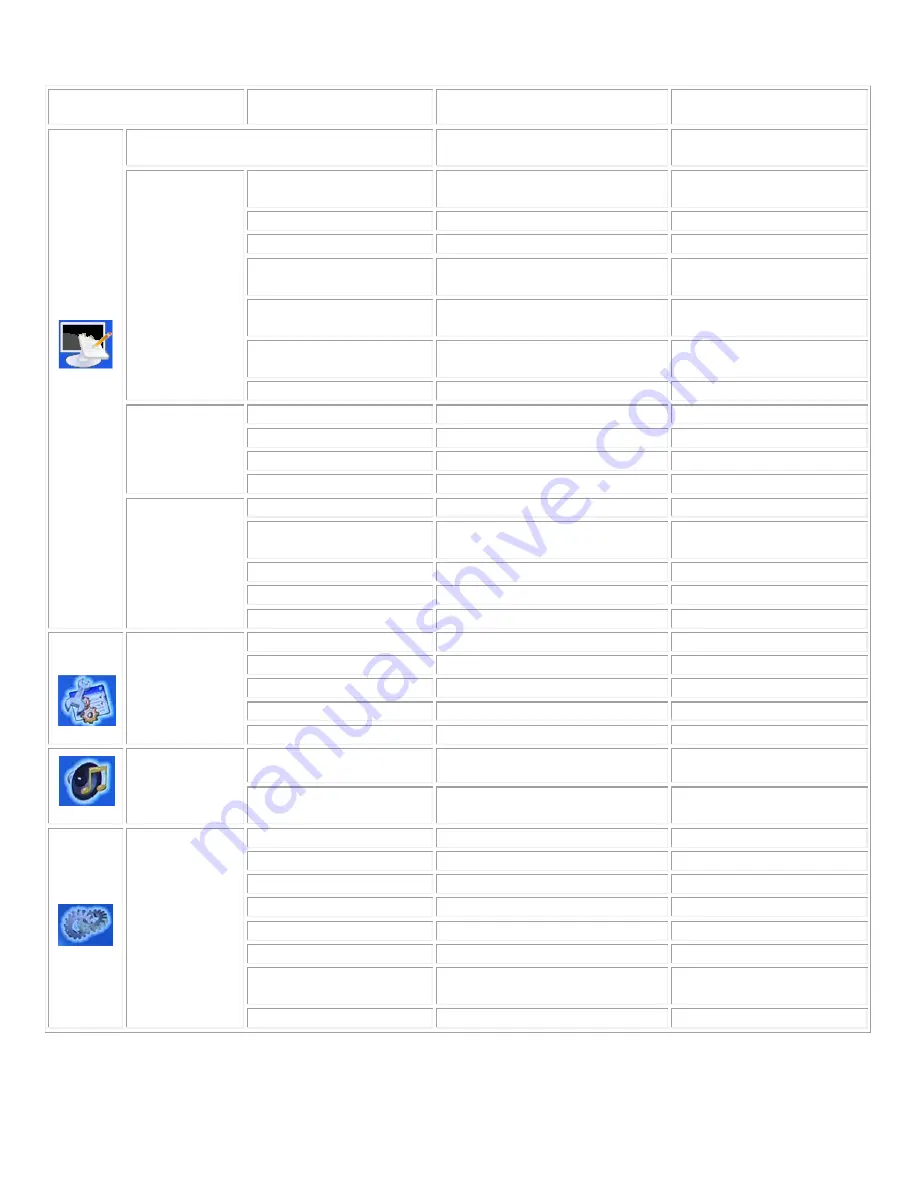
background image

15

Main Menu 

Sub-Menu

(base on IGP mode)

Description Setting 

Press”

X

” 

Input signal selection

VGA/DVI/Composite/ 
S-Video / Component 

Backlightness 

Adjust the backlightness of the 
monitor

0~100 

Brightness 

Adjust the Brightness of the monitor

0~100 

Contrast 

Adjust the contrast of the monitor 

0~100 

Dynamic Contrast 

Adjust the dynamic contrast of the 
monitor 

On, Off 

Hue 

Adjust the picture hue of the 
monitor 

-45~+45 

Saturation 

Adjust the picture saturation of the 
monitor 

0,100 

DISPLAY 

Flash-Tone 

Adjust the picture tone of monitor 

Off/Weak/Soft/Strong 

PIP Mode 

Adjust the PIP mode 

Off/Singe/PAP 

PIP Size 

Adjust the PIP size 

Small/Med\/Large 

Vertical 

Adjust the V-position of PIP 

0~100 

PIP 
CONTROL 

Horizontal 

Adjust the H-position of PIP 

0~100 

Gamma correction 

Select the Gamma setting 

Off/ 2.2/ 2.4 

Color Temperature 

Select the color temperature setting

User/3200K/6500K, 
7500K/9300K 

Red 

Adjust red color 

0~255 

Green 

Adjust green color 

0~255 

COLOR 

Blue 

Adjust blue color 

0~255 

OSD

 Vertical 

Adjust the OSD menu V-position 

0~255 

OSD

 Horizontal 

Adjust the OSD menu H-position 

0~255 

OSD

 Blend 

Adjust the OSD menu of blend 

0~15 

OSD

 Time out 

Adjust the OSD menu display time 

0~60 

OSD setting 

OSD Zoom 

Magnify the OSD menu 

On/Off 

Volume 

Adjust the volume of the OSD menu 

0~100 

Audio setting 
(

option

Balance 

Adjust the balance of the OSD 
menu 

-15~+15 

Factory Reset 

Reset to the factory default setting 

Yes/ No 

Set Display Address 

Select monitor ID address(optional)

0~255 

Baud Rate Selection 

Select bard rate of monitor 

115200,38400,19200,9600

Light Sensor 

Select the light sensor setting 

On/ Off 

Light Sensor Value 

Adjust the light sensor value 

0~100 

Light Sensor Threshold 

Adjust the light sensor threshold 

0~100 

Source Auto Detection 

Select input source detection 
function 

On, Off 

Other 
setting 

Sleep Mode 

Select sleep mode function 

On, Off 

„

(IVP) means selection is working on Video mode. 

„

(IGP) means selection is working on VGA mode. 

Summary of Contents for VT520

Page 1: ...User s Guide Industrial CRT and Flat Panel Displays VARTECH S Y S T E M S I N C VT520 Large Screen Series 52 0 Large Screen Series LCD Monitors Solutions for Demanding Applications...

Page 2: ...tion 9 Power Input 9 Power Interface 9 Connection 10 Single Source Input 10 Operating The Monitor 11 The Side Controller Of The Monitor 11 The Remote Controller RCU Instructions 11 Change The RCU Batt...

Page 3: ...is still used in this condition it may cause a fire or an electrical shock Contact your dealer for inspection If water is spilled or objects are dropped inside the monitor remove the power plug from t...

Page 4: ...c shock Don t use a damaged power plug or worn outlet Don t insert the improper power plug it may cause a fire and an electric shock Don t place the monitor on an unstable shelf or desk such as a shak...

Page 5: ...old the plug don t revolve Don t sprinkle any kind of liquid on the monitor If the monitor is sprinkled by any kind of liquid please be sure to take off the power plug and ask a qualified service pers...

Page 6: ...he moving of long distance please wrap the monitor with blanket to avoid damages Please be careful not to bump to the monitor Don t expose in the rubber or vinyl for a long time It will damage the coa...

Page 7: ...b 15pin RGB DIGITAL DVI ID 24pin RS 232C in D sub 9pin Option Other functions Building the light sensor inside the monitor will adjust the brightness according to the surrounding light intensity There...

Page 8: ...set VT520 1 pcs DVI D 24 pin cable 1 pcs Power cord 1 pcs D SUB 15pin cable 1 pcs User s manual 1 pcs S VIDEO Mini Din 4 pin cable 1 pcs Remote controller 1 pcs Component Mini Din 8 pin cable 1 pcs R...

Page 9: ...8 Dimension Front Back...

Page 10: ...of the LCD monitor and the wall outlet Connect the power cord into main power of the monitor is power on is power off Input 100 240V 3A 50 60Hz Power Interface Main interface switch AC socket Please...

Page 11: ...tically selected RGB inputting You can select RGB input for 2 connections as below RGB signals Connection type Signal RGB Analog VGA 15 pins RGB Analog RGB Digital DVI D DVI D 24 pins RGB Digital Comm...

Page 12: ...urce selection Activate selection 3 Menu right Value increasing 4 Menu left Value decreasing 5 Menu down 6 Menu up 7 MENU Enter OSD menu Exit menu or select No Key Description 1 POWER Power ON OFF 2 M...

Page 13: ...atteries inside the remote control causing leakage of internal liquid resulting metal rust or fatal damage to the remote control hand unit vi Battery to be used according to the instruction Risk of ex...

Page 14: ...on the remote control turn on PIP function and press source to select PIP input source There is no PIP button on side controller of the monitor The sub source changes as the main source changes Pictu...

Page 15: ...IGP mode enable only 0 255 Clock Adjust the monitor clock IGP mode enable only 0 255 Automatic Auto Adjust Select the auto adjust function On Off Noise Reduction Select the noise reduction mode IGP mo...

Page 16: ...6500K 7500K 9300K Red Adjust red color 0 255 Green Adjust green color 0 255 COLOR Blue Adjust blue color 0 255 OSD Vertical Adjust the OSD menu V position 0 255 OSD Horizontal Adjust the OSD menu H p...

Page 17: ...ter to save the setting Press Exit to exit the item Main Setting On side of controller 1 Press MENU to enter OSD Menu 2 Press Enter to enter and select sub item Display Position IMAGE COLOR by or then...

Page 18: ...djusting 4 Press MENU to exit the item On RCU 1 Press MENU to enter OSD Menu 2 Press twice then press Enter to enter sub item PiP setting DISPLAY PiP CTRL COLOR by Z Z Z Z or Y Y Y Y then press or Ent...

Page 19: ...e select items then press Enter to save the setting when finished adjusting 4 Press EXIT to exit the item Other Setting On side of controller 1 Press MENU to enter Main Menu press 5 times and press th...

Page 20: ...19 Default Setting Item Default Brightness 80 Contrast 50 Color temp User Red 255 Green 255 Blue 255 Language English Light sensor Off Source Auto Detection On Monitor ID 00...

Page 21: ...5 85 5 P P 1792 112 256 1360 64 795 6 18 768 3 O O 1152x864 67 500 75 000 108 000 P P 1600 128 256 1152 64 900 3 32 864 1 O O 63 981 60 020 108 000 P P 1688 112 248 1280 48 1066 3 38 1024 1 O O 79 976...

Page 22: ...Graphic Input Connector D Sub 15 pins DVI D 24 pins Component Composite S Video RS 232C option Auto Adjust Clock Phase H Position V Position Screen Scaling VGA SVGA XGA SXGA WXGA Full Screen Display...

Page 23: ...ty to adjust If you are using YUV terminals make sure cables are correctly connected Compliance FCC Compliance Statement This equipment has been tested and found to comply with the limits for a Class...

Page 24: ...t Moving shipping the monitor please hold the white handles and be sure to make the bundle If not it may drop and a serious injury may result Please see as below pictures Carrying Notice This monitor...

Reviews: