background image

SECTION 7 – Front Panel LCD Touchscreen Guide 

850D-DA


850D-DA Digital Distributed Audio Amplifier


Installation Manual   

41316 / 1308134-A  © 2011 


Page 

14 

(System Settings Path Continued)


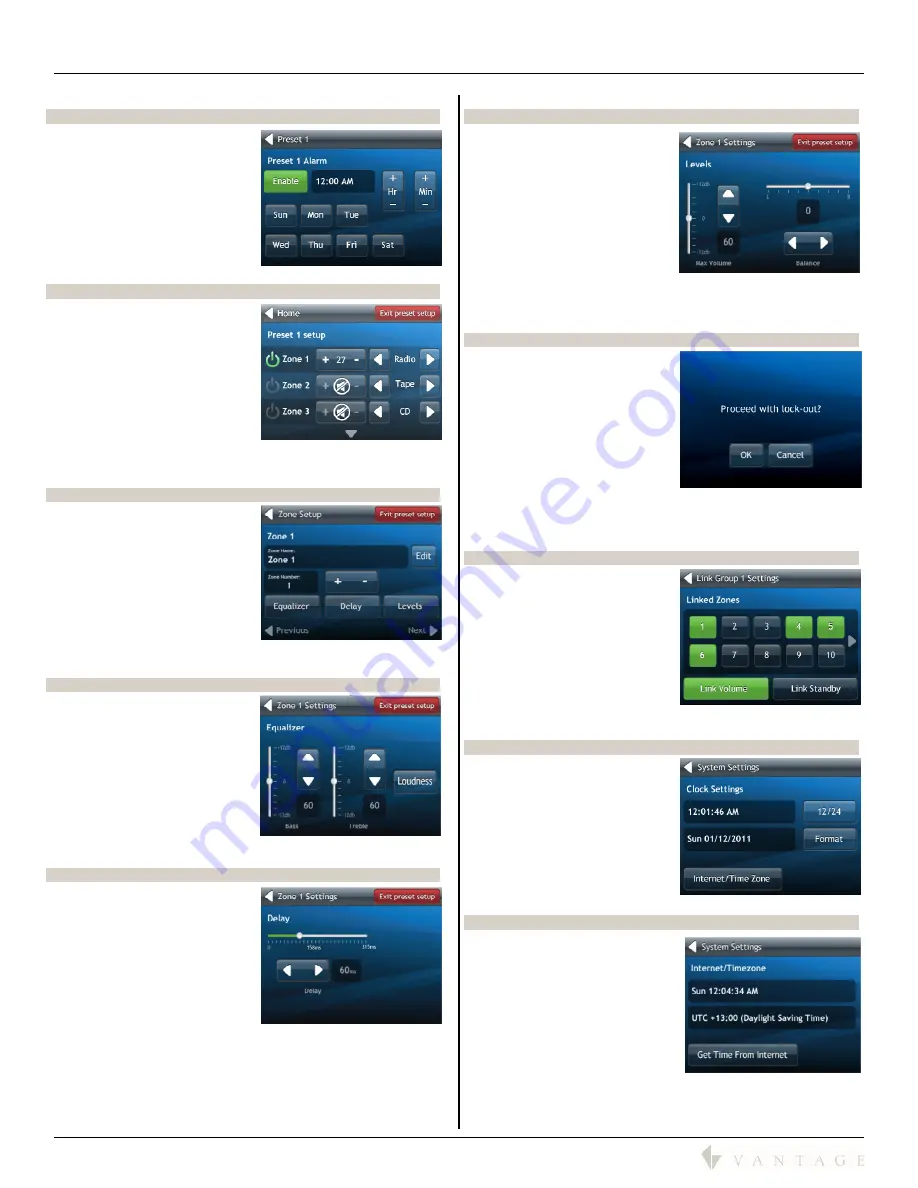
Setup Alarm Page (In Preset Setup Mode) 
On the Setup Alarm page it is 
possible to: 


Toggle the alarm 


Set the alarm time – hour 
and minute 


Set which day or days the 
alarm plays 


Navigate back to the 

Preset 

Zone Selection

 page  


Preset 1 Zone Setup (In Preset Setup Mode) 
On the 

Preset # Setup

 page it is 

possible to: 


Edit which zones and 
source will play the page 
and at what volume level 


When finished, press the 
red, “

Exit preset setup

” to 

exit preset setup mode and 
navigate back to the 

Home


page 


Press and hold any zone for 1 second to move to the selected 
zone’s individual setup 

 
Selected Zone Setup (In Preset Setup Mode) 
On the Zone Edit page, it is 
possible to: 


Edit the zone name 


Edit linked zones 


Navigate to Equalizer, 
Delay, and Levels pages 


Navigate to previous or 
next zone page, and/or 


When finished, press the 
red, “

Exit preset setup

” to 

exit preset setup mode and navigate back to the 

Home

 page 

 
Selected Zone Equalizer (In Preset Setup Mode) 
On the Zone Equalizer page it is 
possible to: 


Edit the bass level 


Edit the treble level 


Toggle the zone Loudess 
button 


Navigate back to the Zone 
Setup page, and/or 


When finished, press the 
red, “

Exit preset setup

” to 

exit preset setup mode and navigate back to the 

Home

 page 

 
Selected Zone Delay (In Preset Setup Mode) 
On the Zone Delay page it is 
possible to: 


Edit the Delay time interval 
(i.e., lip-sync a video) 


Range may be set from 0ms 
to 315ms 


Navigate back to the Zone 
Setup page, and/or 


When finished, press the 
red, “

Exit preset setup

” to 

exit preset setup mode and navigate back to the 

Home

 page 


Selected Zone Levels (In Preset Setup Mode)
On the Zone Levels page it is 
possible to:  


Edit maximum volume level 


Range may be set from 20 
to 100 percent of volume 
range (minimum volume 
level is 20) 


Adjust the left and right 
balance 


Navigate back to the Zone 
Setup page, and/or 


When finished, press the red, “

Exit preset setup

” to exit 

preset setup mode and navigate back to the 

Home

 page 


Lock Out Page
When selecting the 

Lock Out


option the system first prompts 


Proceed with lock-out?

” 


Selecting 

OK

 locks the 

screen and navigates to the 

Home

 page  


Selecting 

Cancel

 returns to 

the 

Miscellaneous

 page  


To unlock the sytem try to 
navigate from the Home 
screen to see that the system is locked. A padlock icon 
appears, hold the padlock icon in for about 5 seconds to 
unlock the screen 

 
Linked Zones (In Preset Setup Mode) 
On the 

Link Groups # Settings


page it is possible to (same 
options as in Zone Settings 
default menu): 


Select zones wanted in the 
group 


Link Volume 

of zones in 

group 


Link Standby

 of zones in 

group 


Navigate back to the 

Edit Link Group #

 page 

 
Clock Settings Page
On the 

Clock Settings

 page it is 

possible to: 


Set the time and select 12hr. 
or 24hr. clock 


Set the date and date 
format 


Navigate to the 
Internet/Time Zone page 


Navigate back to 

System 

Settings


Internet/Timezone Page
On the 

Internet/Timezone

 page 

it is possible to: 


View current internet time 


Select region 


Force time update by 
pressing the 

Get Time From 

Internet 

button 


Navigate back to 

System 

Settings


Summary of Contents for EQ40TB-TI

Page 1: ...aphic for Off Displays the word heat or cool and the current mode graphic becomes more vivid when system is actively heating or cooling o time HH MM format twelve hour clock only o weather Displays cu...

Page 2: ...ide View Illustration Do not bend mounting plate 3 Connect pigtail to station 4 Install station by rotating see B in Side View Illustration and connecting the top first Then press station in and hold...

Page 3: ...l Buttons bottom bar left right buttons o Pressing the home mechanical button on the bottom left will return to page 1 o Press and hold the home button for station setup o Note The right button may ha...

Page 4: ...od Binding Method Substitute 1 Binding Method Substitute 2 SkipPrevious Rewind ScanPrevious Pause Play SkipNext Forward ScanNext Tuner Interface Standard Binding Method Binding Method Substitute 1 Bin...

Page 5: ...e relay adjust dim is not supported 5 Make sure all objects support required methods LED Status Status using fixed colors for ON and OFF Character counts not fixed width based on characters used Turns...

Page 6: ...I N S T A L L A T I O N Vantage 41380 IS 0541 A InFusion Equinox 40 LCD Keypad MODEL EQ40TB TI page 6 of 6 Multi View Line Drawing...

Page 7: ...Digital Distributed Audio Amplifier Instruction Manual 850D DA...

Page 8: ......

Page 9: ...vicing is required when the apparatus has been damaged in any way such as power supply cord or plug is damaged liquid has been spilled or objects have fallen into the apparatus The apparatus has been...

Page 10: ...ective and the power supply MUST BE EARTH GROUNDED Connect only to a mains socket outlet with protective earth and only use the power cord supplied 5 Never Touch this Unit With Wet Hands Never handle...

Page 11: ...istributed Audio Amplifier TPT TouchScreens and all other art work brand and product names and designs are copyrighted trademarks or registered trademarks of Vantage Controls Inc All other art work br...

Page 12: ...er with finished setup If setup changes are needed consult your Vantage dealer This instruction is subject to change without notice Supplied Accessories and Update Information Locate the following acc...

Page 13: ...oor Bell 4 SECTION 3 Front Panel Guide 5 Descriptions 5 1 Front Panel 5 2 Infra Red Receiver 5 3 Power Indicator 5 4 Color TFT LCD Resistive Touch Panel 5 5 Chassis Feet 5 SECTION 4 Rear Panel Guide 6...

Page 14: ...elected Zone Levels In Preset Setup Mode 14 Lock Out Page 14 Linked Zones In Preset Setup Mode 14 Clock Settings Page 14 Internet Timezone Page 14 Device Information Page 15 Restore Defaults Page 15 S...

Page 15: ...e paralleled combined In this amplifier speaker ground outputs are not common o Zone 7 and Zone 8 are line level outputs Use high quality shielded cable made for line level runs Line level wire run le...

Page 16: ...um volume setting is useful for protecting connected speakers It may be applied to both amplifier and preamplifier outputs Amplifier Power Protection and Clipping Indicators Each zone supports 50Watts...

Page 17: ...expansion bus share the same zone names causing the zones to mimic each other and act as a single zone unless renamed through the front panel user interface To reiterate when using an Infusion Control...

Page 18: ...fier zones return to their previous states PG1 is always assigned to the Page 1 Preset PG2 may be assigned to any one of the 15 available Presets For page 1 and 2 contact wiring see Doorbell Wiring Ex...

Page 19: ...tor The power indicator glows blue whenever AC power is applied 4 Color TFT LCD Resistive Touch Panel LCD Touch Panel display for menu guided control and programming The display is dimmed to Off after...

Page 20: ...applications supported 6 Ethernet Bus Port Allows communication between the 850D DA and the InFusion Controller via the Vantage Ethernet Bus Connect to a standard network switch or router All IP sett...

Page 21: ...tallation Example The figure above depicts a typical installation configuration where the 850D DA audio amplifier provides independent audio source 1 selections to eight remote locations devices Notic...

Page 22: ...above depicts an installation configuration using the 850D DA audio amplifier to power main speakers and a self powered subwoofer The preamplifier zone Zone 7 in this example can be used to provide li...

Page 23: ...similar connected music source to play media files from storage devices like the Vantage DMM or a NAS drive etc o Supported File Types Ogg Vorbis MP3 MP1 MP2 MPEG4 HE AAC v2 WAV and FLAC NOTE The onbo...

Page 24: ...ifiers Link multiple 850D DA units to add additional audio zones within a project When linking the 850D DA connect each unit via the expansion bus using standard Ethernet patch cables Each 850D DA mus...

Page 25: ...iple 850D DA Amplifiers On Source Unit 1 MediaPlayer Source has the ability to be linked through multiple 850D DA units thus buffering the source to play synchronized across each unit s zones assigned...

Page 26: ...ower Adjust or mute the volume Change the source Scroll through Zones by threes using up and down arrows Return to Home Press and hold any zone for 1 second to move to the selected zone s individual s...

Page 27: ...o Change the Media Player source Click OK to lock in new source Controls Skip Previous Next Pause Play and Stop Navigate back to the Sources page Presets Page On the Presets page it is possible to Sel...

Page 28: ...ime interval i e lip sync a video Range may be set from 0ms to 315ms Navigate back to the Zone Setup page and or When finished press the red Exit preset setup to exit preset setup mode and navigate ba...

Page 29: ...ation that may by helpful in setup and trouble shooting The IP Address is setup automatically using DHCP or Vantage s Auto Range feature do not change IP address settings Navigate back to System Setti...

Page 30: ...ge preset o Each sound file may be up to 480 KB in standard WAV format Loop Sound check box not typically used in non page preset Activate Learn Zone Settings Select which zones with all of their zone...

Page 31: ...e selection of sources zones Common Settings in each zone Audio Levels in each zone and may even be assigned to an alarm Presets are not temporary settings but pre programmed settings When a Preset is...

Page 32: ...nit place a check in the Output on S12 OUT checkbox By checking this box the media player source selected on unit 1 is routed internally to the source 12 SPDIF output In a linked configuration additio...

Page 33: ...ate Menu in Design Center 2 Select All 850D DA units in project and click OK 3 Click Browse and select the latest 850D DA firmware This firmware may be downloaded from the Vantage dealer site if a new...

Page 34: ...tal input level and Impedance 0 5V 0 05V 75 Preamplifier Output Level and Impedance Z7 Z8 L R 16dB 470 Frequency Response 20Hz 20 KHz 3dB 8 Tone Control 12dB 100 Hz Bass 12dB 10 KHz Treble Signal to N...

Page 35: ...SECTION 9 850D DA Specifications 850D DA 850D DA Digital Distributed Audio Amplifier Installation Manual 41316 1308134 A 2011 Page 21 850D DA Line Drawing...

Page 36: ...SECTION 10 850D DA Installation Notes 850D DA 850D DA Digital Distributed Audio Amplifier Installation Manual 41316 1308134 A 2011 Page 22 SECTION 10 My 850D DA Installation Notes...

Page 37: ...SECTION 10 850D DA Installation Notes 850D DA 850D DA Digital Distributed Audio Amplifier Installation Manual 41316 1308134 A 2011 Page 23 Installation Notes continued...

Page 38: ......

Page 39: ...feature a built in foam gasket to minimize vibration and maximize seal ability They also feature a perforated metal grill with a scrim cloth to enhance the speakers appearance once installed All ev Q...

Page 40: ...aker mounting hole There are clips on the corner of the bracket to secure the speaker wire Leave enough speaker wire to be able to pull the wire through the bracket and comfortably connect the wire to...

Page 41: ...crews that engage the installation tabs see Figure 5 Tighten the tabs in a cross or X pattern until snug Be careful not to over tighten the tabs or damage could result The speaker should appear flush...

Reviews: