


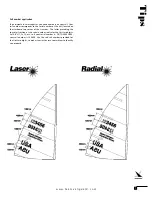

Sail
Controls
Vang
Rigging the Laser 15:1 Boom Vang by Harken
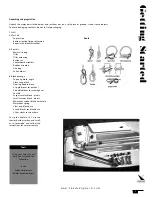
This system consists of six parts: one vang key, three blocks and two
pieces of line. The block with the cleat on it will be referred to as the
‘cleat block,’ the single block with becket will be referred to as the
‘top block’ and the small double block with becket will be referred to
as the ‘floating block.’ The grey piece of Spectron string is called the
primary line, while the red piece of Dyneema line is called the control
line.
For tying all of your lines, it is best to use a knot called an ‘Australian
Bowline.’ This consists of an 8-knot secured with a half hitch
Step 1: Lay everything out and make sure that you have everything.
Do this in an uncluttered area.
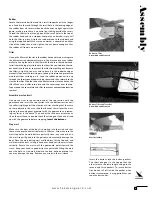
Step 2: Connect the vang key to the top block. It doesn’t yet matter
which way the key faces in relation to the block.
Step 3: Lead the primary line. Tie the primary line to the becket of
the top block, then through the aft most sheave (the one just above
the cleat) on the cleat block (leading the line from front to back
through the sheave), back up to the sheave on the top block. The
ends of the curve in the key should be facing forward (like a shallow
‘c’) at this point. Lead the primary line from back to front through
the sheave on the top block. Finally, tie the primary line to the top
of the floating block. At this point, all three blocks are connected
together by means of the primary line.
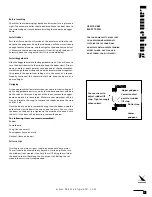
Step 4: Rig the control line. Lay the floating block out so that its
becket is forward. The sheaves of the floating block should be per-
pendicular to the top block’s sheave and parallel to the cleat block’s
double sheaves. Tie the control line to the floating block’s becket,
then lead it clockwise through the top transverse sheave on the cleat
block, back up to and clockwise through the forward sheave (the one
with the becket attached to it) on the floating block, down to and
clockwise through the bottom transverse sheave on the cleat block,
then up to and clockwise through the lower sheave on the floating
block. Finally, lead the control line down through the center of the
cleat block, under the transverse sheaves and around the bottom
sheave from top to bottom, then out through the fairlead and cleat.
Vang installation
Attach the vang cleat block to the tang on the mast. Hook the top
“key” of the vang into the slot on the underside of the boom and
tighten it. Tie a large bowline in the end of the line, to make it easy
to grab while sailing.
4
w w w . t e a m v a n g u a r d . c o m
Vang Assembly