Van Guard 1210CM, 1211CM, 1220CM, 1221CM, 1222CM, 1223CM, 1230CM, 1231CM, 1232CM,... Operation Manual Download Page 16

16

Troubleshooting

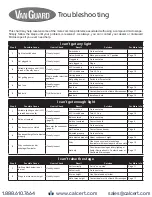
This chart may help resolve some of the more common problems associated with using a compound microscope.  

Simply follow the steps until your problem is resolved.  As always, you can  contact your dealer or VanGuard 

Microscopes if you ever need help.

I can’t get any light

Step #

Possible Cause

How to Check

Result

Solution

For More Info

1

Light not switched on

Visually inspect

Switched on

Go to next step

Not switched on

Move power switch to “|” position

Page 10

2

Not plugged in

Visually inspect

Plugged in

Go to next step

Not plugged in

Plug in

6

Variable lighting control (VLC)

turned all the way down

Visually inspect

VLC turned up

Go to next step

VLC turned down

Turn VLC up

Page 10

3

Not getting power

Plug in another electrical 

appliance

Getting power

Go to next step

Not getting power

Switch to different outlet

4

Bad fuse

Visually inspect

(see page 13)

Good fuse

Go to next step

Bad fuse

Install new fuse

Page 14

5

Bad bulb

Try different bulb

Good bulb

Contact dealer or VanGuard Microscopes Page 17

Bad bulb

Install new bulb

Page 14

I can’t get enough light

Step #

Possible Cause

How to Check

Result

Solution

For More Info

1

Variable lighting control (VLC) 

is turned down too far

Visually inspect

VLC turned up

Go to next step

VLC turned down

Turn VLC up

Page 10

2

Bulb not centered

Visually inspect  

(page10)

Bulb centered

Go to next step

Bulb not centered

Center the bulb

Page 9

3

Condenser not centered

Recenter  the  condenser        

(page 8)

Centered

Go to next step

Not Centered

Center the condenser

Page 8

4

Condenser height not adjusted 

properly

Visually inspect

Adjusted properly

Go to next step

Not adjusted properly

Adjust condenser height

Page 10

5

Dirty condenser and/or 

substage illuminator

Visually inspect

Dirty

Clean condenser and/or substage 

illuminator with lens cleaner and lens cloth Page 15

Not dirty

Consider purchasing auxiliary lighting or 

Kohler Illumination kit.  Contact dealer or 

VanGuard Microscopes

Page 17

I can’t raise the stage

Step #

Possible Cause

How to Check

Result

Solution

For More Info

1

Up-Stop Mechanism is set 

too low

Visually inspect

Set incorrectly

Set to “no up-stop” 

Page 11

Set correctly

Go to next step

2

Stage is at maximum height

Visually inspect

At max height

Can’t be raised any further

Not at max height

Contact dealer or VanGuard Microscopes Page 17

www.calcert.com

[email protected]

1.888.610.7664

0

5

10

15

20

25

30

Summary of Contents for 1210CM, 1211CM, 1220CM, 1221CM, 1222CM, 1223CM, 1230CM, 1231CM, 1232CM,...

Page 1: ...Covering Models 1210CM 1211CM 1220CM 1221CM 1222CM 1223CM 1230CM 1231CM 1232CM 1233CM Operation Manual 1200CM Series www calcert com sales calcert com 1 888 610 7664 0 5 10 15 20 25 30...

Page 2: ...be condenser Phase contrast models come with a 1 25 N A Zernike condenser with phase annulus rings for 10X 25X 40X and 100X also has a 0 setting for brightfield work All condensers are mounted on a ra...

Page 3: ...lan Phase Objective 1 ea 40X Plan Phase Objective 1 ea 100X Plan Phase Objective 1 ea Dispersion Filter 1 ea Blue Filter 1 ea Green Filter 1 ea Model 1230CM Trinocular Head 1 ea Stand 1 ea Brightfield...

Page 4: ...1400 CDPC 3 USB Digital Camera System 3 Megapixels for 1210 and 1220 series 1200 CDPC 3 USB DIgital Camera System 3 Megapixels for 1230 series Other Accessories Part Number Description Call for Part...

Page 5: ...ature Iris Diaphragm Adjustment Lever Fine Focus Control Substage Collector Base Stand Mechanical Stage Slide Holder Slide Holder Knobs Focusing Tension Control Knob Coarse Focus Control Camera Port T...

Page 6: ...se Annuli Centering Knobs Phase Contrast Condenser Iris Diaphragm Adjustment Light Bulb Centering Mechanism Substage Collector Set Screw 6 Light Bulb Access Door Lock Knob Swing out Filter Holder Mode...

Page 7: ...ing the objectives from their storage containers individually install each one into the nosepiece by threading them clockwise into the threaded holes of the nosepiece see figure 3 It is generally cons...

Page 8: ...small white hexagon is visible within a black field see Figure 6A Focusing of the hexagon is performed by turning the coarse fine focus controls This white hexagon is the light which is passing throu...

Page 9: ...of light are centered upon one another see Figure 8 Once the phase rings are centered remove the phase contrast centering telescope and replace with the eyepiece The phase rings are now centered for t...

Page 10: ...not to adjust light intensity The mechanical stage X Y controls located underneath the right hand side of the stage see figure 9 provide easy and accurate positioning of the sample One complete turn...

Page 11: ...er Adjustment 1 2 3 Interpupillary adjustment the distance between eyepieces is made through a folding action The Seidentopf design allows for a folding adjustment which is quickly and easily done for...

Page 12: ...mly secured with the camera port set screw Tighten the camera port set screw Pull the prism slider completely out to divert the image to the camera port The prism slider is the silver knob on the righ...

Page 13: ...omes with this microscope must be used with immersion oil in order to maintain image quality After use the objective tip needs to be wiped clean so that no oil residue remains Procedure for using imme...

Page 14: ...ld not have to force the bulb Close the light bulb access door and screw the knob back in to lock Return the microscope to normal operating position If necessary recenter the illuminator following the...

Page 15: ...the condenser lenses All other parts can be cleaned with a paper towel and rubbing alcohol Be aware that rubbing alcohol can break down lubricants so be careful when cleaning near the following parts...

Page 16: ...ble Cause How to Check Result Solution For More Info 1 Variable lighting control VLC is turned down too far Visually inspect VLC turned up Go to next step VLC turned down Turn VLC up Page 10 2 Bulb no...

Page 17: ...e Cause How to Check Result Solution For More Info 1 Up stop set too low Visually inspect Set too low Reset up stop to appropriate height Page 11 Not set too low Go to next step 2 Using the 100X objec...

Page 18: ...c or Plan Achromatic 20X 0 40 NA 0 50mm WD 0 9mm FOV 40X 0 65 NA 0 40mm WD 0 45mm FOV 100X oil 1 25 NA 0 25mm WD 0 18mm FOV Stage Dimensions 125mm x 135mm Stage Motion Right Hand Coaxial Control Rack...

Page 19: ...19 Notes www calcert com sales calcert com 1 888 610 7664 0 5 10 15 20 25 30...

Page 20: ...Printed in the USA No VGMNL070319 1200CM www calcert com sales calcert com 1 888 610 7664 0 5 10 15 20 25 30...

Reviews: