Van Guard 1210CM, 1211CM, 1220CM, 1221CM, 1222CM, 1223CM, 1230CM, 1231CM, 1232CM,... Operation Manual Download Page 11

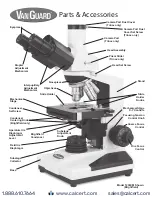
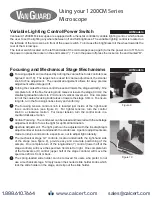
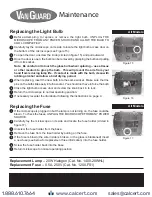
Setting the Up-Stop Mechanism

The up-stop mechanism is located just inside of the left-hand focus control knob (see figure 10).  It allows the user 

to set a maximum point to which the stage can be raised, which prevents damage to the specimen and objective.  

To set this point, turn the up-stop mechanism in a counterclockwise motion, so that its tab is facing down 

(which is also the “no up-stop position” for normal use).  

Raise or lower the stage, by turning the focus control knobs, to the desired height.  Be careful not to raise the 

stage high enough to crash into the objective. 

Once achieved, turn the up-stop mechanism in a clockwise motion, so that its tab is facing up (see figure 10).  

Once gently tightened, the up-stop mechanism will not allow the stage to be raised higher than the set point.

1

3

4

Using your 1200CM Series 
Microscope

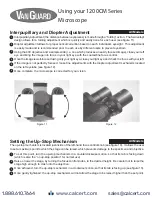
Interpupillary and Diopter Adjustment

1

3

Interpupillary adjustment (the distance between eyepieces) is made through a “folding” action.  The Seidentopf 

design allows for a folding adjustment which is quickly and easily done for each user (see figure 11).
Diopter adjustment allows for proper optical correction based on each individual’s eyesight.  This adjustment 

is easily made and is recommended prior to each use by different users to prevent eyestrain.

Using the 40X objective and a sample slide (i.e. one which produces an easily focused image), close your left 

eye and bring the image into focus in your right eye with the coarse/fine focus control.

Once the image is well-focused using only your right eye, close your right eye and check the focus with your left.

If the image is not perfectly focused, make fine adjustments with the diopter adjustment mechanism located 

on the left eyetube (see figure 12).  

Once complete, the microscope is corrected for your vision.

11

Figure 11

Figure 12

All Models

All Models

4

6

www.calcert.com

[email protected]

1.888.610.7664

0

5

10

15

20

25

30

Summary of Contents for 1210CM, 1211CM, 1220CM, 1221CM, 1222CM, 1223CM, 1230CM, 1231CM, 1232CM,...

Page 1: ...Covering Models 1210CM 1211CM 1220CM 1221CM 1222CM 1223CM 1230CM 1231CM 1232CM 1233CM Operation Manual 1200CM Series www calcert com sales calcert com 1 888 610 7664 0 5 10 15 20 25 30...

Page 2: ...be condenser Phase contrast models come with a 1 25 N A Zernike condenser with phase annulus rings for 10X 25X 40X and 100X also has a 0 setting for brightfield work All condensers are mounted on a ra...

Page 3: ...lan Phase Objective 1 ea 40X Plan Phase Objective 1 ea 100X Plan Phase Objective 1 ea Dispersion Filter 1 ea Blue Filter 1 ea Green Filter 1 ea Model 1230CM Trinocular Head 1 ea Stand 1 ea Brightfield...

Page 4: ...1400 CDPC 3 USB Digital Camera System 3 Megapixels for 1210 and 1220 series 1200 CDPC 3 USB DIgital Camera System 3 Megapixels for 1230 series Other Accessories Part Number Description Call for Part...

Page 5: ...ature Iris Diaphragm Adjustment Lever Fine Focus Control Substage Collector Base Stand Mechanical Stage Slide Holder Slide Holder Knobs Focusing Tension Control Knob Coarse Focus Control Camera Port T...

Page 6: ...se Annuli Centering Knobs Phase Contrast Condenser Iris Diaphragm Adjustment Light Bulb Centering Mechanism Substage Collector Set Screw 6 Light Bulb Access Door Lock Knob Swing out Filter Holder Mode...

Page 7: ...ing the objectives from their storage containers individually install each one into the nosepiece by threading them clockwise into the threaded holes of the nosepiece see figure 3 It is generally cons...

Page 8: ...small white hexagon is visible within a black field see Figure 6A Focusing of the hexagon is performed by turning the coarse fine focus controls This white hexagon is the light which is passing throu...

Page 9: ...of light are centered upon one another see Figure 8 Once the phase rings are centered remove the phase contrast centering telescope and replace with the eyepiece The phase rings are now centered for t...

Page 10: ...not to adjust light intensity The mechanical stage X Y controls located underneath the right hand side of the stage see figure 9 provide easy and accurate positioning of the sample One complete turn...

Page 11: ...er Adjustment 1 2 3 Interpupillary adjustment the distance between eyepieces is made through a folding action The Seidentopf design allows for a folding adjustment which is quickly and easily done for...

Page 12: ...mly secured with the camera port set screw Tighten the camera port set screw Pull the prism slider completely out to divert the image to the camera port The prism slider is the silver knob on the righ...

Page 13: ...omes with this microscope must be used with immersion oil in order to maintain image quality After use the objective tip needs to be wiped clean so that no oil residue remains Procedure for using imme...

Page 14: ...ld not have to force the bulb Close the light bulb access door and screw the knob back in to lock Return the microscope to normal operating position If necessary recenter the illuminator following the...

Page 15: ...the condenser lenses All other parts can be cleaned with a paper towel and rubbing alcohol Be aware that rubbing alcohol can break down lubricants so be careful when cleaning near the following parts...

Page 16: ...ble Cause How to Check Result Solution For More Info 1 Variable lighting control VLC is turned down too far Visually inspect VLC turned up Go to next step VLC turned down Turn VLC up Page 10 2 Bulb no...

Page 17: ...e Cause How to Check Result Solution For More Info 1 Up stop set too low Visually inspect Set too low Reset up stop to appropriate height Page 11 Not set too low Go to next step 2 Using the 100X objec...

Page 18: ...c or Plan Achromatic 20X 0 40 NA 0 50mm WD 0 9mm FOV 40X 0 65 NA 0 40mm WD 0 45mm FOV 100X oil 1 25 NA 0 25mm WD 0 18mm FOV Stage Dimensions 125mm x 135mm Stage Motion Right Hand Coaxial Control Rack...

Page 19: ...19 Notes www calcert com sales calcert com 1 888 610 7664 0 5 10 15 20 25 30...

Page 20: ...Printed in the USA No VGMNL070319 1200CM www calcert com sales calcert com 1 888 610 7664 0 5 10 15 20 25 30...

Reviews: