background image

10

7.3

SEAL THE FLOOR FRONT
(ALL INSTALLATIONS)

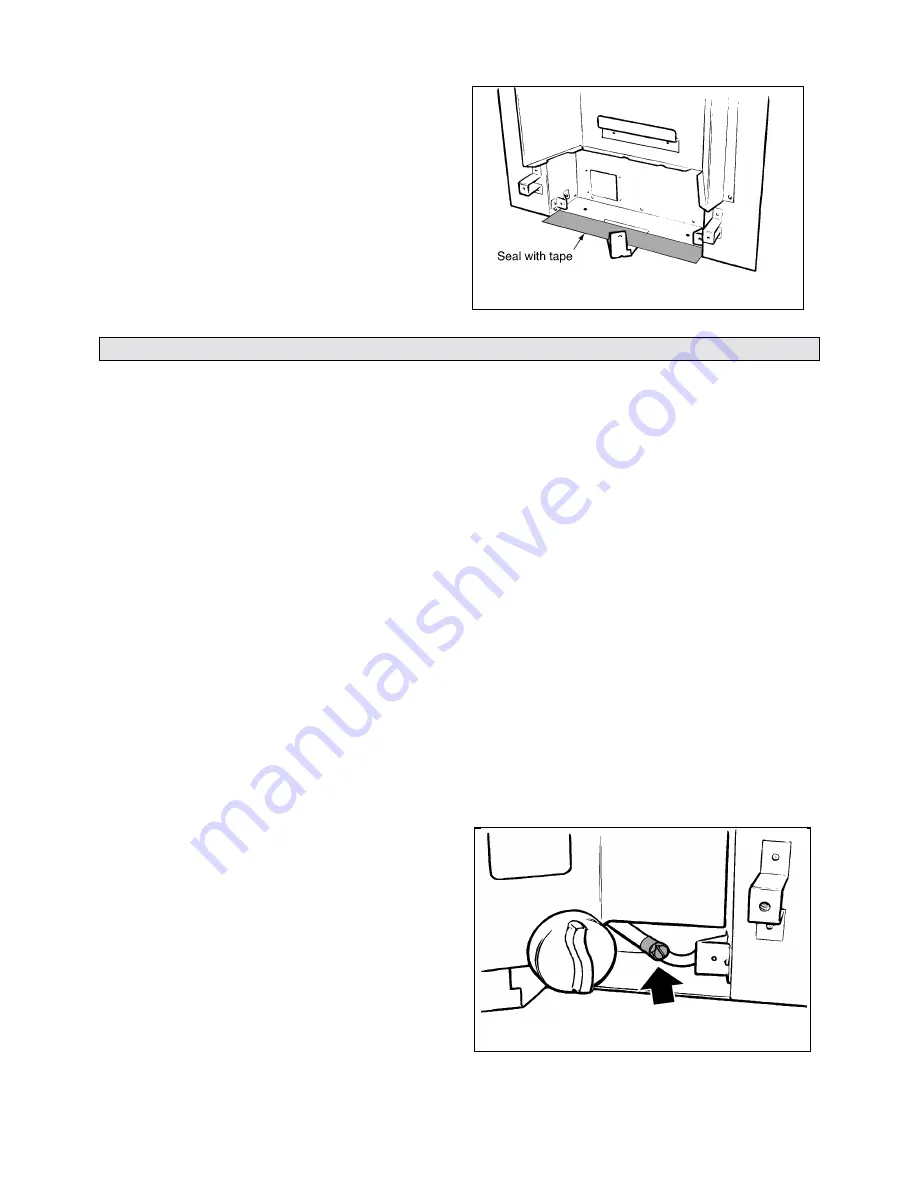
Using the floor sealing tape supplied, seal the bottom
of the convection box to the fireplace and hearth
floor. Run the tape over the burner fixing bracket.
(see figure 15).

8.

BURNER, FRONT SURROUND & SUPPLY PIPE INSTALLATION

8.1

Refit the burner unit to the convection box with
three screws.

8.2

Locate the two lugs at the top of the front surround
in the slots in the convection box hood. Swing the
bottom of the surround sides back against the
convection box and lower the surround so that the
lugs are fully seated in the slots in the convection box
hood.

8.3

Refit the two screws to secure the surround sides to
the convection box brackets.

8.4

Connect the supply line to the appliance.

For right hand side connection. 

The supply pipe

will have to be formed to go behind the control knob
and burner support bracket. The installation
template contains a diagram for bending this supply
pipe.


8.5

Pressure check the installation pipework for gas
soundness in accordance with the current edition of
BS6891.


A long brush may be required to reach

some joints

.

8.6

PRELIMINARY BURNER CHECKS

Some burner operations can be checked at this stage.
Checking now will mean that less disassembly will
be required if any problems are found. 

A full check

should still be made, however, after final installation.

8.6.1

If closed

,

 open the isolating valve at the inlet elbow.

8.6.2

Depress the control knob and turn anticlockwise
partially towards the “PILOT/IGN” position until
some resistance is felt.  Keep depressed at this
position to purge air from the system then, while
keeping it depressed, turn fully to the “PILOT/IGN”
position. A spark should be generated at the pilot
while turning. The spark should ignite the pilot

.

8.6.3

When pilot ignition has been achieved, keep the
control knob depressed for approximately ten
seconds to allow the thermocouple probe to warm
up and then release it. If the pilot does not remain
alight, ensure that the air has been purged, that the
pilot orifice is clear and that the thermocouple
connections are sound. Replace the pilot unit if
necessary (see servicing section of this manual).

8.6.4

When the pilot is alight and stable, partially depress
the knob and turn to “LOW”. The pilot should then
light the main burner at its low setting. There may
be a delay of up to four seconds between the pilot

lighting and ignition of the gas at the main burner.
This is normal and is due to the time required to fill
the main burner compartment with sufficient gas for
ignition.

8.6.5

When the burner is operating properly, partially
depress the control knob and gradually turn it anti-
clockwise. The burner flames should gradually
increase until the knob reaches the “HIGH”
position. 

When the above checks have been completed

partially depress the control knob and turn to “OFF”.

8.6.6

If the above checks are satisfactory, continue with the
installation. If not, check the control and ignition
circuitry and components as described in the
servicing section of this manual.

8.7

CHECK REFERENCE PRESSURE

The appliance is pre-set to give the correct heat input
at the inlet pressure shown in section 1 of this
manual. No adjustment is necessary. Check the
burner pressure by fitting a pressure gauge at the test
point. The test point is on the pipe situated below
the bottom right corner of the burner unit (See
figure 16). Check the pressure with the appliance
alight and set at maximum output.
After checking, turn off the appliance. Remove the
pressure gauge and replace the test point sealing
screw. Relight the appliance. Turn to the maximum
output position and test around the sealing screw for
gas soundness with a suitable leak detection fluid.


 Fig. 15 Floor sealing


Fig. 16 Pressure test point

Summary of Contents for 417

Page 1: ...bar THESE APPLIANCES ARE FOR USE IN THE UNITED KINGDOM GB AND THE REPUBLIC OF IRELAND IE ONLY We trust that these instructions give sufficient details to enable this appliance to be installed and maintained satisfactorily However if further information is required our Valor advice line will be pleased to help Ring 0345 626 341 Local call rates apply Please leave these instructions with the user 60...

Page 2: ...y pipe installation 10 Preliminary burner checks 10 Reference pressure check 10 Ceramic coals walls installation 11 Full operating checks 14 Control settings check 14 Flue spillage check 14 Flame supervision spillage monitoring system check 15 Final review 15 Servicing parts replacement 16 Burner plaque replacement 16 Front surround removal 17 Burner unit removal 17 Pilot unit removal 17 Gas tap r...

Page 3: ...g Device SIT Ref OP9044 SIT Ref OPLPG9221 Ignition Piezo Electric Integral with Gas Tap Piezo Electric Integral with Gas Tap Aeration Non adjustable Non adjustable 2 GENERAL INSTALLATION REQUIREMENTS 2 1 For the user s protection in the United Kingdom it is the law that all gas appliances are installed by competent persons in accordance with the current edition of the Gas Safety Installation and U...

Page 4: ...rate marble hearths are considered as non combustible The appliance can be fitted to a purpose made proprietary class O 150 C surround The hearth material must be at least 12mm thick The periphery of the hearth or fender should be at least 50mm above floor level to discourage the placing of carpets or rugs over it The surface of the hearth must be sufficiently flat to enable the bottom of the fron...

Page 5: ... cables 2 Cable clamps 4 Eyebolts 1 Installation template 1 Smoke match tube 1 Fire front casting 1 Bottom front cover casting 1 Literature pack Carefully remove the contents Take special care in handling the ceramic walls and the coals Check that all the listed parts are present and in good condition Fig 1 Installation Data a Fireplace Dimensions Does not apply to pre cast flues See section 2 2 3...

Page 6: ...at the back and towards the centre of the fireplace floor are sound enough to take the eyebolts and screws If these areas have deteriorated due to prolonged use they should be made sound with a suitable cement 4 2 3 Installations using a metal flue box The whole of the top surface of the metal flue box must be covered with a layer of mineral wool or equivalent insulation at least 100mm thick see f...

Page 7: ...d and through a cut out at either rear bottom corner of the fire front casting For side connection final installation of the supply pipe should be left until the appliance is installed in the fireplace 6 PREPARING APPLIANCE FOR INSTALLATION 6 1 Remove the two screws securing the bottom of the front surround to the sides of the convection box Raise the front surround to allow the retaining lugs at ...

Page 8: ...rough thepierced hole in the rear seal 7 1 2 Mark the fireplace front surround through the four fixing holes in the side flanges of the convection box see figure 9 7 1 3 Remove the convection box Drill four holes in the fireplace front surround at the marked positions using a no 12 masonry drill 7 1 4 Insert a rawlplug into each hole 7 1 5 Place the convection box back in position in the fireplace...

Page 9: ...tainer over the bottom end of each cable 7 2 8 Pull each cable taut Push the cable retainers hard up against the V brackets Tighten the screws in the retainers so that they clamp the cables in position Apply tension to the cables by turning the hexagonal adjusters by hand see figure 13 7 2 9 Drill a hole into the fireplace floor through each of the two holes in the base of the convection box using...

Page 10: ...nition has been achieved keep the control knob depressed for approximately ten seconds to allow the thermocouple probe to warm up and then release it If the pilot does not remain alight ensure that the air has been purged that the pilot orifice is clear and that the thermocouple connections are sound Replace the pilot unit if necessary see servicing section of this manual 8 6 4 When the pilot is a...

Page 11: ...r compartment See fig 18 9 3 Place the rear base coal in the burner compartment behind the front coal Its rear face should touch the rear ceramic wall See figure 19 9 4 The ceramic side walls are marked at the rear bottom corners L Left side R Right side Place the side walls against the sides of the fire box and in the recesses at the sides of the base coals The markings L R should be at the at th...

Page 12: ...ce them in the central two valleys of the front coal See figure 21 9 5 2 Place two of the remaining coals in the two outer valleys of the front coal One each side of the large coals See figure 22 Place the left side coal so that the customer will be able to see the pilot flame below the coal Fig 21 Front row inner coals Fig 22 Front row outer coals ...

Page 13: ...13 9 5 3 Place the three remaining coals behind and approximately midway between each of the coals in the front row See figure 23 Fig 23 Middle row of coals ...

Page 14: ... and turn the control knob to HIGH 10 2 3 Leave the appliance on for five minutes 10 2 4 There are two types of smoke match holders One has a copper finish the other is plain steel Please apply the relevant parts of the spillage test instructions Place the smoke match tube into the convection box at the right hand side and immediately below the black top cross member Angle it at approximately 45 t...

Page 15: ...ed Lower the casting so that it rests on the hearth see figure 25 Black chrome front casting Place the fire front casting in front of the appliance 11 2 Place the bottom front cover casting in position below the fire front casting 11 3 Visually inspect the appliance Clean off any marks incurred during installation 11 4 Hand these instructions and the user s instructions to the customer 11 5 Advise...

Page 16: ...e sure that the ceramic walls and coals are replaced correctly as described in the installation instructions Always test for gas soundness and spillage after servicing the appliance 12 1 TO REPLACE BURNER PLAQUE ITEMS See figure 26 12 1 1 Remove the 7 loose coals ceramic side walls front base coal rear base coal and ceramic back wall The plaques can be then be removed as follows without detaching ...

Page 17: ...t elbow 12 4 5 Remove the first screw securing the dust cage to the pilot unit burner Carefully remove the dust cage and place aside 12 4 6 Remove the second screw securing the pilot unit to the burner Remove the pilot unit and place it aside 12 4 7 Refit in the reverse order Note 1 The pilot unit must be replaced as a whole assembly Its individual components are not separately replaceable 2 Once ...

Page 18: ...N BURNER ELBOW INJECTOR 12 8 1 Remove the burner unit See section 12 3 12 8 2 Disconnect the main burner pipe from the elbow injector If necessary loosen the pipe at the gas tap end to swing the pipe clear of the injector 12 8 3 Unscrew the elbow injector from the support bracket 12 8 4 Refit in the reverse order 12 9 TO REMOVE THE APPLIANCE FROM THE FIREPLACE 12 9 1 Remove the 7 loose coals ceram...

Page 19: ... Pilot unit For Natural Gas Appliances 1 545949 Pilot unit For Propane Appliances 544929 F Burner plaque gasket set For Natural Gas Appliances 1 545989 Burner plaque gasket set For Propane Appliances 566929 G Ceramic rear wall 1 545999 H Front coal halves 1 546009 J Rear base coal 1 563359 K Pack of loose coals 1 563369 L Ceramic side wall right side 1 546039 M Ceramic side wall left side 1 546049...

Page 20: ...dards Valor is a member of the Society of British Gas Industries which works to ensure high standards of safety quality and performance Careful Installation Valor is a Corgi registered company All our gas fires must be installed by a competent Corgi Registered Installer in accordance with our Installer Guide and should not be fitted directly on to a carpet or floor of combustible material Valor He...

Reviews: