


ADD-A-Cam PRO
Add-A-Cam PRO - Document 341-592 Rev. C
Page 3 of 13
SYSTEM CONNECTIVITY (continued):
SYSTEM COMPONENTS:
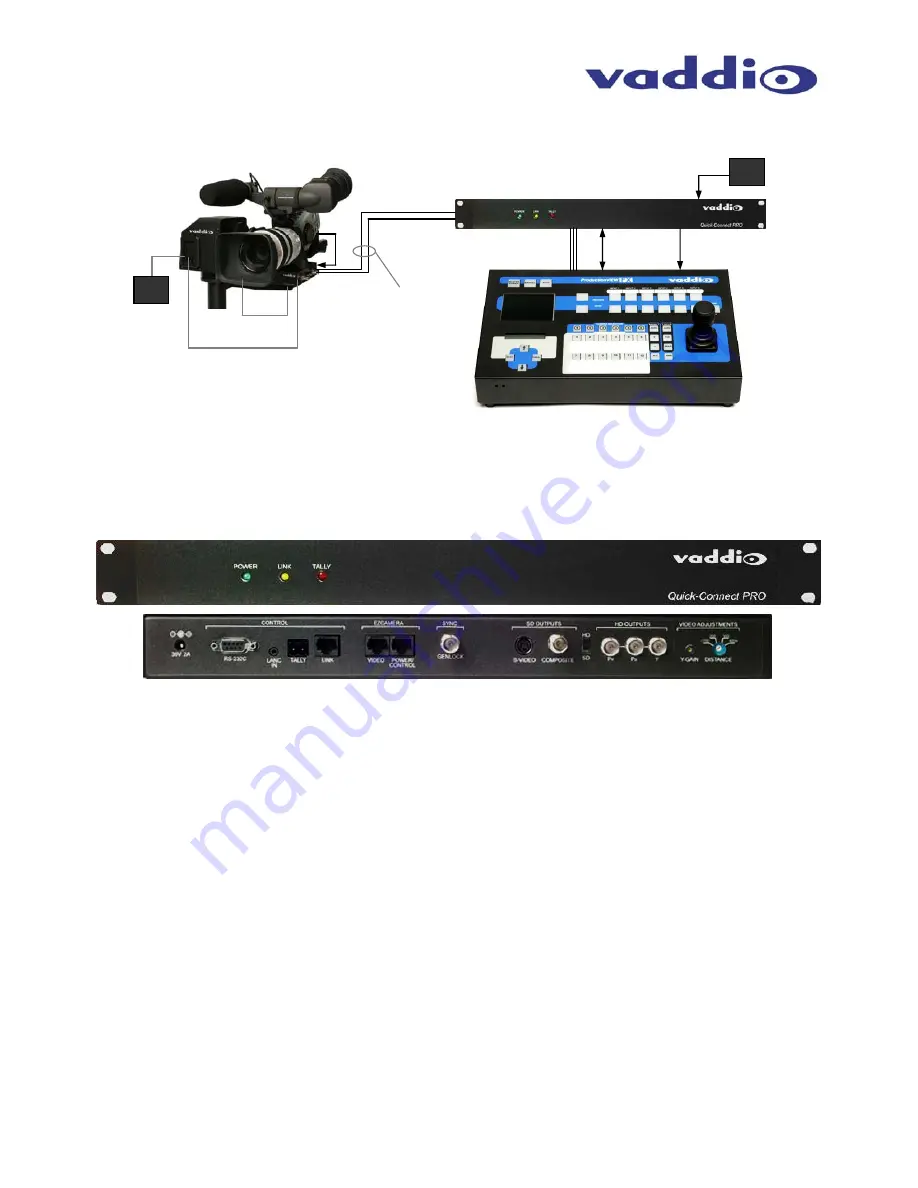
Quick-Connect PRO
Quick-Connect Pro Front Panel
•
Power Indicator - Solid green when connected to the EZCamera Shoe, blinks when shoe is not connected
•
Link Indicator - Illuminates when connected to a control port of any ProductionVIEW console
•
Tally Light - Lights when tally contacts on the rear panel are engaged (also lights Tally LED on the EZCamera Shoe)
Quick-Connect PRO Rear Panel
•
Power Input - Use only the 36VDC Power supply provided
•
Control Ports:
•
RS-232 Control Port - For control of the camera and Pan/Tilt Head functions with an external controller
•
LANC Input - External LANC controller input for lens control
•
Tally Contacts - Lights the Tally LED on the front panel of the Quick-Connect Pro and EZCamera Pro Shoe
•
Link Input - Control link for use with ProductionVIEW consoles
•
EZCamera I/O
(video, power and control over two Cat. 5 cables)
•
Video Port - Carries SD video (S-Video and composite video), or HD video (Y, PB, PR) between Shoe and Quick-
Connect
•
Power/Control - Power supply for the camcorder and RS-232 control between the ProductionVIEW and camera
•
Sync -
Genlock Input
•
Video Outputs and Adjustments
•
SD Outputs - S-Video and Composite Video Outputs
•
HD/SD Selection Switch - Selects between SD and HD Video signals
•
HD Outputs - Y, PB, PR analog component video outputs on BNC connectors
•
Video Adjustments - Distance Adjustments for Cat. 5 cable (<100’, 200’, 300’, 400’), and Y-Gain controls, adjust for cable
length and for Y-Gain
Local
24VDC
Power
Supply
Canon XL-2 SD
Camcorder mounted on
EZCamera PRO Shoe
Optional:
Pan/Tilt
Head
LANC
(Lens)
Pan/Tilt Control
(RS-232)
Power & Control
SD Video
Quick-Connect PRO
Tally Contacts
Control
LINK
(RS-232)
SD Video
ProductionVIEW FX
Video, Power and
Control up to 500’
on Cat. 5 cable
Video
Figure 3: SD System Configuration
ProductionVIEW FX input 1 camera control port is connected to the Quick-Connect PRO. The Quick-Connect PRO is connected to
the EZCamera PRO Camcorder Shoe with two (2) Cat. 5 cables. When the ProductionVIEW is initialized, it automatically
recognizes the Add-A-Cam PRO system components and loads the control protocols. In this example, SD video is mixed and
switched with the ProductionVIEW FX.
Figure 4:
Quick-Connect PRO Front Panel and Rear Panel
PS
36VDC Power
Supply
PS


