ENGLISH
- 8 -
SELECTION OF SHUTTER/AWNING
MODE AND SETTINGS RESET
NOTE: the motor is programmed in the factory to work in
SHUTTER mode.
If necessary, edit this setting to proceed as follows:
1.
Power the motor
2.
Keep button SW1 pressed on the motor head for 30 seconds:
after approx. 5 seconds, the motor moves in two directions,
keep pressing the button until the motor repeats the
movement.
3.
Release the button: the led flashes in alternating RED/BLUE
mode
4.
To select the AWNING mode, press the button when the led is
BLUE.
To select the SHUTTER mode, press the button when the led is
RED.
5.
Release the button: the motor saves the new settings by
loading the factory data and moves in two directions to signal
the end of the procedure.
PROGRAMMING OF LIMIT SWITCHES
The programming procedure of the limit switches is carried out
using the button with integrated led SW1 available on the head of
the motor.
To activate the procedure, proceed as follows:
1.
Power the motor
2.
Keep the button pressed (approx. 5 seconds) until the motor
moves in two directions
3.
Release the button: the led flashes in alternating RED/BLUE
mode
4.
If the motor is assembled with the head on the LEFT (awning/
shutter seen from inside), press the button when the led is
RED.
If the motor is assembled with the head on the RIGHT (awing/
shutter seen from inside), press the button when the led is
BLUE.
NOTE: the colour of the RED or BLUE led will be
maintained during the subsequent programming phase
5.
Release the button: the led starts to slowly flash
6.
To edit the UPPER position of the limit switch, within 5
seconds from flashing starts, keep the button pressed to bring
the roller shutter to the desired position.
To invert the movement direction, release and press the button
again.
NOTE: if the roller shutter is equipped with a lock on the
upper point, simply activate the motor in ascent. When
the stop is reached, the control unit saves this position
as the UPPER limit switch.
7.
If the UPPER position of the limit switch must not be re-
programmed, wait 5 seconds without pressing the button: the
led starts to quickly flash.
8.
To edit the LOWER position of the limit switch, within 5
seconds from fast flashing starts, keep the button pressed to
bring the roller shutter to the desired position.
To invert the movement direction, release and press the button
again.
9.
Having completed this setting, wait 5 seconds until the led
switches off and the motor moves in the two directions to
confirm the new parameters were saved.
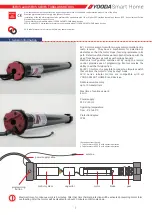
INSTALLATION (FIG. 1-2)
• Fasten the bracket
G
to the wall or box.
• Insert the crown
A
on the ring nut
B
of the limit switch.
• Insert the part
E
inside the pulley
C
.
• Insert the pulley
C
on the pin of the motor
D
.
• Insert the split pin
F
on the pin
D
.
• Completely insert the motor in the roller shutter tube.
• Fasten the roller shutter tube with the transmission pulley with
screw 4 x10
H
.
DESCRIPTION
This opening system is composed of a tubular motor
with integrated electronic control unit with the following
characteristics:
• Integrated KNX module on the board
• Extended range power supply (185-265 Vac 50-60 Hz)
• Low consumption in standby (0.35 W)
• Local activation using normally open button.
ATTENTION: the cables of the motor reserved for the
button cannot be connected to the electricity mains.
• Button with integrated led to manage limit switch
programming (fig. 4)
• Obstacles detection: if an obstacle is detected during the
closure phase of the shutter, the device re-opens the roller
shutter completely.
ATTENTION: obstacles detection only works if the motor
is installed using the accessories supplied with the
motor.
OPERATING LOGIC OF THE EXTERNAL
BUTTON
The external button works according to two different modes:
• Before receiving the command CMD_MOT_GET_ID from the
KNX network, it activates the motor with UP/STOP/DOWN
logic
• Having received the command CMD_MOT_GET_ID from the
KNX network, it no longer activates the motor, but sends its
opened/closed status to the KNX network
MOTOR OPERATING TIME
The command control unit shuts-off movement of the motor after
5 minutes: in the event of malfunctioning of the limit switch, this
“time out” avoids overheating of the motor.
START-UP
1.
Connect the power supply of the motor and the button as
outlined on page 4.
2.
Execute PROGRAMMING THE LIMIT SWITCHES
3.
Connect the device to the KNX bus
ATTENTION: before connecting the device to the KNX
bus, you need to execute PROGRAMMING THE LIMIT
SWITCHES
4.
Proceed to COMMISSIONING (COMMISSIONING MANUAL)
Summary of Contents for LEX-KNX Series
Page 2: ... 2 Fig 1 Fig 2 SW1 Fig 4 ...


