background image

ENGLISH

- 40 -

10 - QUICK CONFIGURATION

This paragraph concerns a quick procedure to set the control unit 
and set it at work immediately.
We recommend following these instructions, in order to 
check quickly the correct operation of control unit, motor and 
accessories, and then changing the configuration in case of any 
non-satisfactory parameter.

1.

  Set parameters 

StoP

Foto

CoSt

 according to the safety 

devices installed on the gate

2.

  Check the motor connection is correct: 


a.

  Power the control unit and activate automation with a 

START command: the motor must move in opening


b.

 If the movement direction is wrong, invert the opening/

closure cables of the motor

3.

  Start the self-learning cycle (chapter 12)

4.

  Check that the automation work properly and if necessary 

modify the configuration of the desired parameters 

11 - LOADING OF DEFAULT
PARAMETERS

If necessary, it is possible to restore all the parameters to their 
standard or default value (see table at the end)

m


WARNING: This procedure causes the loss of all the 

customized parameters.
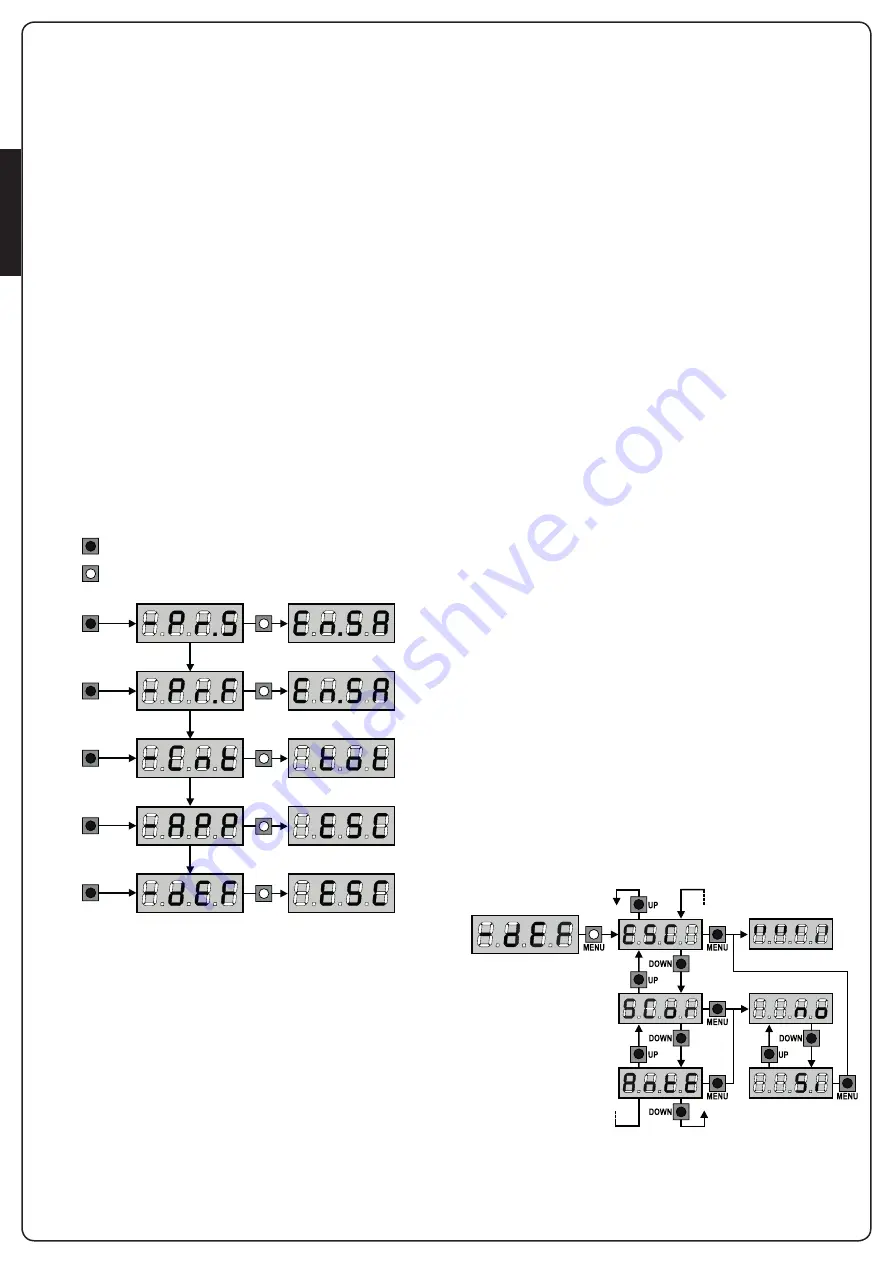
1.

  Press and hold down the MENU key until the 

-dEF 

appears 

on the display

2.

  Release the MENU key: the display will show 

ESC 

(press the 

MENU key only if you want to leave this menu)

3.

  -  If the unit controls a door, press the UP key: the display 

shows 

AntE


  -  If the unit controls another type of automation press the 

DOWN key: the display shows 

SCor

4.

  Press the MENU key: 

no 

will appear on the display.

5.

  Press the DOWN key: 

Si 

will appear on the display.

6.

  Press the MENU key: All of the parameters are returned to their 

default values (chapter 16) and the display shows the control 
panel

9.1 - USE OF DOWN MENU AND UP KEYS FOR
PROGRAMMING

Control unit time and function programming is made within a 
special configuration menu, to which you can access and where 
you can shift through DOWN, MENU and UP keys placed under 
the display.

m


CAUTION: Except in the configuration menu, pressing 

the UP key activates a START command and pressing the 
DOWN key activates a START PEDESTRIAN command.

Hold down the MENU key to scroll through the 5 main menus:

-Pr.S

   BASE PROGRAMMING (SHORT MENU): only the useful  

        parameters for a base programming are displayed.

-Pr.F

   ADVANCED PROGRAMMING (FULL MENU): all  

        parameters of the programming menu are displayed.

-Cnt

   COUNTERS

-APP

   SELF-LEARNING OF WORKING TIMES

-dEF

   LOAD DEFAULT PARAMETERS

To enter one of the 5 main menus, just release the MENU key 
when the menu you want appears on the display.

To move through the 5 main menus, press the UP and DOWN keys 
to scroll through the various items. Press the MENU key to display 
the current value of the selected item and change it if needed.

MENU

3”

3”

MENU

6”

3”

3”

3”

MENU

9”

MENU

12”

MENU

15”

KEY PRESSED

KEY RELEASED

m

 WARNING: If no operations are required for more 

then a minute, the control unit exits from the programming 
mode without saving the given information and changes 
will be lost.

Summary of Contents for CITY4-EVO

Page 1: ...DIGITALE UNIVERSALE PER IL COMANDO DI UN MOTORE 230V 120V UNIVERSAL DIGITAL CONTROL UNIT FOR THE CONTROL OF A 230V 120V ENGINE CENTRALE DIGITALE UNIVERSELLE POUR LE CONTROLE D UN MOTEUR A 230V 120V CU...

Page 2: ...DOWN MENU UP MAINS OVERLOAD J1 J2 J3 FISSAGGIO FIXING FIXATION FIJACION...

Page 3: ...T 5 12 LOCK 5 13 EXTERNAL AERIAL 5 14 POWER SUPPLY 6 PLUG IN RECEIVER 7 USB CONNECTOR 8 ADI INTERFACE 9 CONTROL PANEL 9 1 USE OF DOWN MENU AND UP KEYS FOR PROGRAMMING 10 QUICK CONFIGURATION 11 LOADING...

Page 4: ...ly who can issue the Compliance Certificate concerning the whole installation EEC Machine Directive 89 392 Annex IIA The automated vehicular gates shall comply with the following rules EN 12453 EN 124...

Page 5: ...efore each opening as required by the referred regulations Deactivation of safety inputs through the configuration menu no jumper is required for terminals concerning safety devices that have not been...

Page 6: ...24 Vac for photocells and other accessories Z2 Common for accessories power supply Z3 Photocell optical edge TX power supply for functional test Z4 Z5 Lock 12V Z5 Z6 Low voltage light 12Vdc 3W RM MR...

Page 7: ...NTACT FLASHING LIGHT ANT DOWN MENU UP MAINS Z1 Z2 Z3 Z4 Z5 Z6 G1 G2 G3 G4 G5 G6 G7 N L OPEN COM CLOSE M OVERLOAD J1 J2 J3 L1 L2 L3 L4 L5 L6 L7 L8 L9 L10 L11 mATTENTION jumpers J1 and J2 must be remove...

Page 8: ...mode DEFAULT START START it controls the total opening of the gate START P START PEDONALE it controls the partial opening of the gate Open Close command START APERTURA it controls the opening of the...

Page 9: ...ns of a remote control stored on channel 1 see relevant instructions of MR receiver The START P function can also be activated by pressing DOWN key outside the programming menu or by means of a remote...

Page 10: ...L9 and L11 closing limit switch in door 1 between terminal L10 and L11 FCC FCA L1 L2 L3 L4 L5 L6 L7 L8 L9 L10 L11 5 8 ENCODER With CITY4 EVO you can use encoder equipped motors to control the exact po...

Page 11: ...when a remote control arrives on channel 4 and opens after the time set If a second remote control reaches channel 4 before the time is up the relay opens 5 11 LOW VOLTAGE LIGHT The control unit has a...

Page 12: ...nostics If the unit is not fed by connecting the USB cable to the unit and the PC the display switches on and caption USb is displayed in this stage only the programming operations through the PC can...

Page 13: ...e is added or removed it is necessary to repeat the scanning procedure in order to update the unit 9 CONTROL PANEL When power is on the control unit checks that display correctly operates by switching...

Page 14: ...ss the DOWN key the display shows SCor 4 Press the MENU key no will appear on the display 5 Press the DOWN key Si will appear on the display 6 Press the MENU key All of the parameters are returned to...

Page 15: ...lay will show ESC press the MENU key only if you want to leave this menu 3 Press the DOWN key t LAv will appear on the display 4 Press the MENU key to start the self learning cycle for the work cycle...

Page 16: ...t service request Area 1 is the reading of the total number of completed cycles through Up and Down keys you can alternate the display of thousands or units Area 2 is the reading of the number of cycl...

Page 17: ...ending order from n 01 to n 32 select the event and press the MENU key to display the following information A EVENT CODE The code displayed is used to define the type of event that has occurred see th...

Page 18: ...n of the COST safety strip 2 3 4 CoSt E059 Activation of the virtual safety strip control from an ADI device 2 3 4 i Adi E066 Intervention of the amperometric protection on opening 2 SEnS E067 Interve...

Page 19: ...out changes and going back to the control unit normal operation You must exit from programming mode through this menu item if you do not want to lose your configuration mWARNING in case no operation i...

Page 20: ...d to setup a longer time than t AP opening time t APP Partial opening time pedestrian access 6 0 6 0 0 0 2 00 When the control unit receives a Start Pedestrian command it will open leaf for a shorter...

Page 21: ...off When the gate is standstill and it begins moving the initial inertia must be faced therefore if your gate is quite heavy it could not move In case the SPUNTO pickup function is activated for the f...

Page 22: ...The gate stops and goes to pause ChiU The gate immediately starts closing no The gate go on with the opening phase command is ignored St Ch Start command during the closing phase This menu allows fixi...

Page 23: ...unction disabled t LUC Operation timed from 0 0 to 20 0 1 00 1 00 CiCL Lights on for the entire duration of the cycle AUS Auxiliary Channel This menu allows you to set relay operation for courtesy lig...

Page 24: ...Photocells Input This menu allows input to be enabled for the photocells CFCh CFCh APCh Input enabled on opening and closure CFCh Photocell active on closure and with gate stopped Ch Input enabled for...

Page 25: ...if the limit switch is enabled the START ON OPENING must be disabled St AP parameter no mWARNING Improper use of this function can affect the safety of using the automation V2 recommends Use this func...

Page 26: ...the unit detects the devices During scanning the display shows the number of detected devices Once scanning is completed the display shows ESC select ESC to exit from the menu without programming the...

Page 27: ...turn exactly to the starting position it is possible to set an anti skid time that is added to the time calculated by the control unit in order to recover the inertia mWARNING If function ASM is disab...

Page 28: ...errors detected by the various tests Err2 Err3 etc 2 Even the events that change the normal operation of the gate coming into action of a safety control by user etc 3 Even the safeties that have prev...

Page 29: ...mand is given the gate won t open It means that intervention of safety edge prevents gate movement 1 Check the safety edge is not pressed or damaged 2 Ensure safety edge is connected correctly activat...

Page 30: ...hows Err5 When a start command is given the gate won t open It means that the test of the safety edges failed 1 Make sure that the menu relative to the test of the facets for cables Co tE is configure...

Page 31: ...V2 S p A Corso Principi di Piemonte 65 67 12035 RACCONIGI CN ITALY Tel 39 0172 812411 Fax 39 0172 84050 info v2home com www v2home com...

Reviews: