background image


TruVision TVD-2101/4101 Dome Camera User Manual 

17 

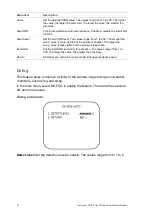
Privacy mask area 

Use this function to mask areas that you want to hide on screen to protect 
privacy, such as a neighboring building. You can mask up to eight areas using a 
variety of colors. 

In the 

Function

 menu, go to 

Privacy

 and press 

Enter. 

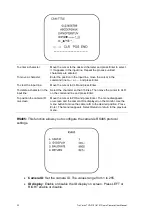
The Privacy menu 

appears, showing the options available. 


Menu Item 

Description 

Area


Select the privacy mask (AREA1 to AREA8) that you want to configure. 
Each privacy mask is already associated with a pre-selected color that 
you can change using the COLOR setting. 

Area display


Enable or disable the selected privacy mask. If enabled, you can also 
customize the position and size of the privacy mask. 

Color


Set the color of the privacy mask. There are 16 colors available. 

Transpar


Set the level of transparency of the privacy mask. The values range from 
0 to 3. Level 0 lets you see behind the mask. Level 3 means the mask will 
entirely cover the area. 

Return 

Exit the menu and return to live mode. Changes made are saved. 


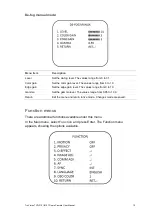
Digital effect 

In the 

Function

 menu, go to 

D-effect 

and press 

Enter. 

The D-Effect menu 

appears, showing the options available. 

Summary of Contents for TruVision TVD-2101

Page 1: ...TruVision TVD 2101 4101 Dome Camera User Manual P N 1072660A EN REV 1 0 ISS 09OCT13 ...

Page 2: ...lled and used in accordance with the instruction manual may cause harmful interference to radio communications Operation of this equipment in a residential area is likely to cause harmful interference in which case the user will be required to correct the interference at his own expense ACMA compliance Notice This is a Class A product In a domestic environment this product may cause radio interfer...

Page 3: ...allation 5 Mount the camera 5 Connect the cables 5 Adjust the lens 5 Adjust the focus and zoom 6 Programming 7 Access the Main menu 7 Exposure 8 Backlight 9 Day Night mode 12 Image noise reduction 13 Defog 14 Function 15 Privacy mask area 17 Digital effect 17 Image adjustment 19 Protocol adjustment 21 Autofocus 23 OSD language 23 Exit 24 Specifications 24 Menu Tree 25 ...

Page 4: ...res Exview HAD II hole accumulated diode technology with 480 000 pixels NTSC 570 000 PAL Use of LSI large scale integration digital processors to produce 700 lines of horizontal resolution Motorized lens with auto manual focus for easy installation Advanced OSD onscreen display control via DVR with Coaxial Control feature Advanced privacy mask areas to protect privacy concerns Digital WDR wide dyn...

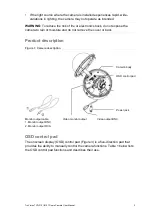
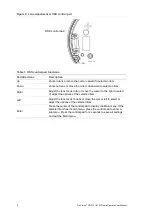
Page 5: ... rain or moisture and do not remove the cover or back Product description Figure 1 Camera description Camera body OSD control pad Power jack Monitor output cable 1 Monitor output BNC 2 Monitor output RCA Video monitor output Video output BNC OSD control pad The onscreen display OSD control pad Figure 3 is a five direction pad that provides the ability to manually control the camera functions Table...

Page 6: ... to select an item Right Adjust the lens focus to far or move the cursor to the right to select or adjust the options of the selected item Left Adjust the lens focus to near or move the cursor left to select or adjust the options of the selected item Enter Press the center of the control pad to display the Main menu If the selected item has its own menu press the control pad to enter a submenu Pre...

Page 7: ...all and cause serious damage Mount the camera Use the ceiling drilling hole template and mark the holes on the ceiling with a pen Attach the plate with fasteners to the ceiling and then attach the camera body to the plate To mount the camera attach the camera to the mounting surface using the appropriate fasteners Connect the cables To connect the cables 1 Connect a coaxial cable from the camera s...

Page 8: ...platform 2 To adjust the horizontal angle of the rotor up to 350 degrees turn the rotor on the platform 3 To adjust the vertical angle of the platform up to 90 degrees turn the platform Adjust the focus and zoom Figure 4 Zoom and focus adjustment or To adjust the camera zoom and focus 1 Use the OSD control pad as shown in figure 2 or Coaxial Control as figure3 to adjust the camera zoom and focus T...

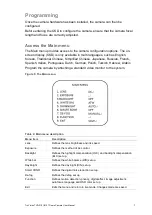
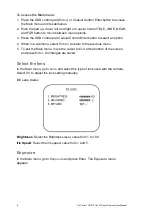
Page 9: ...Dutch German Polish Turkish Hebrew Arabic Program the camera by attaching a standard video monitor to the system Figure 5 The Main menu Table 2 Main menu description Menu item Description Lens Defines the lens brightness and iris speed Exposure Defines the method of iris control Backlight Defines the highlight compensation HLC and backlight compensation BLC set up White bal Defines the white balan...

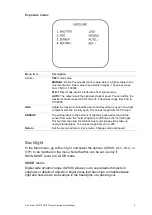
Page 10: ...utton to select an option 4 When in a submenu select Return to return to the previous menu 5 To exit the Main menu move the cursor to Exit at the bottom of the screen and press Enter All changes are saved Select the lens In the Main menu go to Lens and select the type of lens used with the camera Select DC to adjust the lens setting manually DC Lens menu Brightness Select the Brightness level valu...

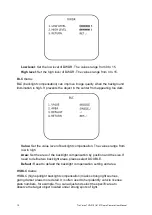
Page 11: ...he values range from OFF to High SENSUP The setting refers to the amount of light being allowed to load on the sensor from twice the normal light up to 256 times the normal light This method can allow for brilliant clear color images to be taken in nearly total darkness The values range from x2 to x256 Return Exit the menu and return to live mode Changes made are saved Backlight In the Main menu g...

Page 12: ...ue level of backlight compensation The values range from low to high Area Set the area of the backlight compensation by position and the size If need to define two backlight areas please select DOUBLE Default Reset to default the backlight compensation setting and area HSBLC menu HSBLC high spotlight backlight compensation masks strong light sources giving darker areas more detail It is often used...

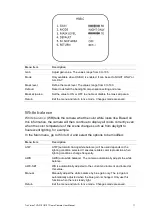
Page 13: ... to display all colors correctly even when the color temperature of the scene changes such as from daylight to fluorescent lighting for example In the Main menu go to White Bal and select the options to be modified Menu Item Description ATW ATW automatic tracing white balance will be used depends on the lighting condition selected It ensures reliable color reproduction when lighting conditions cha...

Page 14: ...es A long delay response would be used for example to avoid switching from Night to Day mode when car headlights pass in front of the camera The values range from 0 to 15 Day Night Set the threshold level on how dark it should be before switching from Day to Night mode Lower Higher value switches camera from Day to Night at lower higher illumination The values range from 16 to 176 Night Day Set th...

Page 15: ...color signal in B W so that the video signal provides better compatibility with certain color equipment OFF mode removes the color burst signal B W video and increase the total TV lines Color mode Select Color to manually set the camera to color day mode Image noise reduction Smart 3DNR noise reduction reduces the background noise in a low luminance environment with 2D 3D filtering system In the M...

Page 16: ... visible but the picture is sharper The larger the value noise is less visible but the picture is less sharp Sensitivity Set the Smart NR sensitivity for activation The values range from 1 to 200 The larger the value the greater the sensitivity Return Exit the menu and return to live mode Changes made are saved Defog This feature helps to improve visibility of the camera image during poor weather ...

Page 17: ...lues range from 0 to 10 Edge gain Set the edge gain level The values range from 0 to 10 Gamma Set the gamma level The values range from 0 05 to 1 00 Return Exit the menu and return to live mode Changes made are saved Function menus There are additional functions available under this menu In the Main menu select Function and press Enter The Function menu appears showing the options available ...

Page 18: ... press Enter The Motion menu appears showing the options available Menu Item Description Area Select the motion detection zone AREA1 AREA2 AREA3 that you want to configure The selected zone blinks Area display Enable or disable motion detection for the selected zone If enabled you can also customize the position and size of the zone Value Set the sensitivity level for the motion trigger When the s...

Page 19: ... already associated with a pre selected color that you can change using the COLOR setting Area display Enable or disable the selected privacy mask If enabled you can also customize the position and size of the privacy mask Color Set the color of the privacy mask There are 16 colors available Transpar Set the level of transparency of the privacy mask The values range from 0 to 3 Level 0 lets you se...

Page 20: ...e view Range Digital zoom in out The values range from x1 to x32 Pan Set the pan location when D zoom is enabled The values range from 100 to 100 Tilt Set the tilt location when D zoom is enabled The values range from 100 to 100 Smart zoom When a motion is detected in a pre defined area the camera picture will zoom in on the area and then zoom out ...

Page 21: ...to neutralize light camera vibrations It can be On or Off Freeze The FREEZE function helps to hold the image to analyze precisely Mirror The MIRROR function helps change the orientation of the image horizontally reversed MIRROR upside down V FLIP or horizontally reversed upside down ROTATE Using this mode does not affect the orientation of text on the screen Neg Image The NEG IMAGE Display the ima...

Page 22: ...ain and red gain levels for the selected monitor type Lens Shading Enable this option to brighten the edges of the camera image Level Set the level of the lens shading correction The values range from 0 to 60 H center Set the horizontal center location The values range from 0 to 255 V center Set the vertical center location The values range from 0 to 255 Defect If the camera s image sensor display...

Page 23: ...nd a dead pixel The larger the value the larger the size of the dead pixel found The values range from 0 to 3 Threshold Set threshold value The values range from 0 to 4 Start Perform STATIC DPC The camera closes the lens automatically and detects defective pixels that exceed the specified level You need to cover the lens with your hand during the test Protocol adjustment In the Function menu go to...

Page 24: ...ut line Select the character so that it blinks Then move the cursor to CLR on the command line and press Enter To position the camera ID on screen Move the cursor to POS and press Enter The menu disappears on screen and the camera ID is displayed on the monitor Use the menu button to move the camera ID to the desired position Press Enter The menu reappears Select Return to return to the previous m...

Page 25: ...witches from day to night or from night to day it adjusts the autofocus to ensure an accurate picture Delay Defines the delay time for autofocus The values range from 5 to 10 Synchronization mode Use the Sync menu to display the current synchronization mode Only one option is available Internal OSD language In the Function menu go to Language and press Enter Use this menu to select the OSD languag...

Page 26: ...ose the value and press Enter to validate Specifications Model TVD 2101 TVD 4101 Lens type Varifocal 2 8 to 11 mm Power supply 24 VAC 12 VDC Current 12 VDC 200 mA Max 330 mA Heater on 24 VAC 220 mA Max 408 mA Heater on Power consumption 12 VDC 2 4 W Max3 96 W Heater on 24 VAC 2 2 W Max 8 4 W Heater on Operating temperature 30 to 65 C 14 to 122 F Weight 1130 g 2 49 lbs ...

Page 27: ...TruVision TVD 2101 4101 Dome Camera User Manual 25 Menu Tree ...

Reviews: