background image

UIT2400 INSTRUMENTATION MANUAL REV A, May 2020 

4 OF 18 

3. Quick Reference Guide:


3A. Front:

 The front panel of the UIT2400 is a full color 4.3" capacitive TFT touch screen 

display. The display is a sensitive electronic device. It should not be exposed to sharp objects, 

harsh environments, chemicals, liquids etc.  


3B. Rear:

  On the back of the UIT2400 is a stand which is opened by grasping at the two 

finger slots and gently lifting the stand up.  The stand has small posts that slide along the 

housing to open and close.  No force should be applied to the stand during opening and 

closing. When the stand is in use, no pressure should be applied to the meter as this can bend 

the small post holding the stand into the housing.  


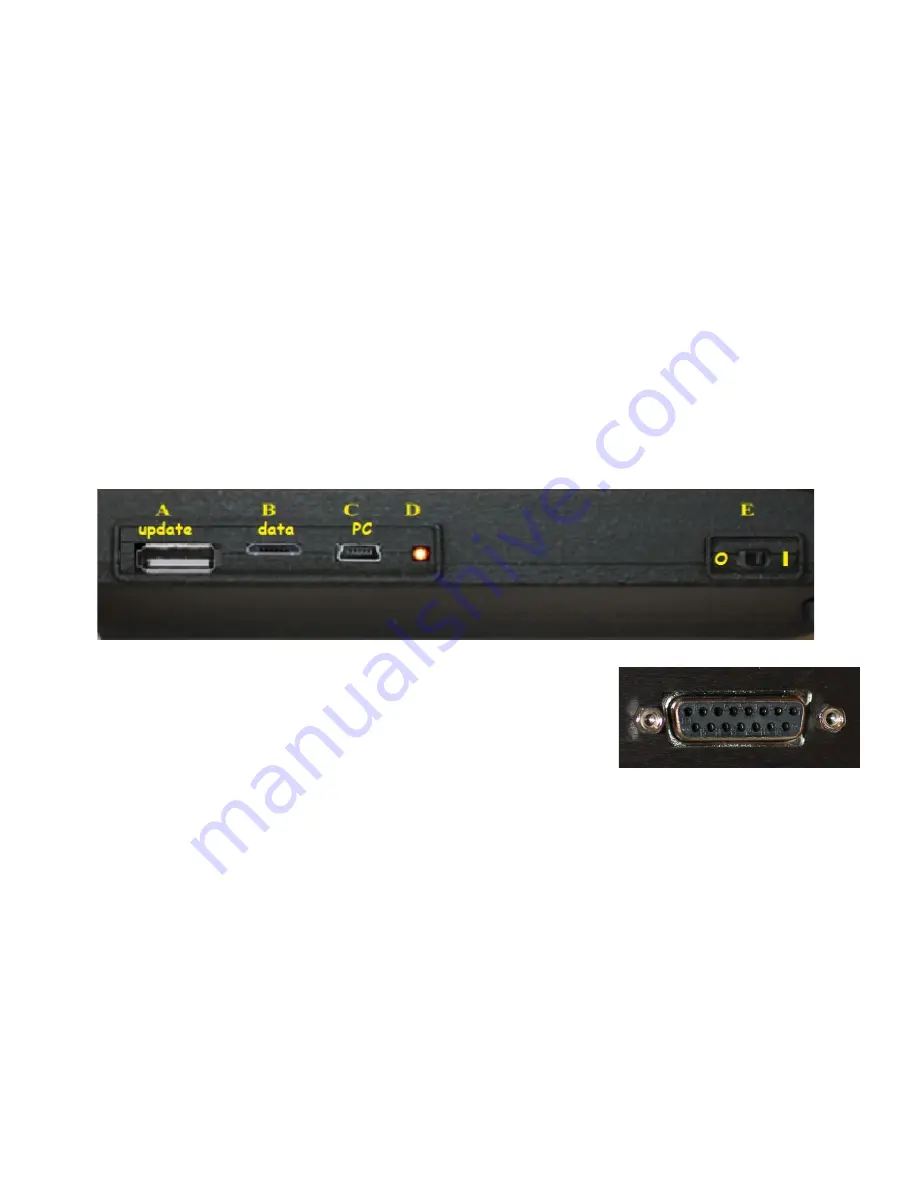
3C Side: 

The right side of the meter includes: 

A. USB A female port – 

For firmware and system updates (requires a USB stick)

.


B. Micro USB female port – 

For charging and extraction of saved data

.


C. Mini USB female port – 

For charging the battery & running external Datalight II 

software

.


D. Charging LED – 

Light when device is charging (off when not charging) 

E. On/Off – Fast Charge:

 Turns meter on for use. Turn off to conserve battery or for faster 

charging. 


3D. Top: 

 Contains the sensor mount, a 

15-Pin D-Sub connector 

and posts for securing the sensor to the device.  To connect the 

sensor, align the sensor’s male 15 pin connector to the meter’s 

female connector and apply slight pressure to insert.  To assure 

proper connection is maintained during testing, tighten screws on 

each side of sensor connector. 


3E. Quick Setting Guide: 

Your meter and sensor were purchased together along with optical 

calibrations, your device(s) will arrive with factory pre-programmed optical calibration factors.  

1. 

Plug in the sensor before turning on the UIT2400 to enable smart sensor 

functionality.  


2. Turn on the meter by pushing the On/Off button down into the (I) position.   

3. After a short start up menu the Home Screen will appear. 

4. Check the power monitor window in the upper right hand corner to assure batteries have 

enough charge to complete testing. (see Section 4 for charging instructions)  

5. Select your display style based on user preference (touch ICON to select) 

Meter: Larger numerical values and no graph 

Trend: Smaller control buttons with optional bar or line graph (see 15I for swap chart 

type)  

Tall: Portrait mode (USB ports and on/off switch on the right) 

Wide: Landscape mode (USB ports and on/off switch on the top) 

6. To change the display style, use the home button and touch the preferred display style 

Summary of Contents for UIT2400

Page 1: ...USHIO AMERICA INC 5440 Cerritos Avenue Cypress CA 90630 Tel 714 236 8600 Fax 714 229 3180 www ushio com UIT2400 Operation Manual Ushio America Inc...

Page 2: ...Wiring 7 6 USB Ports 7 7 Display 7 8 Current Measurement and Limitations 7 9 Sample Time and Limitations 8 10 5V Bias for silicon sensors 8 11 Home Screen 8 12 Display Style Selection 8 13 Display Co...

Page 3: ...ata retrieval C SED220 custom 222nm detector NIST traceable calibrated at 222nm D 8GB flash memory for measurement recordings E CC200 Case Protective carrying shipping case F Electrical Calibration Ce...

Page 4: ...charging 3D Top Contains the sensor mount a 15 Pin D Sub connector and posts for securing the sensor to the device To connect the sensor align the sensor s male 15 pin connector to the meter s female...

Page 5: ...and a scroll menu will appear select a new channel until you find the correct sensitivity factor as noted on your certificate If you do not locate your calibration factor and units from the certificat...

Page 6: ...ure readings see 3F2 above to learn more about assuring an accurate zero 3G7 Hold Freezes the numerical display value on screen 3G8 100 Takes a measurement and saves it as the 100 baseline for transmi...

Page 7: ...n the side of the UIT2400 device UPDATE Is used for code updates and requires the use of a memory stick not included DATA Accesses the internal 8GB memory device where data is saved and to charge the...

Page 8: ...test settings Note There are multiple factors that affect the sampling time including the sensors rise time the light level software selection software settings and the method used to store and transf...

Page 9: ...cases the level can be used as a go no go level indicating the risk of product failures when intensities are too low or too high YELLOW is typically used as a warning stage indicating the range has c...

Page 10: ...ver time When in integrate mode the units of the readings change to include seconds For example W cm2 becomes W cm2 seconds or J cm2 W m2 becomes J m2 14D Hold Freezes the value on the numerical displ...

Page 11: ...urrent 1uA 0 5sec is used else if current 1uA 1 0sec FAST samples at 20ms 50Hz Note Using trend at fast speeds taxes the CPU with processing both measurements numerical updates and graph updates This...

Page 12: ...Interval Ranges from 1 second to 1 hour or sample for faster speeds Sample when selected the record interval and sample time are synched Ie if sample time is set 1 the meter will record a value every...

Page 13: ...vice turns on 15M Use Scientific Notation ON OFF Scientific notation ON uses an exponent to show the decimal place when off a prefix is used Examples On 1 35 e 3 W cm2 Off 1 35 mW cm2 On 4 78e 6 W cm2...

Page 14: ...calibration certificate 2 09e 09 see red arrow on cal cert on page 14 15Q 5 Resulting Light Level Allows the user to enter a known value for the light level under test and create a calibration factor...

Page 15: ...ouble click on the Removable Disk within Devices with Removable Storage To open in excel you will need to select tab or space delimited 16D Deleting Stored Readings To delete files access the files th...

Page 16: ...elect Location box 9 To save reading s touch the capture button Readings will be saved to the Survey_data_file csv file accessible fie the usb micro port 20 Info Lists product and software settings in...

Page 17: ...f the meter Always store the meter in the carrying case when not in use and always ship in the hard plastic carrying case with protective packing to prevent shock and damage No items should be place a...

Page 18: ...America customer service and obtain an RMA customerservice ushio com 24 Warranty The equipment you have purchased from Ushio America Inc has been expertly designed and was carefully tested and inspect...

Reviews: