background image

18

2. Schritt: Installation der Software


Hinweis:

 U.S. Robotics empfiehlt Ihnen, den Wireless 

MAX

g Access Point über eine 

Ethernet-Verbindung zu konfigurieren. So können Sie die Änderungen an der 
Konfiguration ohne gleichzeitige Änderungen an den Einstellungen der Wireless Cards im 
Netzwerk vornehmen.

Hinweis:

 Hier handelt es sich um eine Installation unter Windows. Benutzer von anderen 

Betriebssystemen können im Abschnitt "Ich verwende ein anderes Betriebssystem als 
Windows und muss den Wireless 

MAX

g Access Point konfigurieren" auf Seite 6 

Informationen über die Installation unter dem jeweiligen Betriebssystem finden.

Legen Sie Ihre U.S. Robotics Installations-CD in das CD-ROM-Laufwerk eines Computers ein, 
der mit demselben Netzwerkgerät verbunden ist wie der Wireless 

MAX

g Access Point.

Hinweis:

 Wenn die CD-ROM nicht automatisch gestartet wird, klicken Sie unter Windows 

auf 

Start

Ausführen

, geben Sie 

D:\setup

 (bzw. den Buchstaben Ihres CD-ROM-Laufwerks) 

ein und klicken Sie auf 

OK

.

Nun erscheint die grafische Benutzeroberfläche der Installations-CD auf Ihrem Bildschirm. 
Wählen Sie nach der entsprechenden Aufforderung die gewünschte Sprache. Sie werden 
zum Lesen der Lizenzvereinbarung aufgefordert. Klicken Sie nach dem Lesen der 
Vereinbarung auf 

Yes 

(Ja).

Klicken Sie auf 

Setup

 (Konfiguration). Folgen Sie zum Starten des Erkennungs-

Dienstprogramms den Anweisungen auf dem Bildschirm.

3. Schritt: Konfiguration des Wireless 

MAX

g Access Points 

Klicken Sie bei Start des Erkennungs-Dienstprogramms auf 

Next

 (Weiter).

Wenn mehrere Netzwerkadapter an den Computer angeschlossen sind, auf dem Sie das 
Erkennungs-Dienstprogramm ausführen, müssen Sie den Adapter auswählen, der mit dem 
Netzwerk des Access Points verbunden ist. Klicken Sie auf 

Next

 (Weiter).

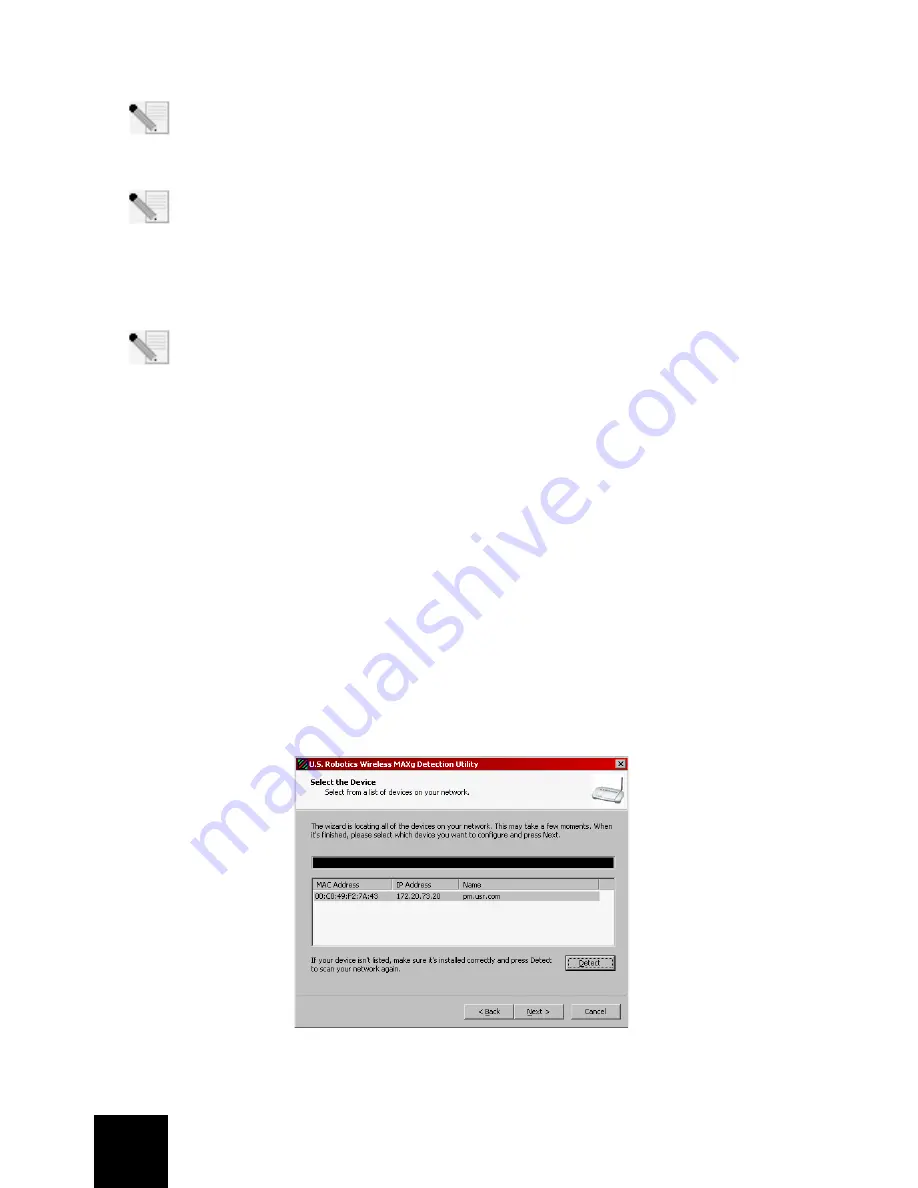
Nachdem die Geräte Ihres Netzwerks erkannt wurden, legen Sie über die LAN-MAC-
Adressen fest, welches Ihr Access Point ist. Die LAN-MAC-Adresse des Access Points finden 
Sie auf dem Etikett an der Geräteunterseite. Wenn Sie die LAN-MAC-Adresse Ihres Access 
Points nicht sehen, vergewissern Sie sich, dass er ordnungsgemäß angeschlossen ist, und 
klicken Sie auf 

Detect

 (Erkennen), um Ihr Netzwerk erneut zu durchsuchen. Wählen Sie die 

LAN-MAC-Adresse Ihres Access Points und klicken Sie auf 

Next

 (Weiter). 

Notieren Sie beim letzten Bildschirm des Erkennungs-Dienstprogramms die für Ihren 
Access Point angeführte IP-Adresse. Mit dieser können Sie später direkt auf die Web-
Benutzeroberfläche zugreifen. Klicken Sie zum Öffnen der Web-Benutzeroberfläche in 

Summary of Contents for USR5451

Page 1: ...Wireless MAXg Access Point Installation Guide Guide d installation Installationsanleitung Guida all installazione rapida Gu a breve de instalaci n Beknopte installatiegids R24 0573 00 Rev 1 0 12 05...

Page 2: ......

Page 3: ...Table of Contents English 1 Fran ais 9 Deutsch 17 Italiano 25 Espa ol 33 Nederlands 41...

Page 4: ......

Page 5: ...ireless MAXg Access Point Note Look at the label on the bottom of the Wireless MAXg Access Point and write down the LAN MAC address listed before you physically place the access point You will need th...

Page 6: ...screen If prompted select your preferred language You will be asked to read the license agreement Read the agreement and click Yes Click Setup Follow the on screen instructions to install and launch t...

Page 7: ...Robotics Installation CD ROM Note After you have completed the installation and configuration procedures U S Robot ics recommends that you create a backup file of your settings in case you ever exper...

Page 8: ...ireless MAXg Access Point Possible Solution Your Wireless MAXg Access Point may not be responding Try restoring the factory default set tings of the Wireless MAXg Access Point to reactivate it If you...

Page 9: ...entering the correct IP address of the access point Possible Solution If your Web User Interface stops responding unplug and then plug back in the power supply of the Wireless MAXg Access Point This...

Page 10: ...the Wireless MAXg Access Point is connected to the power jack on the Access Point and to a standard power outlet I am using an operating system other than Windows and need to configure the Wire less...

Page 11: ...sr com emailsupport ea 08 00 18 00 M F Finland 358 98 171 0015 http www usr com emailsupport ea 08 00 18 00 M F France 33 082 5070 693 http www usr com emailsupport fr 08 00 18 00 M F Germany 49 0180...

Page 12: ...8...

Page 13: ...ape 1 connexion du Wireless MAXg Access Point Remarque observez l tiquette plac e sous le Wireless MAXg Access Point et notez l adresse MAC pour le LAN avant de placer le point d acc s Vous pourrez ai...

Page 14: ...z invit lire l accord de licence Lisez le et cliquez sur Yes Oui Cliquez sur Setup Installation Suivez les instructions l cran pour installer et lancer l utilitaire de d tection Etape 3 configuration...

Page 15: ...ation il est recommand de cr er un fichier de sauvegarde de vos param tres Si vous rencontrez des difficult s par la suite vous pourrez ainsi restaurer vos param tres Proc dez de la fa on suivante 1 L...

Page 16: ...Access Point Solution possible Il est possible que votre Wireless MAXg Access Point ne r ponde pas R tablissez les param tres d usine par d faut du Wireless MAXg Access Point pour le r activer Si vous...

Page 17: ...int d acc s Solution possible Si l interface utilisateur Web ne r pond plus d branchez puis rebranchez l adaptateur secteur du Wireless MAXg Access Point Vous r initialiserez ainsi le Wireless MAXg Ac...

Page 18: ...imentation du Wireless MAXg Access Point est connect la prise d alimentation du point d acc s et une prise d alimentation standard J utilise un syst me d exploitation autre que Windows et je dois conf...

Page 19: ...support ea de 8 h 18 h du L au V Finlande 358 98 171 0015 http www usr com emailsupport ea de 8 h 18 h du L au V France 33 082 5070 693 http www usr com emailsupport fr de 8 h 18 h du L au V Allemagne...

Page 20: ...16...

Page 21: ...inweis Lesen Sie vor der Aufstellung des Ger ts das Etikett auf der Unterseite des Wireless MAXg Access Points und notieren Sie die angef hrte WLAN MAC Adresse Diese Angaben werden Sie sp ter ben tige...

Page 22: ...he Sie werden zum Lesen der Lizenzvereinbarung aufgefordert Klicken Sie nach dem Lesen der Vereinbarung auf Yes Ja Klicken Sie auf Setup Konfiguration Folgen Sie zum Starten des Erkennungs Dienstprogr...

Page 23: ...ation und Konfiguration sollten Sie eine Sicherungsdatei mit Ihren Konfigurationsdaten erstellen Falls nach technischen Problemen einmal ein Zur cksetzen des Ger ts erforderlich wird k nnen Sie dann w...

Page 24: ...ungsvorschlag Ihr Wireless MAXg Access Point reagiert m glicherweise nicht Stellen Sie zur Reaktivierung die werkseitigen Voreinstellungen des Wireless MAXg Access Points wieder her Wenn Sie die werks...

Page 25: ...der Adresszeile des Browsers die richtige IP Adresse eingegeben haben L sungsvorschlag Wenn die Web Benutzeroberfl che nicht mehr reagiert ziehen Sie das Netzkabel des Wireless MAXg Access Points und...

Page 26: ...cht mit Strom versorgt L sungsvorschlag Vergewissern Sie sich dass das Netzkabel des Wireless MAXg Access Points an die Netzbuchse des Access Points und an die Steckdose angeschlossen ist Ich verwende...

Page 27: ...015 http www usr com emailsupport ea 8 00 18 00 Uhr Ortszeit Mo Fr Frankreich 33 082 507 0693 http www usr com emailsupport fr 8 00 18 00 Uhr Mo Fr Deutschland 49 180 567 1548 http www usr com emailsu...

Page 28: ...24...

Page 29: ...essione di Wireless MAXg Access Point Nota prima di posizionarlo annotare l indirizzo MAC LAN indicato sull etichetta sotto Wireless MAXg Access Point Sar necessario per riferimenti futuri A Collegare...

Page 30: ...iesto di leggere il contratto di licenza Leggere tale contratto e fare clic su Yes S Fare clic su Setup Configurazione Seguire le istruzioni a schermo per installare e avviare l utilit di rilevamento...

Page 31: ...tics consiglia di creare un file di backup delle proprie impostazioni qualora si dovessero verificare dei problemi e si desiderasse ripristinare le impostazioni originali Attenersi alla procedura illu...

Page 32: ...o l alimentatore Soluzione possibile Wireless MAXg Access Point non risponde Provare a ripristinare le impostazioni predefinite del Wireless MAXg Access Point per riattivarlo Ripristinando le impostaz...

Page 33: ...funziona ma comunque possibile accedere a Internet Soluzione possibile Assicurarsi di inserire correttamente l indirizzo IP dell access point nel browser Web Soluzione possibile Se l interfaccia utent...

Page 34: ...entatore di Wireless MAXg Access Point sia collegato alla presa di alimentazione dell access point e a una presa di corrente standard Si desidera configurare Wireless MAXg Access Point utilizzando un...

Page 35: ...030 http www usr com emailsupport ea 8 00 18 00 lun ven Finlandia 358 98 171 0015 http www usr com emailsupport ea 8 00 18 00 lun ven Francia 33 082 507 0693 http www usr com emailsupport fr 8 00 18 0...

Page 36: ...32...

Page 37: ...uada en la parte inferior del Wireless MAXg Access Point encontrar la direcci n MAC de la LAN An tela antes de iniciar la instalaci n del punto de acceso puesto que la necesitar m s adelante A Conecte...

Page 38: ...oma elija el que prefiera Se le pedir adem s que lea el contrato de licencia L alo y haga clic en Yes S Haga clic en Setup Configuraci n y siga las instrucciones que ir n apareciendo en pantalla para...

Page 39: ...lemas de esta gu a o la Gu a del usuario del CD de instalaci n de U S Robotics Nota Una vez terminados los procesos de instalaci n y configuraci n U S Robotics recomienda crear una copia de seguridad...

Page 40: ...i n y vuelva a conectarlo para reiniciar el Wireless MAXg Access Point Soluci n posible Puede que el Wireless MAXg Access Point no responda Restaure la configuraci n de f brica pero recuerde que si lo...

Page 41: ...eso en el navegador Soluci n posible ISi la interfaz Web del usuario deja de responder desconecte y vuelva a conectar la toma de corriente del Wireless MAXg Access Point para reiniciarlo Soluci n posi...

Page 42: ...s Point y a la toma de corriente No utilizo Windows como sistema operativo y necesito configurar el Wireless MAXg Access Point Soluci n posible El m todo de instalaci n del Wireless MAXg ccess Point e...

Page 43: ...a 33 082 5070 693 http www usr com emailsupport fr De 8 00 a 18 00 de lunes a viernes Alemania 49 0180 567 1548 http www usr com emailsupport de De 8 00 a 18 00 de lunes a viernes Hungr a 49 0180 567...

Page 44: ...40...

Page 45: ...Access Point aansluiten Opmerking kijk op het etiket aan de onderzijde van het Wireless MAXg Access Point en schrijf het LAN MAC adres dat hier wordt weergegeven op voordat u het Access Point plaatst...

Page 46: ...evraagd de licentieovereenkomst te lezen Doe dat en klik op Yes Ja Klik op Setup Instellen Volg de aanwijzingen op het scherm om het detectieprogramma te installeren en te starten Stap drie het Wirele...

Page 47: ...U S Robotics beveelt u aan om een back upbestand te maken van uw instellingen nadat u de installatie en configuratie hebt voltooid voor het geval dat u problemen ondervindt en uw instellingen wilt he...

Page 48: ...Mogelijke oplossing Wellicht reageert uw Wireless MAXg Access Point niet Probeer de fabrieksinstellingen van het Wireless MAXg Access Point te herstellen om het opnieuw te activeren Indien u de fabrie...

Page 49: ...oerd in uw webbrowser Mogelijke oplossing Als uw webinterface niet meer reageert koppelt u de voedingsadapter los en sluit u deze opnieuw aan op het Wireless MAXg Access Point Het Wireless MAXg Access...

Page 50: ...of de stroomtoevoer van het Wireless MAXg Access Point aangesloten is op de stroomaansluiting van het Access Point en op een gewoon stopcontact Ik gebruik een ander besturingssysteem dan Windows en w...

Page 51: ...ttp www usr com emailsupport ea 8 00 18 00 uur maandag t m vrijdag Frankrijk 33 082 507 0693 http www usr com emailsupport fr 8 00 18 00 uur maandag t m vrijdag Duitsland 49 0180 567 1548 http www usr...

Page 52: ...48...

Page 53: ......

Page 54: ......

Page 55: ......

Page 56: ...Printed in XXXXXXXX...

Reviews: