background image

APARTMENT DOOR PHONE STATIONS

sec.5a 

−−−− 

3

DIGIVOICE - Technical Manual

Call/panic alarm call from apartment station 1000 queued :

23/05/2000 08:10:00

1000 —> SWBD     [STORE]

Call/panic alarm call from apartment station 1000 deleted from queue

using dedicated key:

23/05/2000 08:10:00

1000 —> SWBD     [CANC]

Call/panic alarm call from apartment station 1000 automatically deleted 

from queue:

23/05/2000 08:10:00

1000 —> SWBD     [DEL]

MANAGEMENT  FROM  PC  USING  ‘PCvOICE’ 

SOFTWARE

The switchboard station can be managed from a PC. To do so, a PC 

must be available and the switchboard station must be configured for 

this function (see the section headed ‘Installation’).

When  the  switchboard  station  is  managed  via  PC,  the  computer’s 

keyboard is used instead of the switchboard station keypad and visual 

information  is  shown  in  the  PCVOICE  window  rather  than  on  the 

switchboard display.

The PCVOICE window can be minimized to an icon. When a call is 

received from an entrance panel or apartment station, the window will 

automatically be maximized.

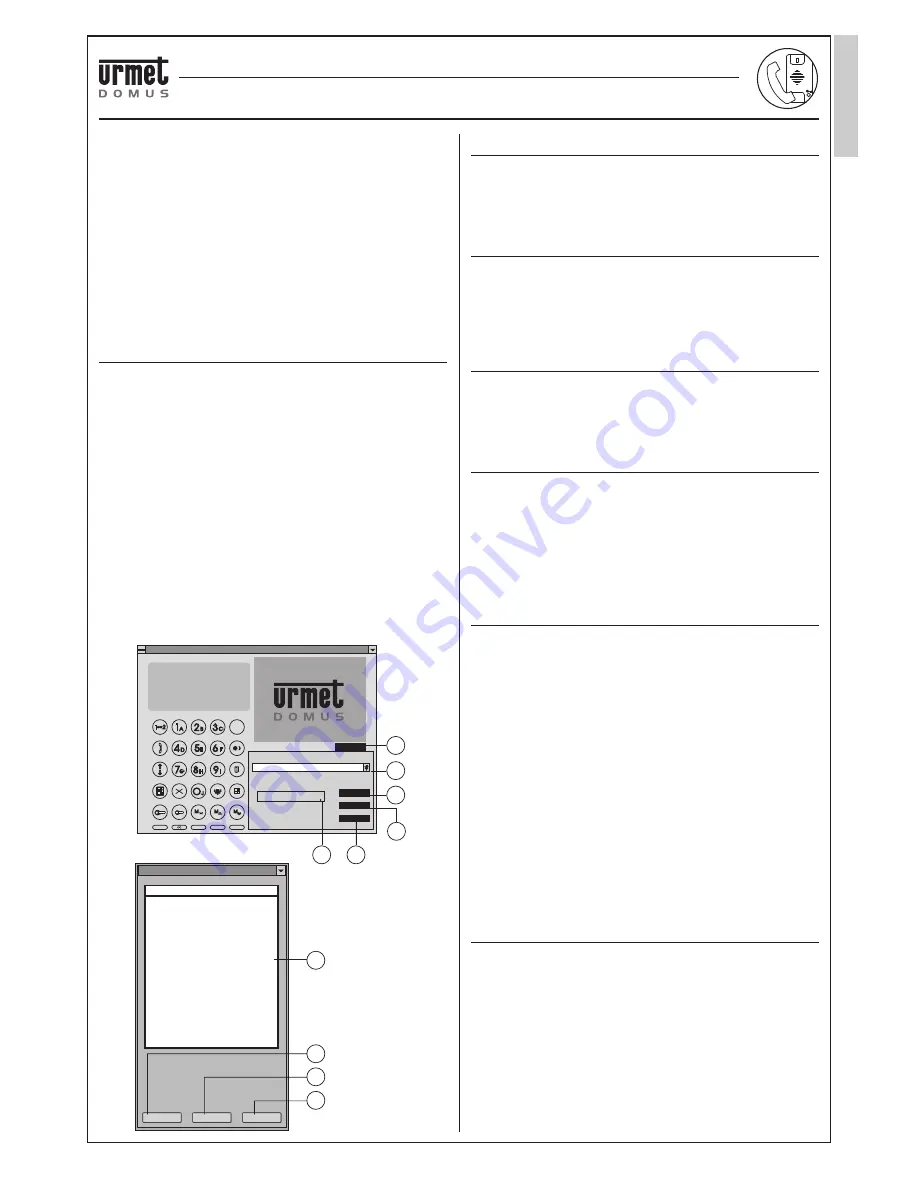
The  PCVOICE  main  screen  represents  a  keypad  as  used  on  the 

DIGIVOICE switchboard station. In addition, the screen features the 

Urmet Domus logo and a configuration button (38). The main screen 

is used to manage a directory consisting of:

List of user names and the associated doorphone codes (39).

Add New User button (40).

Remove User button (41).

Edit User button (42).

Call User button (43).

Calling a user listed in the directory

Using the mouse, select the desired user in list (39) and click on button 

(43).

The switchboard station will dial the associated code automatically and 

call the user.

Adding a user to the directory

Click on button (40): a 32-character field will appear for entering the 

user name, together with a 4-character field for entering the user code, 

an OK button and a Cancel button. After typing in name and code, click 

on the OK button to confirm, or on the Cancel button to exit from the 

procedure without making changes.

Removing a user from the directory

Using the mouse, select the desired user in list (39) and click on button 

(41): an OK button and a Cancel button will appear. Click on the OK 

button to confirm removal, or on the Cancel button to exit from the 

procedure without making changes.

Editing a user listing in the directory

Using  the  mouse,  select  the  desired  user  in  list  (39)  and  click  on 

button  (42):  a  32-character  field  containing  the  selected  name  will 

appear together with a 4-character field containing the user code, an 

OK button and a Cancel button. Change the user name and/or code 

as desired and click on the OK button to confirm changes, or on the 

Cancel button to exit from the procedure without making changes.

Note

the directory can contain a maximum of 1000 names.

‘Printer’ window

A ‘Printer’ icon appears when the PCVOICE is started. This icon is 

associated with a window showing a list of all messages which the 

switchboard station sends to the printer (if configured). This window 

contains:

List of print messages (44)

Save List To Disc button (45)

Print List button (46)

Delete List button (47).

Pressing  button  (46)  will  send  the  entire  contents  of  the  list  to  the 

printer connected to the PC.

Pressing button (45) will save the entire contents of the list in a text 

file, and the list will automatically be cleared. The file will be assigned 

a name in format ‘yymmdd.txt’, where yy, mm and dd are the year, 

month and day on which the list was saved. Typically, this operation 

should be carried out at the end of each day.

Note

:  

the printer message list can contain a maximum of 1000 lines, 

Once this limit is reached, the list will automatically be saved to 

disc and cleared.

PCVOICE software configuration

Double  click  on  the  Urmet  Domus  logo  to  open  the  software 

configuration window.

A window will appear containing the language options for the PCVOICE 

software user interface and the options for the serial port to be used. 

Option selections can be changed and confirmed by clicking on the 

associated buttons.

GUARD DOOR SWITCHBOARD STATION Ref. 038/40

SPECIAL FUNCTIONS

SHIFT

F14

F2 5

F36

J

O

A

1 2

1

B

2

C

3

D

4

E

5

F

6

G

7

H

8

I

9

ON

OFF

M

M

M

Chiama nome

Aggiungi

Cancella

Modifica

PCVOICE v1.0

Setup

38

39

40

41

42

43

Salva

Stampa

Pulisci

Stampante

44

45

46

47

GUARD DOOR SWITCHBOARD STATION

Ref. 

038/40

Summary of Contents for 1038/40

Page 1: ...eedback monitoring 11 SPECIAL FUNCTIONS 11 Date time adjustment 11 Keypad lock activation deactivation 11 Call rerouting 12 Other display messages 12 Using a printer 12 Management from PC using pcvoic...

Page 2: ...apted for tabletop or wall mounting see the section covering installation COMPONENTS 1 Switchboard station body 2 Graphic display 3 Multi function keypad 4 Ringer volume control 5 Handset 6 Handset cr...

Page 3: ...ode of the apartment station called by the switchboard station Zone f 1 character This zone shows a symbol indicating the type of voice connection This symbol may be when main entrance panel eee has c...

Page 4: ...rd station can call any apartment station The switchboard station will normally receive calls from the apartment stations only if they belong to its assigned zone If desired the switchboard attendant...

Page 5: ...e mode A B or C Mode A Call interception enabled In this mode the switchboard station provides concierge service intercepting calls from main entrance panels to apartment stations Calls belong to the...

Page 6: ...Case 2 System with several switchboard stations in parallel Where there are two or more switchboard stations operating in parallel i e when the same zone is assigned to all switchboard stations the s...

Page 7: ...o apartment stations To call an apartment station the switchboard attendant must pick up the handset dial the apartment station code using the numeric keys 37 and press the call button If incorrect co...

Page 8: ...rom apartment station 1634 If the handset is picked up within 10 seconds the device will be ready for communication between the switchboard station and the apartment station and the display will show...

Page 9: ...on hold and switch the voice line to the main entrance panel by pressing key put the main entrance panel on hold and switch the voice line to the apartment station by pressing key or reestablish direc...

Page 10: ...panel 2 by pressing key 1 2 The display will show DOOR LOCK RELEASE FUNCTIONS The switchboard station can release locks at any door associated with a main or secondary entrance panel at any time This...

Page 11: ...MESSAGES SELF ACTIVATION FUNCTION The switchboard station can activate the main entrance modules by means of the self activation function In other words the switchboard attendant can establish video a...

Page 12: ...with a date time stamp Configuration report This report is printed at the end of switchboard station configuration and indicates all settings established for the station Door lock release messages Pri...

Page 13: ...ist 39 and click on button 41 an OK button and a Cancel button will appear Click on the OK button to confirm removal or on the Cancel button to exit from the procedure without making changes Editing a...

Page 14: ...supplied together with the unit inserting them through holes 8 PC VERSION INSTALLATION The switchboard station can be controlled from a PC In this case the PC s keyboard and mouse are used instead of...

Page 15: ...ay STEP 0 LANGUAGE The following menu will appear on the switchboard station display The following languages can also be programmed Press the number key associated with the desired language STEP 1 SWI...

Page 16: ...istobeconfiguredtohandletwo simultaneous calls select 2 For this purpose however the switchboard station and the main entrance panels must be physically connected by two separate voice lines STEP 5 CO...

Page 17: ...hange the function associated with key F1 simply select the desired number using the appropriate number key as indicated below and press the call button Select 0 to specify that no function is assigne...

Page 18: ...DE TO THE FUNCTIONS KEY Proceed as for step 12A STEP 18 PROGRAMMING THE ACCESS PASSWORD The display will show To change the password simply enter up to six numbers as desired and press the call button...

Page 19: ...rtment stations Ability to receive calls from other apartment stations can be disabled Disabled status is indicated by a LED Up to 10 unanswered calls from apartment stations can be stored in memory A...

Page 20: ...s in sequence Activate the configuration cycle noting the following points After selecting each parameter press the CALL button 4 to confirm selection The system will check all entered data rejecting...

Page 21: ...it is necessary to open the door RECEIVING AND STORING CALLS FROM OTHER APARTMENT STATIONS The special doorphone can receive calls from other apartment stations in the system and store unanswered call...

Page 22: ...d deactivate the feature simply press the SHIFT and MUTE keys 5 10 When the feature is active LED 11 flashes green Obviously the feature can be activated together with the MUTE function or separately...

Page 23: ...nd CV TERMINAL BLOCK FOR ADDITIONAL DOOR PHONE CONNECTION M3 FB Voice terminal B FA Voice terminal A CA Ringer and service terminal 0V Ground terminal reference for CA SPECIFICATIONS Consumption in lo...

Page 24: ...y a second courtesy tone will be emitted after 10 seconds CALLS FROM LANDING VIDEO MODULE Doorphone with single port decoder is designed to control video module Ref 1732 1 with associated wall bracket...

Page 25: ...e The programming cycle ends when the last code is received and the LED will go off Programming conditions and the corresponding LED states are shown in the table below If it is not necessary to progr...

Page 26: ...lease key Conversation privacy and provision for door lock release protected by privacy feature No door phone programming required during installation Two buttons for switchboard calls and auxiliary s...

Page 27: ...aker for ringing tone Electret condenser microphone Door lock release key Conversation privacy and provision for door lock release protected by privacy feature No door phone programming required durin...

Page 28: ...nel activation upon making a call to switchboard with optional additional circuit Ref 1138 55 Dimensions W x H x P 90 x 220 x 42mm TERMINAL DESIGNATIONS 0V Logic power supply negative input CA Ringer...

Page 29: ...g cables through hole 11 5 Reassemble switchboard station and supply it with power Note the telephone interface or PABX connecting cables must be less than 3 meters long TERMINAL DESIGNATIONS The conn...

Page 30: ...30 sec 5a DIGIVOICE Technical Manual...

Reviews: