background image

FUDIO DIGITAL DVR 


12 

Option 8:   

Set Top Box

 /

DVD 

/

VCR

 Component (Y Pb Pr) out to DVR Component(Y Cb Cr)     

                    in then from DVR component ( Y Pb Pr) Out to TV component in jack 


Summary of Contents for NV-812

Page 1: ...10 U U U URAKU RAKU RAKU RAKU DVR NV DVR NV DVR NV DVR NV 812 812 812 812 User User User User s Guide s Guide s Guide s Guide http http http http www fudio www fudio www fudio www fudio digital com digital com digital com digital com ...

Page 2: ...14 6 Remote Control 16 6 1 Remote Control Panel Introduction 16 6 2 Remote Control Explanation 17 7 System Menu 20 7 1 Getting Started 20 7 2 Record 20 7 3 Browser 23 7 4 Utility 25 7 5 Setup 26 8 Main Functions Description 36 8 1 Time Shift 36 8 2 Folder Visiting 39 8 3 Video File Edit Operation 41 8 4 One Key Backup 47 8 5 Copy File and Folder 46 8 6 File Playing Mode 48 8 7 Removable HDD 50 9 C...

Page 3: ...rding file save as MPEG 2 vob or MPEG 4 avi format Multi Recording Quality VOB HQ SP LP EP SLP SEP 720X576 720X480 AVI HQ SP LP EP SLP SEP 720X576 720X480 Time Shift Pause you live TV program and also allow playback your recording program from start while in the mpeg2 recording mode Video file supported AVI Dvix Xvid VOB DVD DAT VCD MPG Mpeg 1 2 Up to 720x576i Music file supported MP3 and WMA Phot...

Page 4: ...d dust humidity and temperature extremes Do not place the product in the wet or high temperature area Do not drop the DVR from heights Doing so may cause damage to the hard drive To avoid malfunction place the product on a stable and plat surface To avoid the damage of surface do not use any cleanser or the ethyl alcohol This user guide is only used for installation Please use the physical set as ...

Page 5: ...own Move Down Next chapter Channel Down 4 OK OK Stop Source Switch 5 Right Move Right Fast Forward Volume Up 6 Backup Backup USB Data to Hard Disk 7 Menu Menu Open and Returned 8 HDD_LED HDD Indicator LED Light 9 USB_LED USB Indicator LED Light 10 IR IR window 11 USB Slave Hard Disk Data Copy Connector 12 USB Host Ext Hard Disc or Thumb Drive Connector Recording Playback 13 Power Power On Off 1 DI...

Page 6: ...Rear Panel Layout DC In AV Input AV Output VGA Output TV Input TV Output connector are show in below panel 4 4 Installation Guide Option 1 RF Cable out from antenna to DVR TV In then from DVR AV CVBS out to TV AV CVBS in jack ...

Page 7: ...FUDIO DIGITAL DVR 6 Option 2 RF Cable out from antenna to DVR TV In then from DVR Y Pb Pr Component out to TV Component in jack ...

Page 8: ...FUDIO DIGITAL DVR 7 Option 3 RF Cable Out from Antenna to DVR TV In then from DVR VGA out to PC Monitor and DVR Audio out L R to Speaker Audio L R input Jack ...

Page 9: ...FUDIO DIGITAL DVR 8 Option 4 Set Top Box DVD VCR AV CVBS Out to DVR AV CVBS in then from DVR AV CVBS Out to TV AV in jack ...

Page 10: ...FUDIO DIGITAL DVR 9 Option 5 Set Top Box DVD VCR AV CVBS out to DVR AV CVBS in then from DVR Component Y Pb Pr Out to TV component in jack ...

Page 11: ...FUDIO DIGITAL DVR 10 Option 6 Set Top Box DVD VCR AV CVBS out to DVR AV CVBS in then from DVR VGA out to PC Monitor VGA in D Sub and DVR Audio out L R to Speaker Audio L R input Jack ...

Page 12: ...FUDIO DIGITAL DVR 11 Option 7 Set Top Box DVD VCR Component Y Pb Pr out to DVR Component In Y Cb Cr then from DVR AV CVBS Out to TV AV in jack ...

Page 13: ...FUDIO DIGITAL DVR 12 Option 8 Set Top Box DVD VCR Component Y Pb Pr out to DVR Component Y Cb Cr in then from DVR component Y Pb Pr Out to TV component in jack ...

Page 14: ...FUDIO DIGITAL DVR 13 Option 9 Set Top Box DVD VCR Component Y Pb Pr out to DVR Component Y Cb Cr in then from DVR VGA out to PC Monitor VGA in D Sub ...

Page 15: ...ake sure HDD is still working Step2 Install your HDD into your DVR Step3 Then connect your DVR to PC using the USB Slave connector to PC USB port Step4 If your HDD is still working PC will auto detect it as an external storage device Mouse Point to Computer and right key to select Manage to enter to Computer Management Select Disk Management Select DVR HDD volume on the screen and right click on y...

Page 16: ...up 32GB in one partition But For Mac book is can be formatted your portable hard disk 32GB to FAT32 format or you also can visit below website to download the software to format your USB hard disk drive to FAT32 format in one partition http tokiwa qee jp EN Fat32Formatter Important Notes 1 Time Shift function is not supported if Internal HDD is not installed 2 Mpeg2 video recording file is not all...

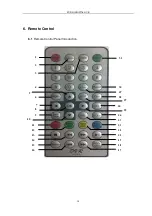
Page 17: ...FUDIO DIGITAL DVR 16 6 Remote Control 6 1 Remote Control Panel Introduction 1 2 3 4 6 7 8 9 11 12 13 14 15 16 31 30 28 26 24 23 22 21 20 19 18 17 5 10 25 27 29 ...

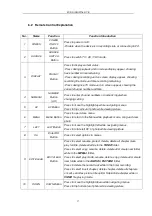
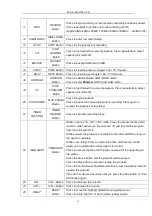
Page 18: ... while viewing picture 6 MENU MENU Button Press to open close menu Press to return to the Menu while playback movie song and view photo 7 LEFT LEFT Button Press to move the highlight left while navigating menus Press to rotate left 90 of photo while viewing picture 8 OK Enter OK Button Press to select options in menus 9 EDIT CLEAR EDIT CLEAR Button Press to select rename protect delete delete all ...

Page 19: ...current playback or recording Press again to resume the playback or recording 21 TIMER RECORD TIMER RECORD Button Press to set timer recording tasks 22 TIME SHIFT TIME SHIFT Button While in the live TV AV1 YUV mode Press to activate the time shift function which allows you to pause live TV and resume the program from the point you left it While paused the program is recorded to the internal HDD as...

Page 20: ...T Button Press to return the last stage menu 28 CH CH Button Press to TV channel up 29 CHANNEL DIGIT Button Press to set input channel or Playback file digit 30 RECALL RECALL Button Press to recall 31 MUTE MUTE Button Press to mute the audio output and press again to resume ...

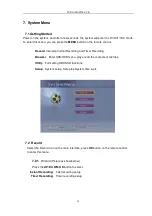
Page 21: ...ecording and Timer Recording Browser Enter USB HDD menu play or edit the contents of the files Utility Formatting HDD USB functions Setup System setup Setup the System time etc 7 2 Record Select the Record icon on the main interface press OK button on the remote control to enter this menu 7 2 1 Wizard Picture as show below Press the UP DOWN OK button to select Instant Recording Fast recording setu...

Page 22: ... recording Source Select Video Input Source TV AV1 YUV Target Select Record Target HDD or USB Quality Select Recording Quality HQ SP LP EP SLP SEP Mode Select Recording Mode VR or Mpeg4 Time Select Recording Time 30mins 60mins 360mins Note If no HDD installed not available for VR mode recording select VR recording mode file format saved as VOB Mpeg2 DVD movie quality MPEG4 recording mode file form...

Page 23: ...on Fri Sat Sun Start Select Start time of Timer Recording End Select End Time of Timer Recording Quality Select Recording file format VR MP4 Quality of recording file HQ SP LP EP SLP SEP and Target of recording file storage HDD USB Press the OK button on the remote control to add a new Timer Recording schedule Press LEFT RIGHT button to move to the source date start time end time and quality and P...

Page 24: ...n to select the Video Mpeg4 Audio Picture Backup title Video For viewing your recording file target saved as HDD VR mode Mpeg4 For viewing your recording file target saved as HDD MP4 mode and playback your movie files such VOB AVI MPG DAT Audio For playing your MP3 WMA music file Picture For viewing your JPG BMP GIF picture file Backup For backup your external device data to DVR internal HDD Note ...

Page 25: ...Audio For playing your MP3 WMA music file Picture For viewing your JPG BMP GIF picture file HDD USB button on the remote control can be used to access the menu or switch between USB and HDD mode Can switch among Video Movie Music Picture Backup through remote control Left and Right button Note Too much files or folders will affect the HDD operation speed delete the unused file or folder to enhance...

Page 26: ...in interface press OK button on the remote control to get the menu as show below Note The main function of Utility is formatting your HDD or USB device Select the USB icon on the Utility interface press OK button on the remote control to get the picture as show below ...

Page 27: ...mportant Note After select the FORMAT and press the OK button will erase all the data on the device 7 5 Setup Select the Setup icon on the main interface press OK button on the remote control to enter this menu as show below ...

Page 28: ... PAL NTSC Sys Language Setup System Language English Chinese Time Format Setup Time Format M_D_Y AM PM or M_D_Y 24H Format Set Date Setup System Date Set Time Setup System Time Reset Setting Reset System to Default Setting 7 5 2 A V Set Select the A V Set you will able to see the picture show as below Press the RIGHT button to set the Video Output TV Type Brightness Contrast Hue and Saturation ...

Page 29: ...der output using the Video only Composite P SCAN Select P Scan when recorder output using the YPbPr Component 720x576p and Video Composite PC VGA Select PC VGA when recorder output using the VGA connector 720x576i and Video Composite Notes 1 Don t connect the Component Out VGA cable to the device at the same time 2 If Select PC VGA as output YCbCr was not signal 3 If select YCbCr as Video Output V...

Page 30: ... Display a wide picture with two black borders on the top and bottom of 4 3 screen Select when a standard 4 3 TV TV is connected 16 9 Compress the image to convert the whole image Select when a 16 9 TV is connected Note System Default Setting PS 4 3 7 5 2 3 Brightness Press the OK button to enter and set brightness levels Press the UP DOWN button on the remote control to adjust the brightness The ...

Page 31: ...P DOWN button on the remote control to adjust the Hue The new setting is previewed on TV screen Press the OK button to confirm 7 5 2 6 Saturation Press the OK button to enter and set Saturation levels Press the UP DOWN button on the remote control to adjust the Saturation The new setting is previewed on TV screen Press the OK button to confirm 7 5 3 Recording Select the Recording you will able to ...

Page 32: ...e below picture Press the UP DOWN button to select from HQ SP LP EP SLP SEP Press the OK button to confirm 7 5 3 2 MPEG4 Quality Select to the MPEG4 Quality you will able to see the below picture Press the UP DOWN button to select from HQ SP LP EP SLP SEP Then Press the OK button to confirm ...

Page 33: ...e the below picture Press the UP DOWN button to select from 5min 10min 20min 30min OFF Then Press the OK button to confirm 7 5 4 TV Tuner Select the TV Tuner you will able to see the picture show as below Press the RIGHT button to set the TV Signal Auto Tuning Channel Set and Manual Tuning ...

Page 34: ...or cable Then Press the OK button to confirm 7 5 4 2 Auto Tuning Select to the Auto Tuning you will able to see the below picture Press the UP DOWN button to select TV System and Audio Format Press LEFT RIGHT to set the TV System PAL NTSC NM SECAM L SECAM L and Audio format BG DK I Then select to Go Icon Press the OK button to start Auto Tuning ...

Page 35: ...5 4 3 Channel Set Select to the Channel Set you will able to see the below picture In this menu you can edit the Channel Name Active Fine Tune Audio Format Manual Tune and sequences for the TV Channels Press the navigational buttons to select and modify the settings and press EXIT button to return and confirm ...

Page 36: ...to see the below picture In Manual Tuning mode you can use the LEFT RIGHT buttons to search the Frequency When search the TV program press the OK buttons to save it after that change the channel number and continues to search the other TV Program until captured and save all the programs ...

Page 37: ...his function to pause the program when you are attending to something else during watching TV program You can rewind or fast forward it to a particular portion of the TV program after have finished attending to something else Operation Procedure in Non Recording Mode 1 When watching TV program Press TIME SHIFT button a progress bar prompted and caused the program to be pause See picture as below ...

Page 38: ... 37 2 Press PLAY PAUSED button to play the program Press FORWARD button to fast forward to the present TV program contents or press BACKWARD button to rewind to the beginning of the program when you start time shifting ...

Page 39: ...nction Operation Procedure in Recording Mode 1 When in timer recording mode Recording format is set to VR mode Press TIME SHIFT button to playback your program from start point while in recording You also can press the FF button on the remote control to fast forward the ...

Page 40: ...installed 2 System will not enter into Time Shift mode when recording format is not being set to VR video format 3 During recording System will enter into Time Shift mode after 10 seconds of recording 4 In non recording condition Press Time Shift button to enter time shift mode immediately 8 2 Folder Visiting Function introduction Folder management method was introduced to properly managed files a...

Page 41: ...e address bar and press enter into document Press OK Button to get the menu Examples enter into VIIDEO document Folder show as below 2 Use direction keys to select folder and press OK Button to access Example enter to 019 024 Folder 3 Example enters into MPEG4 AUDIO PITURE Folder Press the Up Down Left Right Button on the remote control to select the address bar ...

Page 42: ...t the folder in the address bar See picture show as below Note For USB MPEG4 record file format saved under the RECORED folder 8 3 Video File Edit Operation Select a Video file and then press EDIT CLEAR button on remote control to enter the edit ...

Page 43: ...N LEFT RIGHT button on the remote control to scroll and select and highlighted the particular file Press the EDIT button on remote control on that particular highlighted file to select a list of option for editing the file See Picture show as below a Rename b Protect c Delete d Delete All Chapter Mark e Play Full Title f Delete All 8 3 1 1 Rename 1 Press the UP DOWN button on the remote control to...

Page 44: ...s OK button on the remote to confirm The new program name will be displayed on top right corner of this program list 8 3 1 2 Protect Unprotect of Program a Protect Program The function of the Protect is to prevent user from accidentally delete away the recorded program You also can able to delete the protected program by unprotect it 1 Press UP DOWN button on the remote control to choose Protect i...

Page 45: ... recovery once it is deleted Press UP DOWN button on the remote control to choose Delete in program edit menu Press OK button to delete the program Note Protected program unable to delete 8 3 1 4 Delete All Chapters Marks This function is for deleting the program chapter mark in one time Press UP DOWN button on the remote control to Delete All Chapters Marks in program edit menu Press OK button to...

Page 46: ...pter b Delete Chapter Mark c Delete All chapter Mark d CM Cut e Set Index Picture f Hide Unhide Picture g Title Split 8 3 2 1 Insert Chapter The purpose of insert chapter mark is allowing user to book mark the content Chapter mark can be inserted at any position of program during playing Chapter mark can help to search the desired program faster and easier 1 Move the cursor to Insert Chapter 2 Pre...

Page 47: ... EDIT CLEAR button to appear the function 3 Move the cursor to CM cut 4 Selects Set A and press OK button to confirm as a start point 5 Then Press the Exit Button to exit the function 6 Continue playing your video until the part you want to cut 7 Then Pause again to your program Press the EDIT CLEAR button to appear the Function again 8 Move the cursor to CM cut 9 Selects Set B and press OK button...

Page 48: ...e Split is split the file into two file 1 Move the cursor to Title Split 2 Press OK button to confirm the title splits into two separate titles based on this time point 8 4 One Key Backup Function Introduction Backup all contents from USB to HDD through a button Operation steps In TV AV1 YUV mode press Backup button to prompt Backup USB Device Data menu Press OK button to start copy the file from ...

Page 49: ...s are same function as Video folder Copy Operation 1 Select to the file that you want to transfer to USB device 2 Press the EDIT CLEAR button to appear the copy function 3 Use UP DOWN button to select the Copy 4 Press OK button to confirm A menu was prompt as shown below ...

Page 50: ... After selected the folder save to Select to Next and press OK button to copy which will be closed once copy completed 8 6 File Playing Mode AUDIO PICTURE only Select to AUDIO or Picture folder Press DOWN button to select the audio file Press the EDIT CLEAR button to appear below picture ...

Page 51: ...ITAL DVR 50 Press DOWN button to select Play Mode See picture show as below SEQ Play means file playing from top to bottom File Rep means repeat playing on same file Dir Rep means repeat playing on folder files ...

Page 52: ...s below DIVX Folder All MPEG4 AVI recording file save into this folder All the video contents file such vob mpg dat avi you can copy into this folder for playback AUDIO Folder Copy your mp3 WMA music file into this folder for playing PICTURE Folder Copy your Photo file such jpeg bmp and gif into this folder for viewing Backup Folder All the USB backup files will save into this folder T000xx Folder...

Page 53: ...e battery on PCB 5 Remote control malfunction Reasons 1 Battery of remote control flat 2 System is under recording Actions 1 Change a new battery 2 Stop recording 6 HDD can t detect Reasons 1 HDD faulty 2 HDD power cable connection not properly Actions 1 Ensure that HDD is not faulty 2 Ensure HDD connection properly 7 TV program No Sound Reason Wrong sound mode setting during auto tuning Action En...

Page 54: ...ow website to download the software to format your hard disk drive to FAT32 format in partition http tokiwa qee jp EN Fat32Formatter Q5 Why my DVR VGA out connected to my PC monitor no signal A5 You have to set the video output to PC VGA first before connect to PC monitor Because video output default setting was Ycbcr Please refer to Setup AV Set Video Output to change the setting Q6 Do we need to...

Page 55: ...upported Supported Built in HDD USB Storage Device Recording Supported Recording Supported Recording Supported Recording Supported Analog TV Tuner TV Instant Timer Recording Composite In AV1 Instant Timer Recording Component In YUV Instant Timer Recording Recording Video Recording Video Recording Video Recording Video Format Format Format Format MPEG 2_VOB DVD Format Multi Recording Mode HQ SP LP ...

Page 56: ...ideo Formats Video Formats Video Formats Supported Supported Supported Supported AVI MPG MPEG DAT VOB Music Formats Music Formats Music Formats Music Formats Suppor Suppor Suppor Supported ted ted ted MP3 WMA Picture Formats Picture Formats Picture Formats Picture Formats Supported Supported Supported Supported JPEG BMP GIF Video Codes Video Codes Video Codes Video Codes Supported Supported Suppor...

Reviews: