background image

Message Log (MSG) Function

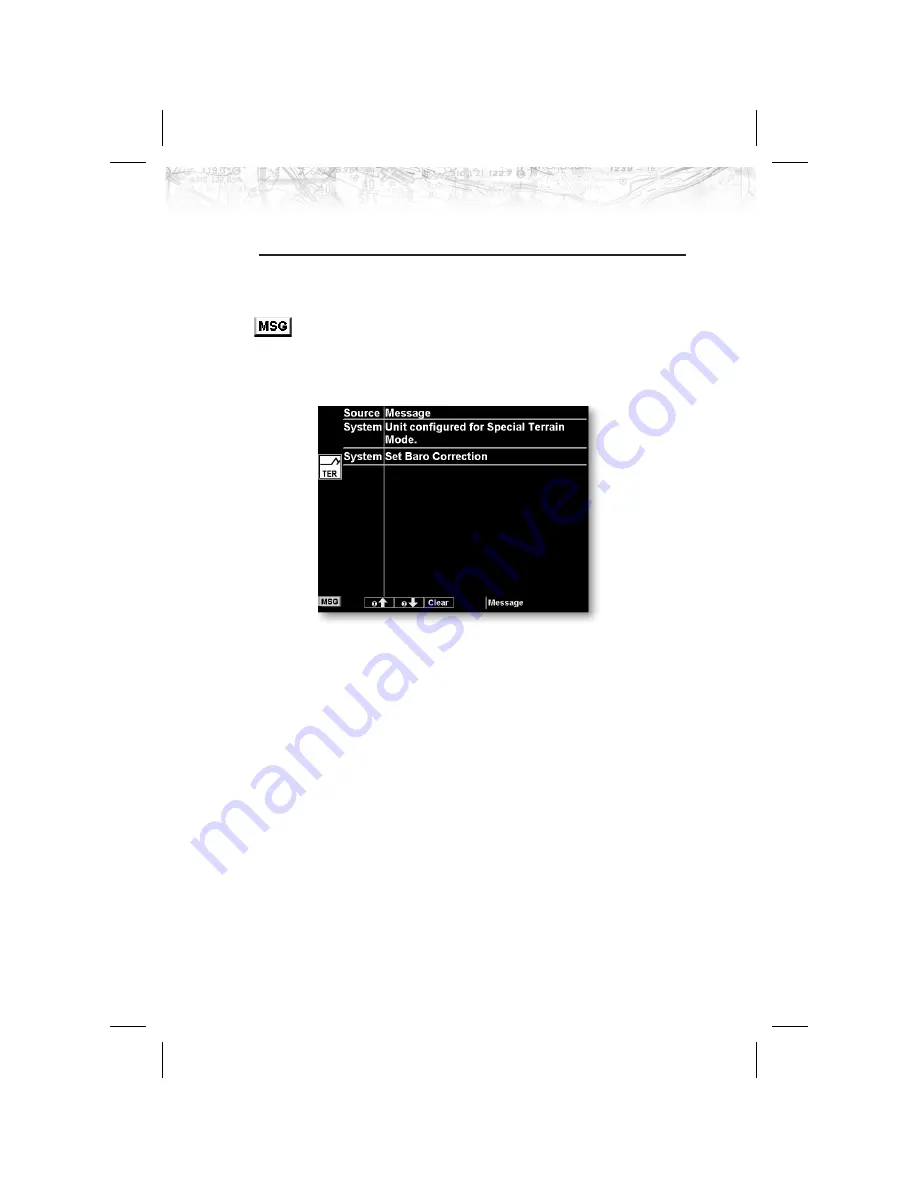
The Message function displays information about the

status of the MX20. Messages may be logged by either the

MX20 internal system or by one of the external sensors.

The amber MSG flag will flash until the message is

viewed. The MSG flag will remain in view while any

messages remain in the message log. New messages that

have not been viewed will be highlighted as bold text.

1. Press

FN

until you see the

MSG

function key.

2. Press the

MSG

key.

3. Use the

UP/DOWN

arrow “smart” keys to move to

additional messages, if more than one page of messages

exist.

4. Press

CLEAR

to remove the stored messages.

16

Detailed Operation

Summary of Contents for Apollo

Page 1: ......

Page 2: ...trademarks of UPS Aviation Technologies Inc 2000 by UPS Aviation Technologies Inc All rights reserved Printed in the U S A UPS Aviation Technologies Inc 2345 Turner Road S E Salem OR 97302 U S A Toll Free 800 525 6726 Canada Toll Free 800 654 3415 International 503 391 3411 FAX 503 364 2138 Visit our web page at http www upsat com Send comments about this manual by e mail to techpubs at ups com ...

Page 3: ...nce Guide is part 561 0263 xx About This Manual Please take a few moments to review the various sections in this manual Even if you are an experienced user of Multi Function Displays be sure to read our Getting Started section This section provides the rules for successful use of the Apollo MX20 The rest of the manual contains important information that you can refer to as you need more detail on ...

Page 4: ...luding but not limited to general special consequential or incidental damages including damages for loss of business profits business interruption loss of business information and the like arising from or in connection with the delivery use or performance of the software Customer Remedies UPS Aviation Technologies and UPS Aviation Technologies suppliers entire liability and your exclusive remedy s...

Page 5: ...omizable so you can create a display for almost any configuration you require The other functions provide more limited levels of customization so that they retain the look and feel of the instruments they reflect The MX20 is capable of creating powerful overlay views where information from a variety of sources can be presented simultaneously in proper relationship to each other thus greatly increa...

Page 6: ...ion to the controls basic operation and organization of the functions in your MX20 Be sure to read the Getting Started section to learn the rules for using the MX20 The Detailed Operation section is the reference for each of the functions in the MX20 Refer to the Detailed Operation section when you want to get into the details on every function and option along with step by step instructions Not e...

Page 7: ... 4 Line Selection 4 Data Card 5 Display 6 Annunciations 7 Advisory Flags 7 Traffic 7 Terrain 7 Lightning 7 Data Flags 8 Message Flag 8 Basic Operation 9 Power On 9 Pre Heat Mode 9 Brightness 10 Start Up Screen 10 Confirm Current Baro Correction 11 Function Selection 11 Advisory hot key 12 Normal Cruise Condition 12 Viewing the Advisory 12 Returning to Normal Condition 13 Options Menu 13 Summary 14...

Page 8: ...Map Orientation 21 Invert 22 Nav Data 22 Terrain 23 Airports 24 VORs 24 VOR Highlight 25 VOR OBS 26 ILS Localizer Depiction 26 Back Course Display 27 NDBs 27 Intersections 27 Airspace 28 Low Airways 28 High Airways 29 Water 29 Roads 29 Boundary 29 Obstructions 30 Traffic 30 Strikes 31 IFR Chart Function 32 Flight Plan 32 Map Orientation 32 Invert 33 vi ...

Page 9: ...fic Map Orientation 40 Traffic Altitude Values 41 Display Mode 41 Graphic 41 Text 41 Altitude Option Relative Pressure 42 Time 42 ADS B Broadcast Mode Control 43 Broadcast FID 43 Broadcast VFR 43 Standby 44 Flight ID Editing 44 Traffic Altitude Filter 44 Flight Plan FPL Function 45 Terrain TER Function 46 Flight Plan 48 TRK Up Arc TRK Up 360 49 Set Barometer 49 TER Data Flag 49 Weather WX Data Lin...

Page 10: ...tem Data 56 Demo 57 Self Test 57 Noise Monitor 57 Strike Test 58 System Function 59 System Nav Page 59 Ownship Symbol 59 Lat Lon Format 59 Set Baro Units 59 Set Baro Correction 60 Display Lat Lon Lines 60 System Info 61 GPS and datalink status 61 System Test Page 62 Test Pattern 1 63 Red Green Blue White Test Pattern 63 Caring For Your MX20 64 Display Care and Cleaning 64 Troubleshooting 65 viii ...

Page 11: ...ons Press the smart key below the function label to go to the displayed function While in each function press the MENU ENTER key to show the options for each function The options are shown on the right side of the display Press the LINE SELECT key to manipulate the options Some options toggle on off while some are tri state three choices The functions are MSG Message Log See page 16 for details MA...

Page 12: ...lled shows nearby traffic and details about each target The Flight Plan function provides details about your flight plan and each waypoint The Terrain function shows a color coded map of terrain elevation in relation to your altitude The Weather Data Link function is capable of displaying graphic weather information with UAT equipped installations The Flight Information Services function allows ac...

Page 13: ...ys to the right of it Press the function FN key repeatedly to scroll through the available functions The functions will appear above the smart function keys in turquoise Use the FN key to display a list of the main functions such as Map IFR Terrain etc Each time you press the FN key you will step through the list of functions After you press one of the function smart keys at the bottom of the disp...

Page 14: ...ction keys are on the right side of the MX20 Press the MENU ENTER key to see the options for the current function Press the LINE SELECT key next to each option to scroll through the choices for each option Some options support tri state choices such as in Map mode When you select a tri state option the option label will change with each key press between completely filled partially filled and empt...

Page 15: ...ght into the slot When fully inserted the data card and eject button will be flush and slightly recessed into the bezel When contacting your dealer or the UPS Aviation Technologies technical services staff eject the data card and write down the information shown on the label 5 Getting Started Data Card Ejector Data Card Front Side View of Data Card Front View of Data Card Slot UPS Aviation Technol...

Page 16: ...display care The MX20 will go into a pre heat mode for a short period of time on start up During the pre heat mode the display will remain dark The pre heat mode is designed to extend the life of the LCD backlight 6 Getting Started OFF POLLO A MX20 MFD FN MENU ENTER TRAF STRK TERR Power Dimming Graphic Display Line Select Keys Menu Enter Key Data Card Ejector Data Card Smart Keys Function Key Smar...

Page 17: ... appear on the left side of the display when traffic is reported to be within 2000 feet of your altitude and 5 nm of your location The Traffic advisory and Traffic functions are only available when the ADS B system is installed Terrain The Terrain advisory flag will appear on the left side of the display when the terrain surface or obstacle altitude is within approximately 500 feet of your altitud...

Page 18: ... ALT No valid altitude information is available from the external source Altitude related functions will not operate such as terrain awareness TRAF No traffic information is received from the external source Traffic will not be displayed Your position information will not be broadcast in ADS B capable systems LT No valid lightning detection information is being received from the external source St...

Page 19: ...s Press the LINE SELECT key next to the displayed option to choose desired capabilities Some options use multiple key presses for different states for the option Press the MENU ENTER key again to extinguish the option display Refer to the Detailed Operation section for more details on each function Power On Turn the power rotary knob clockwise past the detent to turn the power on The MX20 will pro...

Page 20: ...he ambient light When the brightness is set automatically the display will not dim below a pre defined level Start Up Screen The Start Up screen is displayed while the MX20 goes through its initialization and testing routines System information is shown that provides the MX20 software and database versions The results of the self test are shown A check mark shows that the test passed If any of the...

Page 21: ...ons are shown above the function smart keys on the lower part of the display in green Press the function key under the function label to activate that function The labels above the function key will change to reflect the custom smart controls for that function All described functions may not be available in each installation Function Description MSG Message Log Function MAP Custom Map Function IFR...

Page 22: ... what is around the aircraft 3 When returning to the previous Function after viewing a Function with an advisory the original zoom and map mode will be restored This feature is designed to allow the pilot to establish a preferred cruise map setup and quickly view an advisory then return back to the previous setting For example Normal Cruise Condition Custom Map Function is being viewed at 5NM in t...

Page 23: ...R key to see the options for the current function You change an option by pressing one of the Line Selection keys that are to the right of the displayed option Many options have more than one choice Press the same LINE SELECT key repeatedly to select the available choices Some functions have several pages of options The lower LINE SELECT key will allow you to reach the Next Page when multiple page...

Page 24: ...an Map Orient Set Barometer Press Line Selection Keys Flight Plan Map Orient Invert Clear Press Line Selection Keys Flight Plan Map Orient Display Mode Altitude Time Broadcast FID Enter FID Altitude Filter Press Line Selection Keys Press Function Keys FIS LT SYS Nav Press Line Selection Keys Ownship Symbol Lat Lon Format Set Baro Correction Display Lat Lon Lines Press Line Selection Keys Flight Pl...

Page 25: ...function is selected The functions are described in the order that they appear A description of each function will be followed by an explanation of how the function smart keys operate for the function and then each menu option as selected by the Line Selection keys All described functions may not be available in your pariticular installation See your Airplane Flight Manual supplement for the detai...

Page 26: ...h until the message is viewed The MSG flag will remain in view while any messages remain in the message log New messages that have not been viewed will be highlighted as bold text 1 Press FN until you see the MSG function key 2 Press the MSG key 3 Use the UP DOWN arrow smart keys to move to additional messages if more than one page of messages exist 4 Press CLEAR to remove the stored messages 16 D...

Page 27: ...Repeated presses of the LINE SELECT key will scroll through the available selections for each option The smart keys at the bottom of the display over the function keys control the map scale by zooming in or out moving the map view around with the Pan feature and viewing Info about the current destination waypoint Map Scale The In and Out function keys control the map scale by zooming in and out Yo...

Page 28: ...will automatically adjust to bring that waypoint on the map To exit the autozoom mode simply increase or decrease the current zoom level to re enter the manual adjust mode Pan The Pan keys are used to move the display around so you can see beyond the initial boundaries of the screen The PAN function key is one of the smart keys available at the bottom of the screen When you select the Pan function...

Page 29: ... current TO waypoint Each press of the INFO key will step through the available information for the current destination waypoint The number of pages depends on the amount of information about the destination waypoint Runway diagrams of airports will be displayed in the same orientation as the main map i e North Up Track Up or DTK Up 19 Detailed Operation ...

Page 30: ... will show information about the nearest airport to the center of the screen This allows panning around the immediate area and obtaining information about airports in the vicinity without changing the current TO waypoint While in this mode both the PAN and INFO smart keys are highlighted Only information about airports can be obtained with this feature 20 Detailed Operation ...

Page 31: ...t Plan The Flight Plan option controls the display of the Flight Plan course line Pressing the LINE SELECT key next to the Flight Plan option toggles between showing or not showing the Flight Plan route line Map Orientation This option controls the screen orientation in reference to the aircraft symbol You may select from North Up Track Up Track Up Arc Track Up 360 and Desired Track Up North Up se...

Page 32: ...stance when terrain is shown the Invert option switches between white and black text When terrain is turned off the Invert option switches between a white background with black text and a black background with white text Nav Data The Nav Data option allows to control the display of navigation data on the display Subsequent presses of the LINE SELECT key for this option provides choices of no nav d...

Page 33: ...display shows a color coded view where the colors relate to terrain elevation relative to your altitude For more information about the terrain awareness option see the Terrain function section on page 46 When you turn the Terrain feature off the background is either black or white depending on your selection in the Invert option When no terrain data is available the missing areas will be shown in ...

Page 34: ...he Airport LINE SELECT option keys VORs The VORs option allows you to choose the type of VOR information displayed on the Map screen You may select the display of VOR icon and identifier icon only or no information by each subsequent press of the VOR LINE SELECT key The MX20 supports full integration with the Apollo SL30 Nav Com This feature allows tuned VORs along with ILS and localizer approache...

Page 35: ... MX20 highlights the VOR in magenta on the moving map when the SL30 is either tuned to or monitoring a nearby VOR station The highlighted VOR station is determined by using the tuned or monitored VOR frequency of the SL30 with the MX20 internal database The SL30 must be receiving a valid signal from the VOR The VOR information box for the selected VOR will show the distance and radial from bearing...

Page 36: ...ed radial to help improve situational awareness The OBS line will only be drawn from the active VOR not the monitored VOR The SL30 must be receiving a valid signal from the VOR and the MX20 must have VOR symbols turned on for this feature to be active ILS Localizer Depiction When either an ILS or localizer is tuned on the SL30 the MX20 will display the currently tuned approach on the appropriate a...

Page 37: ... A published back course approach at the airport is not necessary to enable this feature The SL30 must be receiving a valid ILS or localizer and the MX20 must have airports turned on for this feature to be active NDBs The NDBs option allows you to choose the type of NDB information displayed on the Map screen You may select the display of NDB icon and identifier icon only or no information by each...

Page 38: ...menu items Custom Map Menu Option Page 3 The third option page of the Custom Map function lets you select options for the choices of Low Airways High Airways Water Roads and political boundaries The last option selection takes you to the next page of options Low Airways The Low Airways option allows you to control the display of Low Airways Pressing the LINE SELECT key next to Low Airways toggles ...

Page 39: ...essing the LINE SELECT key next to Waters toggles between either the display or no display of the bodies of water Roads The Roads option allows you to control the display of interstate and state highways Pressing the LINE SELECT key next to Roads toggles between either the display or no display of the road features Boundary The Boundary option allows you to select the display of political boundari...

Page 40: ...e shown in red objects that are near your altitude are shown in yellow objects with towers that are significantly below your altitude colored green Obstructions are shown on the Custom Map and in the Terrain function Current coverage for obstructions is North America only and are drawn only when the zoom level is below 50nm Traffic The Traffic option turns the display of traffic information on or ...

Page 41: ...rikes menu option controls the display of lightning strike information if the MX20 receives strike data from an external source such as the WX500 Each reported lightning strike is shown as a red x on the display Strikes are not shown if the zoom level is below 20 nm Press the Next Page LINE SELECT key to display the next page of menu items 31 Detailed Operation ...

Page 42: ...Page 1 The first option page of the IFR Chart function lets you select options for the choices of Flight Plan Map Orientation Invert display Nav Data and Labels The last option selection takes you to the next page of options Flight Plan The Flight Plan option controls the display of the Flight Plan course line Pressing the LINE SELECT key next to the Flight Plan option toggles between showing and ...

Page 43: ... key next to this option to scroll through the options Invert The Invert option changes the display of text and the background color The Invert option switches between a white background with black text and a black background with white text Nav Data The Nav Data option allows you to control the display of navigation data on the Map displays Subsequent presses of the LINE SELECT key for this optio...

Page 44: ... last option selection takes you back to the first page of options Low Airways The Low Airways option allows you to control the display of Low Airways Pressing the LINE SELECT key next to Low Airways toggles between either the display of the airway and label airway alone or no display of Low Airways High Airways The High Airways option allows you to control the display of High Airways Pressing the...

Page 45: ... or off Flight Plan The Flight Plan option controls the display of the Flight Plan course line Pressing the LINE SELECT key next to the Flight Plan option toggles between showing and not showing the Flight Plan route line Map Orientation This option controls the screen orientation in reference to the aircraft symbol You may select from North Up Track Up Track Up Arc Track Up 360 and Desired Track ...

Page 46: ... terrain in a given area Nav Data The Nav Data option allows to control the display of navigation data on the Map displays Subsequent presses of the LINE SELECT key for this option provides choices of no nav data nav data in the corners waypoint bearing zoom and distance or full nav data The full nav data option includes the information in the four corners selection plus altitude barometer setting...

Page 47: ...al Supplement to verify if this feature is available Traffic Description Your position ownship symbol is located at the tip of the empty triangle The other traffic is shown as a large solid cyan light blue arrow pointing in its direction of travel Next to the traffic arrow symbol is the traffic identifier and altitude Altitude is selected as either Pressure or Relative as noted in the upper left c...

Page 48: ...ta link radio Non ADS B equpped aircraft that are detected by ground based radar can be up linked to all aircraft in the area that are ADS B data link equipped TIS targets act and behave similar to actual ADS B traffic targets except that the target symbol is a rounded nose target As TIS target location is determined by ground based radar coverage range and target positional accuracy are highly de...

Page 49: ...wing the TRAF smart key 2 Press TRAF Traffic 3 Press the IN key to zoom in Press the OUT key to zoom out 4 Press the LABEL key to turn the Identifier over each Traffic item on or off 5 Press the SELECT key to step through each Traffic item that is shown on the display When a target is selected additional information about that target is shown in the upper right corner of the display The selected t...

Page 50: ...the Flight Plan course line Pressing the LINE SELECT key next to the Flight Plan option toggles between showing and not showing the Flight Plan route line Traffic Map Orientation The Traffic Map Orientation option lets you choose between a 360 degree compass rose or an arc that covers about 90 degrees over the top of the display Your aircraft position is shown by an empty white triangle near the c...

Page 51: ...hic The graphic traffic display shows your location nearby traffic and information about the traffic Text The text traffic display shows the distance to the traffic item flight id category position speed and altitude The currently selected target is shown in green The traffic list is sorted by distance with the closest traffic to your current position shown on the top line The total number of targ...

Page 52: ...n Pressure Altitude is selected if a value of 121 is shown the value means that the indicated traffic is at 12 100 feet pressure altitude Pressure altitude does not show a or Remember that pressure altitude can be substantially different than the baro corrected altitude shown on the altimeter in your aircraft Time The time interval option sets the amount of time to estimate the path and location o...

Page 53: ...he Traffic Function Menu and allow the pilot to toggle between Broadcast FID Broadcast VFR Standby Broadcast FID Causes the currently set Flight ID and permanently assigned ICAO address to be broadcast with the aircraft s current position The Flight ID is pilot settable via the menu option Enter FID while the ICAO address is set during system install Broadcast VFR Causes a fixed Flight ID of VFR a...

Page 54: ...e between characters Press the MENU ENTER key to save the displayed Flight ID The Flight ID is only sent when the Flight ID broadcast option is enabled Traffic Altitude Filter For ADS B equipped installs an altitude filter allows targets that are outside of a 2000 vertical range to be filtered off the display This option is controlled via the Traffic Function Menu and causes the on screen mode to ...

Page 55: ...urrent leg of the flight plan The Current Flight Plan box shows all of the legs of your flight plan with the current leg indicated in magenta Listed are each leg with the bearing and distance between the legs The Current Nav Data box shows the aircraft current position in latitude and longitude ground speed and track In the lower right corner information for the current waypoint is displayed in th...

Page 56: ... to your position Colors used for terrain display are shown below Note The Terrain function shows you the general terrain elevations relative to your altitude and are advisory in nature Individual obstructions may be shown if available in the database Terrain is displayed from database information and may therefore potentially contain some degree of error Do not use this information for surface or...

Page 57: ...en to make minor adjustments to the barometric pressure value Color Description RED Terrain that is at or above your current altitude YELLOW Terrain that is within 500 feet of your current altitude GREEN Terrain that is within 2000 feet of your current altitude BLACK Terrain that is more than 2000 feet below your current altitude LIGHT BLUE No terrain data is available 47 Detailed Operation ...

Page 58: ...t Plan Map Orientation and setting the barometric pressure Flight Plan The Flight Plan option controls the display of the Flight Plan course line Pressing the LINE SELECT key next to the Flight Plan option toggles between showing and not showing the Flight Plan route line 48 Detailed Operation ...

Page 59: ...the Set Barometer option to enter the correct barometric pressure for your area or adjust the current value Use the UP DOWN arrow keys to increase or decrease the values Use the LEFT RIGHT arrow keys to move between characters Press the ENTER key to save the displayed barometric pressure A Confirm Current Baro message is displayed at the initial power up and again once every 30 minutes of operatio...

Page 60: ...all to magenta for heavy rainfall Rainfall data is color coded as follows Brown Blue Zero rainfall transparent color Light Green Light rainfall Dark Green V Yellow V Amber V Red V Magenta Heavy rainfall Cyan No rainfall data available A cyan checkerboard pattern indicates that no data is available for area and that area may contain any rainfall levels When weather data is received the airborne sys...

Page 61: ...ta has been received in the previous two minutes the Service indicator in the lower left of the screen will display Available If no data has been received in this time period Not Available will be shown This indicator shows if the aircraft is currently within reception coverage of a ground station with weather broadcast capabilities The ground system determines the weather coverage area and extent...

Page 62: ...PE LOCATION TIME MESSAGE BODY METAR KSLE 191534Z METAR TEXT METAR KMMV 181423Z METAR TEXT TAF KSLE 171423Z TAF TEXT The upper portion of the FIS Function page is used for displaying the contents of an individual FIS message while the lower portion of the screen is used for categorization and sorting of different message types such as METARS TAFs SIGMETS etc The lower portion of the screen is divid...

Page 63: ...to select the desired category location and time that is of interest Using this interface the pilot can easily select the desired message type such as METAR then select the airport of interest such as KPDX then select a specific METAR report by time such as 141512Z At all times the message displayed in the upper FIS Message area on the screen matches the highlighted entry in the FIS Category area ...

Page 64: ... the green Selection Pointer is located in the second column the fourth smart key changes to read Sort When consecutively pressed the sorting of the messages toggle with the following options Distance to Nearest Present Position Distance to Nearest Final Waypoint Distance to Nearest Next Waypoint Alpha As the sorting is based on distances from current ownship to a given airport the system must be ...

Page 65: ...ure is available Your display range must be selected to be greater than 25 nm to display lightning strikes The display range is shown in the lower left corner of the display For instance if you zoom In to a range of 20 nm no strikes will be shown but if you zoom Out to 30 nm strikes will be shown Lightning Menu Option Page 1 The first option page of the Lightning function lets you select options f...

Page 66: ... The WX500 detects electrical discharges within a range determined by the installation of your Stormscope These discharge locations are noted as Lightning strikes and displayed as a red x You may select either single strike or cell groups of lightning representations Strike Individual strikes are noted Cell Only lightning strikes associated with a group or cell of strikes are displayed Heading Sta...

Page 67: ...g strikes Self Test The Self Test option performs a number of tests on the operation of the WX500 and provides a report of its status Noise Monitor The Noise Monitor feature is a function of the WX500 For details about using this feature refer to the WX500 owner s documents The Noise Monitor displays reports of electrical noise whether they are from lightning or other noise sources within the rang...

Page 68: ...s about using this feature refer to the WX500 owner s documents The Strike Test feature is used by installers to verify proper operation of the WX500 Test strikes are sent to the antenna The received test strike is then visually presented on the screen 58 Detailed Operation ...

Page 69: ...our aircraft on the display You can make selections of Single Twin Jet or Helicopter Lat Lon Format The Lat Lon format option allows you to select between two choices for the display of Lat Lon coordinates Choose between degrees minutes seconds seconds decimals DD MM SS SS or degrees minutes minutes decimals DD MM MM Set Baro Units Baro Correction QNH can now be entered in Millibars in addition to...

Page 70: ...bottom of the display will have direction arrows above them Press the UP DOWN arrow keys to change the value of the highlighted number Press the LEFT RIGHT arrow keys to move to another number 3 Press MENU ENTER to save the changed values and leave the Set Baro Correction option Display Lat Lon Lines Use this option to choose to display or not display Lat Lon lines on the map displays 60 Detailed ...

Page 71: ...installs the SYS INFO page now shows additional details for both the internal GPS engine and the data link status GPS satellite usage and signal strength are presented in the upper right of the info page in addition to each satellite s position in the sky If no GPS is installed in the MX20 the text Internal GPS Not Available will be shown Data link information is monitored as follows HB Heart Beat...

Page 72: ...System Test Page The System Test Page allows you to test the display of the MX20 to ensure proper operation 62 Detailed Operation ...

Page 73: ... proper operation of the display or when contacting Customer Service Red Green Blue White Test Pattern Choosing the Red Green Blue or White options floods the screen with the selected color Use this option to verify proper operation of the display or when contacting UPS Aviation Technologies Customer Service 63 Detailed Operation ...

Page 74: ... display and then wipe the area with the clean fabric Moisten a clean fabric with a small amount of water and wipe the display area Apply a small amount of glass cleaner without ammonia to the fabric and wipe the area Apply a small amount of isopropyl alcohol and wipe the area this is your last resort Contacting the Factory The UPS Aviation Technologies factory may be called weekdays from 8 00 am ...

Page 75: ...he preceding section Be sure to have the information from the System Info page see page 61 and the data card available before you contact your dealer or the factory Problem Possible Cause Action Unit does not power on or blank screen Wiring problem Improper brightness setting Low temperature Data card Check for proper wiring or Check the fuse circuit breaker Check the display brightness setting Al...

Page 76: ...ck for any interference sources Have dealer installer check for proper MX20 setup RTE Route flag Position source route Ensure that the external position source has an active route engaged ALT Altitude flag Serial altitude source Ensure the serial altitude encoder is powered up and working properly Have dealer installer check for proper installation and setup of the encoder If altitude data is prov...

Page 77: ...k for proper altitude input No traffic display ADS B system installation You must have the ADS B system installed If you do have an ADS B system check the antennas and other components for proper operation Have dealer installer check for proper MX20 setup Special Terrain message Capstone General Aviation setup This is normal for the Capstone installation Have dealer installer check for proper MX20...

Page 78: ...Notes 68 Detailed Operation ...

Page 79: ...ard 5 65 Data flags 8 Data port status 61 Database version 61 Demo 57 Desired track up 22 33 36 Display 41 Care 64 Graphic 41 Text 41 Display Lat Lon lines 60 E Enter key 4 F Flight ID Editing 44 Flight plan 8 21 35 45 Function key 11 Function keys 3 Functions 1 G Getting started 1 14 H Heater 9 High airways 29 34 I IFR 32 ILS 24 26 Info 19 Intersection 27 Invert 33 36 L Label 34 36 Lat Lon format...

Page 80: ... Range ring 40 Relative 23 Relative altitude 37 42 Roads 29 Route 8 RTE 8 S Self Test 57 Set baro 60 SL30 24 Software version 61 Start Up 10 Stormscope 2 55 57 Strike 56 Strike test 58 Strikes 31 System 59 Data 56 Info 61 Test 62 T TER 8 49 Terrain 2 7 8 11 21 23 46 49 67 Test pattern 63 Time 42 Track up 21 33 35 Track up 360 21 33 36 Track up arc 21 33 35 TRAF 8 Traffic 7 30 37 Troubleshooting 65...

Page 81: ......

Page 82: ... 2000 by UPS Aviation Technologies Inc 2345 Turner Rd S E Salem OR 97302 U S A Phone 503 581 8101 800 525 6726 In Canada 800 654 3415 FAX 503 364 2138 http www upsat com Part 560 1026 01 August 2000 ...

Reviews: