background image

Illustrated Parts Breakdown

6.2

Section

AB46 Work Platform

6-5

FINAL ASSEMBLY,AB46
GAS

DRAWING 3 OF 4

Summary of Contents for AB46 C

Page 1: ...AB46 I C Service Parts Manual Service Parts Manual 2 WHEEL DRIVE WORK PLATFORMS...

Page 2: ...VICE PARTS MANUAL AB46 2WD I C Models Serial Numbers 1000 to current When contacting UpRight for service or parts information be sure to include the MODEL and SERIAL NUMBERS from the equipment namepla...

Page 3: ...ice could result in minor injury or property damage NOTES Give helpful information WORKSHOP PROCEDURES CAUTION Detailed descriptions of standard workshop procedures safety principles and service opera...

Page 4: ...AB46 Work Platform ii Foreword NOTES...

Page 5: ...Hub 3 15 Removal 3 16 Installation 3 16 Seal Replacement 3 17 Roll Test 3 17 Leak Test 3 17 Roll and Leak Testing 3 17 Disassembly 3 17 Assembly 3 17 Main Assembly 3 18 Pressing Tools 3 20 Table of Co...

Page 6: ...ervation 3 32 3 23 Torque Specifications 3 32 Fasteners 3 32 Hydraulic Components 3 32 4 0 Troubleshooting 4 0 Introduction 4 1 General Procedure 4 1 4 1 Hydraulic Troubleshooting Guide 4 2 4 2 Electr...

Page 7: ...Controller Inststallation Gas 068339 002 6 52 Controller Inststallation Diesel 068339 003 6 53 Controller Assembly Platform Gas 068329 001 6 54 Controller Assembly Platform Diesel 068329 002 6 58 Hos...

Page 8: ...0 Rear Axle Assembly 3 10 3 11 Brake Assembly 3 11 3 12 Pressure Override Valve 3 12 3 13 Hydraulic Pump 3 12 3 14 Front Axle Assembly 3 13 3 15 Drive Motor 3 14 3 16 Torque Hub 3 15 3 17 Torque Hub A...

Page 9: ...ions can be found in Section 2 Elevating Assembly The platform is raised and lowered by the elevating assembly an articulated boom powered by two single stage lift cylinders The hydraulic pump driven...

Page 10: ...g noncontinuous Platform rotation 160 deg Tail swing None Jib length 5 ft Jib arc 140 deg Inside turning radius 2 ft Outside turning radius 9 ft 10 in Drive speed lowered 3 5 mph Drive speed elevated...

Page 11: ...NEVERelevatethemachinewhenwindspeedsexceed28mph 12 5m sec INCASEOFEMERGENCYpushemergencystopbuttontocutpowertoallmachinefunctions ALWAYScloseandsecuregateafterenteringplatform NEVERexitorenterplatfor...

Page 12: ...om is elevated 13 With the upper boom elevated one foot operate drive control handle Observe that drive speed is limited to creep 1 2 foot 15m per second Lower upper boom to stowed position 14 Press t...

Page 13: ...ice horn button to sound an audible warning if neces sary Always wear an approved fall restraint properly attached to designated platform anchorage point when driving or elevating the machine see figu...

Page 14: ...andle and on the chas sis They will indicate the direction of travel when the drive control handle is moved With Boom Elevated Travel with boom elevated is restricted to firm level surfaces only When...

Page 15: ...erating the function 2 While depressing the foot switch turn the platform rotation control switch counterclock wise to rotate left clockwise to rotate right Release the switch to stop rotation Levelin...

Page 16: ...ounterclockwise turn counterclockwise to rotate the turret clockwise Figure 2 4 Emergency Control Operation Figure 2 5 Manual Turret Rotation Emergency control pump Riser Valve Extend Valve Boom Valve...

Page 17: ...2 Maneuver the machine onto bed of truck trailer 3 When winching follow instructions for emer gency towing Attach winch cable to front tie down lugs Chassis Tie Down Lifting Lug typ Wooden Block 7 5 x...

Page 18: ...cap to add hydraulic oil 5 Replace cap LUBRICATION Refer to service manual for lubrication chart and guidelines BATTERY MAINTENANCE Hazard of explosive gas mixture Keep sparks flame and smoking mater...

Page 19: ...kwise and lifting off base TERMINAL BLOCKS Remove wires by inserting a small flat bladed screwdriver into square beside wire Install wires by stripping 1 2 of insulation inserting screw driver in squa...

Page 20: ...Check mounting bolts for proper torque 30D Torque Check for leaks Daily Hubs Check Oil level 250H 6M Change Oil after break in 50H 30D Change Oil 1000h 2y Steering Check hardware fittings for proper t...

Page 21: ...top switch is ON 4 Turn platform chassis switch to CHASSIS 5 Using the raise button elevate platform 8 12 inches 6 Connect a crane or overhead hoist capable of supporting elevating assembly to front o...

Page 22: ...olution inside the cells Rinse thoroughly with clean water Clean battery and cable contact surfaces to a bright metal finish whenever a cable is removed Hazard of explosive gas mixture Keep sparks fla...

Page 23: ...range or when the platform is elevated Oil and Filter Replacement 1 Operate the platform for 10 15 minutes to bring the hydraulic oil up to normal operating temperature Grease Oil open gear lube Figu...

Page 24: ...4 IMPORTANT Back out ramp trimpot 10 turns counter clockwise before making any adjustments 1 Verify that battery is fully charged 2 Connect ammeter in series at A terminal 3 Set threshold at 1 00 amp...

Page 25: ...amps or so machine travels 40 in Eight seconds 3 Adjust mid pot so machine travels One foot per second when platform is elevated 4 Turn ramp back in 10 turns and adjust until ma chine stops in 2 to 3...

Page 26: ...llation to prevent damage to O rings Seat all balls in manifold block by lightly tapping on the ball with a brass drift punch 1 Install fittings plugs springs balls and orifices Use one drop of Lockti...

Page 27: ...6 Fitting Elbow 27 Fitting Elbow 28 Fitting Elbow 29 Fitting Elbow 30 Grip 31 Fitting Elbow 32 Screw 10 20 33 Screw 5 16 18 12 Diverter Valve 13 Counterbalance 14 Piston 15 Lever 16 Extension 17 Deten...

Page 28: ...aulic lines to drive motors Clean all fittings before disconnecting the hose assemblies Plug all port holes and hose assemblies IMMEDIATELY to prevent contamination from dust and debris 4 Remove capsc...

Page 29: ...to the seal grooves in the piston 7 Install piston into power plate using a shop press Be careful not to damage the seals during assembly Center cutouts in piston with torque pin holes in the power pl...

Page 30: ...e joystick control to full reverse 6 Check pressure reading on pressure gauge at B Pressure readings should be the same Figure 3 13 Hydraulic Pump Gauge Port B Gauge Port A A Pressure Relief Valve B P...

Page 31: ...e bearing with a liberal amount of multi purpose grease and position it in the hub Install new grease seal 3 Apply a thin coating of grease to the spindle and slide the hub onto the spindle 4 Pack the...

Page 32: ...17 Alignment Sleeve 3 12 DRIVE MOTOR REMOVAL 1 Park the work platform on firm level ground 2 Mark and remove the drive motor hydraulic lines Clean all fittings before disconnecting the hose assemblies...

Page 33: ...lug opening 1 2 full 7 Replace fill level plug Replace fill plug 8 Replace torque hub Figure 3 16 Torque Hub 3 13 ASSEMBLY 1 Assembly is reverse of disassembly 2 Apply grease to one side of thrust pla...

Page 34: ...rs from torque hub 14 Remove torque hub IMPORTANT Note location of 90 fitting on torque hub body Hub must be installed with fitting in same position Figure 3 17 Torque Hub Assembly 3 13 Installation I...

Page 35: ...preload to output shaft to remove retaining ring Follow steps a b a Place bearing cone pressing tool on retaining ring b Apply pressure to fixture using a hydraulic ram or by striking the fixture with...

Page 36: ...ng a marker mark the four shoulder bolt holes in hub 3 Grease O ring and place in counterbore in hub NOTE O rings may be stretched or squeezed together in order to fit exactly in counterbore 4 Oil all...

Page 37: ...2 Bearing Cone 3 Bearing Cup 4 Thrust Washer 5 Retaining Ring A Spindle B Housing C Carrier Assy D Gear Ring E Spacer Input Figure 3 19 Torque Hub K Stud L Stud M Pipe Plug N Pipe Plug 6 O Ring 2 7 Th...

Page 38: ...Section 3 20 AB46 Work Platform Maintenance 3 13 Figure 3 20 Seal Pressing Tool...

Page 39: ...Section 3 21 AB46 Work Platform Maintenance 3 13 Figure 3 21 Bearing Cone Pressing Tool...

Page 40: ...Section 3 22 AB46 Work Platform Maintenance 3 13 Figure 3 22 Bearing Cup Pressing Tool...

Page 41: ...tall a 0 3000 PSI pressure gauge assembly 3 Remove the plug in the end of the low relief valve to expose the adjusting screw 4 Turn the low relief valve adjustment screw counter clockwise two full tur...

Page 42: ...ep enough to catch the fingernail are unacceptable replace the cylinder Polishing is a sign of uneven loading When this occurs the surface should be checked for roundness Cylinders not round within 00...

Page 43: ...lace the cylinder Polishing is a sign of uneven loading When this occurs the surface should be checked for roundness Cylinders not round within 007 should be replaced ASSEMBLY NOTE Torque all hardware...

Page 44: ...h the fingernail are unacceptable replace the cylinder Polishing is a sign of uneven loading When this occurs the surface should be checked for roundness Cylinders not round within 007 should be repla...

Page 45: ...7 Inspect cylinder parts for scratches pits or polish ing Check seal groves and sealing surfaces Scratches or pits deep enough to catch the fingernail are unacceptable replace the cylinder Polishing i...

Page 46: ...g Check seal groves and sealing surfaces Scratches or pits deep enough to catch the fingernail are unacceptable replace the cylinder Polishing is a sign of uneven loading When this occurs the surface...

Page 47: ...shing is a sign of uneven loading When this occurs the surface should be checked for roundness Cylinders not round within 007 should be replaced ASSEMBLY NOTE Torque all hardware to torques listed on...

Page 48: ...of shaft NOTE Piston is loctited Loctite 277 onto rod 4 Slide the head off of the rod 5 Remove seal kit components wipers rod seals o rings and backup rings from head and piston 6 Thoroughly clean al...

Page 49: ...order to install cylinder IMPORTANT Boom extend cylinder must be ex panded to the same length it was when it was re moved 2 Slowly cycle cylinder several times Check hydraulic connections for leaks C...

Page 50: ...HREAD SIZE 1 4 5 16 3 8 7 16 1 2 5 8 3 4 7 8 1 ENGLISH METRIC American National Std UNC course Grade 5 Table 3 3 Bolt Torque 110 In Lbs 190 In Lbs 30 Ft Lbs 50 Ft Lbs 75 Ft Lbs 150 Ft Lbs 250 Ft Lbs 4...

Page 51: ...atform controls and chassis controls and note all functions that are not operating correctly 2 Narrow the possible causes of the malfunction Use the troubleshooting guide to determine which components...

Page 52: ...C B Valve X Boom Extend CK Valve X Boom Raise Valve X Boom Raise Cylinder X Boom Raise C B Valve X Boom Raise CK Valve X Proportional Valve X X X X X Jib Valve X Jib Orifice X Jib Cylinder X Jib C B V...

Page 53: ...m Raise Jib Cage Level Cage Rotate Slew Drive Diff Lock Drive Brake Release Parking Brake Release Drive Pump X X Charge Pump X X Charge Pump Relief Valve X X Bypass Valve 3 3 X Differential Lock Valve...

Page 54: ...use X Control BoxKeySwitch X DiodeDB20R X DiodeDB20L X EngineRelayContactsandCoil X X TiltRelayContacts X X X X TiltLightofffornormal operation X X TiltAlarmofffornormal operation X X BrakeRelayContac...

Page 55: ...X X X X X DiodeDB17 X X X X DiodeDB18 X X FootSwitch X X X X X X X X X X X X X X X X X X BoomDisconectRelay Upper TurretRotateSwitch X X Upper CagerotateSwitch X X Upper TrimSwitch X X Upper JibSwitc...

Page 56: ...Up Solenoid Valve X Riser Down Solenoid Valve X Riser Up Relaycoil X Riser Up Relaycontacts X Riser Down Relaycoil X Riser Down Relaycontacts X CageRight Solenoid Valve X CageLeftSolenoid Valve X Cage...

Page 57: ...l Schematics Figure 5 1 Electrical Schematic Gas Model Figure 5 2 Electrical Schematic Dual Fuel Model Figure 5 3 Electrical Schematic Diesel Model Section 5 2 Hydraulic Schematics Figure 5 4 Hydrauli...

Page 58: ...Cage Left Solenoid Controls down valve Right side of manifold SOL13 Turret Right Solenoid Controls steer valve when Right side of manifold steering right SOL14 TurretLeft Solenoid Controls steer valv...

Page 59: ...Schematics Section AB46 Work Platform 5 3 Figure 5 1 Electrical Schematic Gasoline Model 068341 001...

Page 60: ...Enable Relay Power to Upper Upper Control box Control box R26 Brake Relay Power to Brake Lower Control box Solenoid R27 Differential Lock Activated Differential Lower Control box Relay Lock R28 Propa...

Page 61: ...Schematics Section AB46 Work Platform 5 5 6 1 Figure 5 2 068341 002 Electrical Schematic Dual Fuel...

Page 62: ...d Upper Control box Relay Controller R24 Turret Drive Relay Power to Turret Upper Control box Rotate Solenoid R25 Drive Enable Relay Power to Upper Upper Control box Control box R26 Differential Lock...

Page 63: ...Schematics Section AB46 Work Platform 5 7 Figure 5 3 068341 003 Electrical Schematic Diesel Model...

Page 64: ...eed of the jib PMP1 Drive Pump Provides fluid power for Chassis drive system PMP2 Boom Pump Provides fluid power for Chassis boom system PMP3 Hand Pump Pump up brakes for towing Hydraulic manifold REF...

Page 65: ...Schematics Section AB46 Work Platform 5 9 Figure 5 4 068340 002 Hydraulic Schematic 5 2...

Page 66: ...PUMP 15 LEVER WELDMENT HAND PUMP 16 LEVER EXTENSION HAND PUMP 17 DETENT BALL SPRING 18 PIVOT LINK 19 MOUNTING PLATE VALVE BLOCK 20 SEAL POLY PACK 12500625 21 SCREW SOC HD 5 16 18 UNC X 1 2 22 SCREW SH...

Page 67: ...Schematics Section 5 11 AB46 Work Platform 5 3 Figure 5 6 Hydraulic Valve Ports...

Page 68: ...Section 5 12 AB46 Work Platform Schematics 5 3 5 2 Figure 5 7 Check Ports...

Page 69: ...Valve Spool 2 Position 3 Way 4 Adapter 10MB 8MJ 5 Valve Flow Control 6 Valve Spool 2 Way N O 7 Adapter 45 4MB 4MJ 8 Adapter 45 10MB 8MJ 9 Plug 8 SAE 10 Adapter 12MB 12MJ 11 Plug 4 SAE 12 Steel Ball 15...

Page 70: ...tart 13 Terminal Strip 14 Cable Connector 3 4 15 Switch Platform Level 16 Switch Platform Rotate 17 Switch Turret Rotate 18 Cable Connector 1 2 19 Circuit Breaker 10 amp 20 Terminal End 21 End Cap Con...

Page 71: ...Schematics Section AB46 Work Platform 5 15 5 5 Figure 5 10 Electrical Diagram Upper Control Box Gasoline Model Figure 5 11 Electrical Diagram Upper Control Box Diesel Model...

Page 72: ...7 Relay SPDT 8 Retainer Clip 1 pole 9 Socket Four Relay 10 Retainer Clip 4 pole 11 Relay 12 VDC 4 pole 12 End Block Terminal 13 Jumper 3 pin 14 Terminal Block orange 15 Socket Single Relay Table 5 6...

Page 73: ...Schematics Section AB46 Work Platform 5 17 5 6 Figure 5 14 Electrical Diagram Lower Control Box Gas Model 068328 001...

Page 74: ...Schematics Section 5 18 AB46 Work Platform 5 6 Figure 5 15 Electrical Diagram Lower Control Box Diesel Model 068328 002...

Page 75: ...a Gas 68661 000 6 26 Fuel Tank Assembly AB46 Gas 68710 000 6 30 Engine Assembly AB46 Kubota Diesel 68666 000 6 32 Fuel Tank Assembly AB46 Diesel 68710 001 6 36 Duel Fuel Conversion Kit 68296 000 6 38...

Page 76: ...8 GA 63 FT 203 29434 099 CABLE 3 10 GA 9 14 GA 11FT 204 29434 099 CABLE 3 10 GA 9 14 GA 63 FT 205 29433 099 CABLE 24 COND 18 GA 63 FT 206 29447 099 WIRE 3 COND 16 GA 13 FT 207 29447 099 WIRE 3 COND 16...

Page 77: ...Illustrated Parts Breakdown 6 2 Section AB46 Work Platform 6 3 FINAL ASSEMBLY AB46 GAS DRAWING 1 OF 4...

Page 78: ...Section 6 4 AB46 Work Platform 6 2 Illustrated Parts Breakdown 6 2 FINALASSEMBLY AB46 GAS DRAWING 2 OF 4...

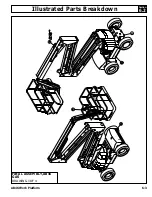
Page 79: ...Illustrated Parts Breakdown 6 2 Section AB46 Work Platform 6 5 FINAL ASSEMBLY AB46 GAS DRAWING 3 OF 4...

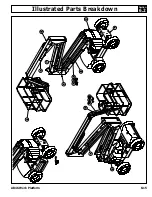
Page 80: ...Section 6 6 AB46 Work Platform 6 2 Illustrated Parts Breakdown 6 2 FINALASSEMBLY AB46 GAS DRAWING 4 OF 4...

Page 81: ...Illustrated Parts Breakdown 6 2 Section AB46 Work Platform 6 7 NOTES...

Page 82: ...0 TERMINAL PIN 12 205 29496 099 WIRE 2 COND 16 GA 5 FT 206 29496 099 WIRE 2 COND 16 GA 37 FT 207 29496 099 WIRE 2 COND 16 GA 24 FT 209 29498 099 WIRE 4 COND 16 GA 11 FT 210 29447 099 WIRE 3 COND 16 GA...

Page 83: ...Illustrated Parts Breakdown 6 2 Section AB46 Work Platform 6 9 FINAL ASSEMBLY AB46 DIESEL DRAWING 1 OF 4...

Page 84: ...Section 6 10 AB46 Work Platform 6 2 Illustrated Parts Breakdown 6 2 FINALASSEMBLY AB46 DIESEL DRAWING 2 OF 4...

Page 85: ...Illustrated Parts Breakdown 6 2 Section AB46 Work Platform 6 11 FINAL ASSEMBLY AB46 DIESEL DRAWING 3 OF 4...

Page 86: ...Section 6 12 AB46 Work Platform 6 2 Illustrated Parts Breakdown FINALASSEMBLY AB46 DIESEL DRAWING 4 OF 4...

Page 87: ...Illustrated Parts Breakdown 6 2 Section AB46 Work Platform 6 13 NOTES...

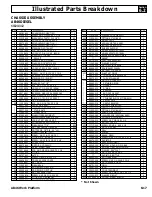
Page 88: ...731 000 HOSE GUARD JIB 1 11 68732 000 HOSE CLAMP JIB 3 12 11248 004 NUT HEX ESNA 1 4 20 UNC 17 13 11240 004 WASHER 1 4 STD FLAT 17 BASIC ASSEMBLY AB46 DIESEL 68305 000 ITEM PART DESCRIPTION QTY 1 6832...

Page 89: ...Illustrated Parts Breakdown 6 2 Section AB46 Work Platform 6 15...

Page 90: ...SHER 6 4 54 68386 001 DOOR WELDMENT R H 1 55 68386 000 DOOR WELDMENT L H 1 56 11248 004 NUT HEX ESNA 1 4 20 4 57 11252 016 SCREW HHC GR5 1 4 20 UNC 4 58 68680 007 FITTING 90 DEG ELBOW 2 201 68381 000...

Page 91: ...4 68386 001 DOOR WELDMENT R H 1 55 68386 000 DOOR WELDMENT L H 1 56 11248 004 NUT HEX ESNA 1 4 20 4 57 11252 016 SCREW HHC GR5 1 4 20 UNC 4 58 68680 007 FITTING 90 DEG ELBOW 2 201 68381 000 CHASSIS WE...

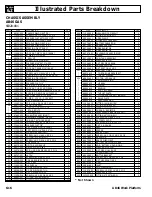
Page 92: ...Illustrated Parts Breakdown 6 2 Section AB46 Work Platform 6 18 CHASSIS ASSEMBLY AB46 GAS DIESEL DRAWING 1 OF 2...

Page 93: ...Illustrated Parts Breakdown 6 2 Section AB46 Work Platform 6 19 CHASSIS ASSEMBLY AB46 GAS DIESEL DRAWING 2 OF 2...

Page 94: ...62642 034 BUSHING 1 75 X 2 28DU32 14 22 62642 028 BUSHING 1 75 X 1 28DU16 4 23 62642 031 BUSHING 1 75 X 1 50 28DU24 16 24 62642 036 BUSHING 1 50 X 1 25 24DU20 4 25 65214 000 ROD END PIN RETAINER 3 8...

Page 95: ...Illustrated Parts Breakdown 6 2 Section AB46 Work Platform 6 21...

Page 96: ...5 BUSHING 1 25 X 1 75 20DU28 8 25 62642 027 BUSHING 1 75 X 75 28DU12 2 26 62642 031 BUSHING 1 75 X 1 50 28DU24 2 27 62642 029 BUSHING 1 75 X 1 75 28DU28 2 28 11764 120 RETAINING RING TRUARC 5100 125 2...

Page 97: ...Illustrated Parts Breakdown 6 2 Section AB46 Work Platform 6 23...

Page 98: ...4 5 49 11238 005 WASHER SPLIT LOCK 5 16 4 50 11254 006 SCRW HHC GR5 3 8 16 UNC X 3 4 6 51 11238 006 WASHER SPLIT LOCK 3 8 6 52 14996 006 WASHER 3 8 FLAT SAE 6 54 68792 000 BRACKET 1 55 68793 000 BRACK...

Page 99: ...Illustrated Parts Breakdown 6 2 Section AB46 Work Platform 6 25...

Page 100: ...REW HHC 5 16 18 UNC X 1 1 4 4 44 11273 005 NUT HEX JAM 5 16 18 UNC 4 45 11238 005 LOCK WASHER SPLIT RING 4 46 REF ELECTRIC FUEL PUMP 1 47 20495 004 NUT HEX JAM 1 4 28 UNF 3 48 30624 019 CHOKE ANGLE 1...

Page 101: ...ANIFOLD NUTS 1 67615 018 MUFFLER 1 67615 013 RADIATOR 1 67615 116 DRAIN COCK 1 67615 117 COOLING FAN 1 67615 015 WATER PUMP W GASKET 1 67615 016 THERMOSTAT 1 67615 118 THERMOSTAT GASKET 1 ITEM PART DE...

Page 102: ...Illustrated Parts Breakdown 6 2 Section AB46 Work Platform 6 28 ENGINE ASSEMBLY AB46 KUBOTA GAS DRAWING 1 OF 2...

Page 103: ...Illustrated Parts Breakdown 6 2 Section AB46 Work Platform 6 29 ENGINE ASSEMBLY AB46 KUBOTA GAS DRAWING 2 OF 2...

Page 104: ...L TANK ASSEMBLY AB46 GAS 68710 000 ITEM PART DESCRIPTION QTY 1 068671 000 FUEL TANK 1 2 063982 003 FUEL GAGE 1 3 011919 002 PLUG 1 4 2 4 063929 001 CAP NON VENTED 1 5 003495 000 FITTING STREET ELBOW 1...

Page 105: ...Illustrated Parts Breakdown 6 2 Section AB46 Work Platform 6 31 NOTES...

Page 106: ...36 11937 006 FITTING 90 10FJX 10MJ 1 37 11253 010 SCREW HHC 5 16 18 X 1 1 4 4 38 REF AIR CLEANER HOSES CLAMPS 1 39 11240 006 WASHER FLAT STD 3 8 2 40 11238 005 WASHER 5 16 SPLIT LOCK 4 41 11273 005 NU...

Page 107: ...SMALL 1 67614 054 SPIN ON ELEMENT 1 67614 007 IN LINE FUEL FILTER 1 67614 026 MECHANICAL FUEL PUMP 1 67614 016 OVERFLOW TANK KIT 1 68694 019 THERMOSTAT HOUSING 1 67614 075 SHUT DOWN SOLENOID 1 67614...

Page 108: ...Illustrated Parts Breakdown 6 2 Section AB46 Work Platform 6 34 ENGINE ASSEMBLY AB46 KUBOTA DIESEL DRAWING 1 OF 2...

Page 109: ...Illustrated Parts Breakdown 6 2 Section AB46 Work Platform 6 35 ENGINE ASSEMBLY AB46 KUBOTA DIESEL DRAWING 1 OF 2...

Page 110: ...EM PART DESCRIPTION QTY 1 068671 000 FUEL TANK 1 2 063982 003 FUEL GAGE 1 3 010178 001 FITTING BARBED 1 8 1 4 063929 001 CAP NON VENTED 1 5 003495 000 FITTING STREET ELBOW 1 4 2 6 010178 005 FITTING B...

Page 111: ...Illustrated Parts Breakdown 6 2 Section AB46 Work Platform 6 37 NOTES...

Page 112: ...7615 069 FTG STR 2 NPT 5 16 HOSE BARB 2 20 67615 070 FEMALE ADAPTER PROPANE TANK 1 21 67615 073 FTG STR 2MP 6MJ BRASS 1 22 67615 075 RELIEF VALVE 400 PSI 1 23 67615 074 FTG 2 2 2 STR TEE BRASS 1 24 68...

Page 113: ...Illustrated Parts Breakdown 6 2 Section AB46 Work Platform 6 39...

Page 114: ...8425 000 MOUNTING PLATE VALVE BLOCK 1 20 12499 016 SEAL POLYPAK 12500625 1 21 14334 004 SCREW SOC HD 5 16 18 UNC X 1 2 4 22 15936 005 SCREW SHOULDER 3 8 X 5 8 LG 1 23 11941 002 FITTING 202702 4 6S 1 2...

Page 115: ...Illustrated Parts Breakdown 6 2 Section AB46 Work Platform 6 41...

Page 116: ...EXPANDER KOENIG 1 4 4 5 68579 000 VALVE FLOW CONTROL 1 6 68596 000 VALVE SPOOL 2 WAY N O 2 7 11935 001 ADAPTER 45 EL 4MB 4MJ 2 8 11935 005 ADAPTER 45 EL 10MB 8MJ 2 9 12004 008 PLUG 8 S A E 4 10 11941...

Page 117: ...Illustrated Parts Breakdown 6 2 Section AB46 Work Platform 6 43...

Page 118: ...90 ELBOW 6MP 4MJ 1 4 21305 007 PLUG MAGNETIC 1 5 63935 000 STRAINER 1 6 11939 024 FITTING STR ADAPTER 16MP 16MJ 1 7 13485 017 FITTING 45 ELBOW 12MP 12MJ 1 8 61818 000 STRAINER 1 9 11940 010 FITTING 9...

Page 119: ...Illustrated Parts Breakdown 6 2 Section AB46 Work Platform 6 45 NOTES...

Page 120: ...UG 437 HEYCO 1 1 209 64443 002 CONTACT BLOCK N C 1 1 210 64443 001 CONTACT BLOCK N O 2 2 ITEM PART DESCRIPTION QTY QTY GAS DIESEL 001 002 212 68588 001 KEY SELECTOR SWITCH 1 1 68807 010 KEY 1 1 213 08...

Page 121: ...Illustrated Parts Breakdown 6 2 Section AB46 Work Platform 6 47 GROUND CONTROL BOX ASSEMBLY AB46 GAS DIESEL DRAWING 1 OF 4...

Page 122: ...Illustrated Parts Breakdown 6 2 Section AB46 Work Platform 6 48 GROUND CONTROL BOX ASSEMBLY AB46 GAS DIESEL DRAWING 2 OF 4...

Page 123: ...Section AB46 Work Platform 6 49 6 2 Illustrated Parts Breakdown GROUNDCONTROLBOX ASSEMBLY AB46 GAS DRAWING 3 OF 4...

Page 124: ...Section 6 50 AB46 Work Platform 6 2 Illustrated Parts Breakdown GROUND CONTROL BOX ASSEMBLY AB46 DIESEL DRAWING 4 OF 4...

Page 125: ...Illustrated Parts Breakdown 6 2 Section AB46 Work Platform 6 51 NOTES...

Page 126: ...6 32 UNC X 3 4 4 14 11248 047 NUT HEX 6 32 UNC ESNA 4 15 11709 006 SCREW RD HD 10 24 UNC X 3 4 3 CONTROLLER INSTALLATION AB46 GAS 68339 002 ITEM PART DESCRIPTION QTY 16 11248 003 NUT HEX 10 24 UNC ESN...

Page 127: ...6 32 UNC X 3 4 4 14 11248 047 NUT HEX 6 32 UNC ESNA 4 15 11709 006 SCREW RD HD 10 24 UNC X 3 4 3 CONTROLLER INSTALLATION AB46 DIESEL 68339 003 ITEM PART DESCRIPTION QTY 16 11248 003 NUT HEX 10 24 UNC...

Page 128: ...L END 2 30 68698 001 TERMINAL BLOCK TAN 16 31 68698 002 TERMINAL BLOCK BLUE 3 32 68799 000 ANGLE CONTROLLER 1 33 67662 001 RELAY SOCKET 4 34 67661 001 RELAY SPDT 12 VOLT 4 35 67662 005 RETAINING CLIP...

Page 129: ...Illustrated Parts Breakdown 6 2 Section AB46 Work Platform 6 55 CONTROLLER ASSEMBLY AB46 GAS DRAWING 1 OF 2...

Page 130: ...Illustrated Parts Breakdown 6 2 Section AB46 Work Platform 6 56 CONTROLLER ASSEMBLY AB46 GAS DRAWING 2 OF 2...

Page 131: ...Illustrated Parts Breakdown 6 2 Section AB46 Work Platform 6 57 NOTES...

Page 132: ...98 001 TERMINAL BLOCK TAN 16 31 68698 002 TERMINAL BLOCK BLUE 3 32 68799 000 ANGLE CONTROLLER 1 33 67662 001 RELAY SOCKET 4 34 67661 001 RELAY SPDT 12 VOLT 4 35 67662 005 RETAINING CLIP WIRE 4 36 1125...

Page 133: ...Illustrated Parts Breakdown 6 2 Section AB46 Work Platform 6 59 CONTROLLER ASSEMBLY AB46 DIESEL DRAWING 1 OF 2...

Page 134: ...Illustrated Parts Breakdown 6 2 Section AB46 Work Platform 6 60 CONTROLLER ASSEMBLY AB46 DIESEL DRAWING 2 OF 2...

Page 135: ...Illustrated Parts Breakdown 6 2 Section AB46 Work Platform 6 61 NOTES...

Page 136: ...X 1 14 68763 063 1 4 HOSE ASSY X 63 6FJX 4FJX 1 15 68740 066 1 2 HOSE ASSY X 66 10FJX 10FJX 1 16 68736 075 3 16 HOSE ASSY X 75 4FJX 4FJX 1 17 68737 028 1 4 HOSE ASSY X 28 4FJX 4FJX 1 18 68736 021 3 16...

Page 137: ...Illustrated Parts Breakdown 6 2 Section AB46 Work Platform 6 63...

Page 138: ...ART DESCRIPTION QTY 1 67609 000 WHEEL 16 5 X 8 25 6 HOLE 6 BC 1 2 67610 000 TIRE 10 16 5 NHS 8 PLY 1 3 12282 001 VALVE STEM 1 TIRE WHEEL ASSEMBLY POLY FILLED AB46 GAS DIESEL 67664 002 003 ITEM PART DE...

Page 139: ...Illustrated Parts Breakdown 6 2 Section AB46 Work Platform 6 65 NOTES...

Page 140: ...R 1 7 63650 012 GAS SPRING 1 8 15936 010 SHOULDER BOLT 2 9 11248 005 LOCKNUT 2 10 11939 004 FITTING 4MP 4MJ 2 11 11737 012 ROLLPIN 1 4 X 1 1 2 1 12 11703 008 SCREW HHC 1 4 20 X 1 1 2 1 13 11248 004 NU...

Page 141: ...Illustrated Parts Breakdown 6 2 Section AB46 Work Platform 6 67...

Page 142: ...Illustrated Parts Breakdown 6 2 Section AB46 Work Platform 6 68 CAGE A AB46 68500 000 ITEM PART DESCRIPTION QTY 1 68500 000 CAGE A WELDMENT 1...

Page 143: ...Illustrated Parts Breakdown 6 2 Section AB46 Work Platform 6 69 4 FT CAGE AB46 68500 003 ITEM PART DESCRIPTION QTY 1 68500 003 CAGE WELDMENT 4 FT 1...

Page 144: ...634 001 LABEL AB46 2 41 061683 005 LABEL UPRIGHT 5 43 061683 007 LABEL UPRIGHT 1 48 068649 000 LABEL CAUTION RAISE JIB BOOM 1 2 061205 002 NAME PLATE BOOM 1 3 065368 000 TACK 4 5 066552 000 LABEL EXPL...

Page 145: ...Illustrated Parts Breakdown 6 2 Section AB46 Work Platform 6 71...

Page 146: ...8 SCR HHC 3 4 10 UNC X 1 1 5 11238 016 WASHER SPLIT LOCK 1 6 29496 099 WIRE C COND 16 GA 8 FT 7 11709 004 SCREW 10 24 UNC X 1 2 LG 4 8 11248 003 LOCKNUT 10 24 UNC ESNA 4 9 11252 006 SCREW HHC 1 4 20UN...

Page 147: ...Illustrated Parts Breakdown 6 2 Section AB46 Work Platform 6 73...

Page 148: ...Call Toll Free in U S A 1 800 926 LIFT UpRight Inc 1775 Park Street Selma California 93662 TEL 209 891 5200 FAX 209 896 9012 PARTS 1 888 UR PARTS PARTSFAX 209 896 9244 068343 001 068343 001 9805 5 D...

Reviews: