17
NEEDLE THREAD TAKE-UP
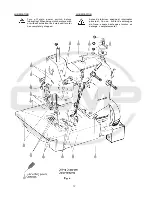
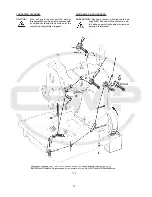
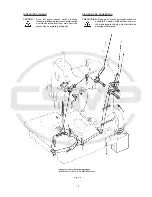
Basically the needle thread take-up roller (B, Figs. 5 and
5A), located left on the upper bed casting under the face
cover, is set as low as possible.
In case more needle thread should be pulled off for a bigger
needle thread loop (depending on thread and fabric), raise
the needle thread take-up roller accordingly.
Fasten the needle thread guide (C, Figs. 5 and 5A), located
on the top of the upper bed casting, approx. in the middle of
its shank.
THREAD TENSION
Regulate the tension on the threads so that uniform stitches
are produced.
In general the tension applied to the needle thread is slightly
higher than the tension applied to the looper thread(s).
Turning the tension nuts clockwise increases the tension,
turning counterclockwise decreases the tension.
CHANGING THE NEEDLE
CAUTION!
Turn off main power switch before
changing the needle! When using clutch
motors with or without actuation lock wait
until the motor has stopped!
Turn the handwheel pulley in operating direction until the
needle is in its upmost position.
Unthread the eye of the needle to be changed.
Loosen screw (D, Figs. 5 and 5A) for the needle and pull
out the needle. Insert the shank of the new needle as far as
it will go and with the long groove of the needle facing to the
front (toward the operator). Tighten screw (D) on the seat of
the needle shank and thread the needle eye.
EDGE GUIDE AND STITCH TONGUE
CAUTION!
Turn off main power switch before setting
edge guide and stitch tongue and changing
the seam width! When using clutch motors
with or without actuation lock wait until
the motor has stopped!
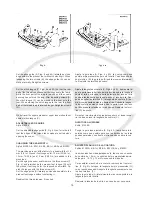
Styles 81500A, B, B1H, B2, BA, BA1H, BA2 and 81500C,
see Fig. 6.
Style 81500E, see Fig. 6 A.
ALIMENTACION DEL HILO DE LA AGUJA
Generalmente el rodillo del alimentador del hilo de la aguja
(B, Figs. 5 y 5A), que está situado en la parte delantera
izquierda del brazo debajo de la tapa frontal, debería estar
fijado tan bajo como sea posible.
En el caso que se necesite más hilo para crear un lazo de hilo
más grande (dependiendo del hilo y tela) tiene que subir el
rodillo adecuadamente.
Fije el guía hilo (C, Fig. 5 y 5 A), que está situada en la parte
delantera superior del brazo, aproximadamente en la mitad de
su mango.
TENSION DE LOS HILOS
Regule la tensión de los hilos de tal manera que se logre una
formación uniforme de la costura.
Normalmente el hilo de la aguja tiene más tensión que el hilo
del looper.
Girar las tuercas del tensor en sentido de reloj aumenta la
tensión, girar en sentido contra el reloj la disminuye.
CAMBIO DE AGUJA
PRECAUCION! Antes de cambiar la aguja, apague el inte-
rruptor principal de la máquina. Con un mo-
tor de embrague sin freno, espere hasta que
el motor se detenga completamente!
Gire el volante en sentido de operación hasta que la aguja se
encuentre en su posición superior.
Retire el hilo del ojo de la aguja.
Suelte el tornillo fijador de la aguja (D, Fig. 5 y 5 A) y quite la
aguja. Inserte la nueva aguja en tal manera que el cabo de la
aguja toque el final de la barra de la aguja y la ranura de la
aguja esté posicionada hacia adelante en dirección al operador.
Apriete el tornillo (D) otra vez en la superficie plana para asentar
la aguja y enhebre el hilo por el ojo de la aguja.
GUIA TOPE Y LENGUETA DE COSTURA:
PRECAUCION! Antes de cambiar la guía tope y la lengüe-
ta de costura, apague el interruptor princi-
pal de la máquina. Con un motor de embra-
gue sin freno, espere hasta que el motor se
detenga completamente!
Para estilos 81500A, B, B1H, B2, BA, BA1H, BA2 y 81500C,
favor ver Fig. 6.
Para estilo 81500E, vea Fig. 6 A.
Summary of Contents for 81500B2
Page 8: ...8 INSTALLATION INSTALACION...
Page 10: ...10...
Page 21: ...21...
Page 23: ...23 Fig 10 Fig 11 Fig 11 A Fig 11 B Fig 11 C Fig 12...
Page 25: ...25...
Page 28: ...28...
Page 33: ...33 VIEWS AND DESCRIPTION OF PARTS VISTAS Y DESCRIPCIONES DE LAS PARTES Y PIEZAS...
Page 34: ...34...
Page 36: ...36...
Page 38: ...38...
Page 40: ...40...
Page 42: ...42...
Page 44: ...44...
Page 46: ...46...
Page 48: ...48...
Page 50: ...50...
Page 52: ...52...
Page 54: ...54...
Page 56: ...56...
Page 58: ...58...
Page 60: ...60...
Page 62: ...62...
Page 64: ...64...
Page 68: ......


