


PART II: INSTALLATION
16
Priming the pump and adjustments
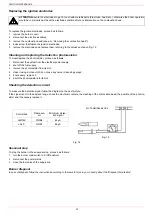
1
remove the electric panel cover;
2
prime the oil pump, by means of the related contactor: check the motor rotation and keep pressed for some seconds until the oil cir-
cuit is charged bleed the air from the
M
pressure gauge port of the pump (see picture below), loosening the cap without removing
it; then release the contactor;
3
Remove the actuator cover.
4
Turn the burner on by means of its main switch
A
(Fig. 10): if the burner locks (LED
B
on in the control panel) press the RESET
button (
C
) on the control panel (Fig. 10) - page 19;
5
start the burner up by means of the thermostat series and wait until the pre-purge time comes to an end;
6
Keep the burner to the low flame stage by disconnecting the
TAB
thermostat (remove the bricge between terminals 6 and 7).
7
Proceed as follows acting on the ST1 actuator cam to adjust the air flow rate in the low flame stage, checking the combustion
values:
8
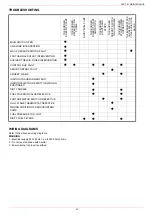
Refer to the next table for cams functions.
Berger STA4: this actuator is not provided with the manual control of the air damper. The adjustment of the cams is carried out by
means of a screwdriver, by twisting the
VS
screw located inside the cam.
Berger STA6: this actuator is not provided with the manual control of the air damper. The adjustment of the cams is carried out by
means of the cam lever
Siemens SQN72: a key is provided to move cams I and IV, the other cams can be moved by means of screws. On the Siemens
actuator the AUTO/MAN mode is provided (see picture).
9
by removing the bridge between the 6 and 7 terminals of the
TAB
thermostat , the actuator moves to the position (degrees) set for
the ST1 cam (low flame cam);
10 to decrease the low flame position (and then decrease the opening angle of the actuator), move the cam to a lower position: the
actuator will close to the new position of ST1;
11 to increase the low flame position, move the cam higher to the required position, make the bridge between the 6 and 7 terminals
only for a while and then remove it immediately: the actuator will move for just few degrees towards the high flame, then it will move
down to the new ST1 low flame position;
12 now, charge the oil ciruit of the second nozzle by pressing the P1 button (see next picture);
Suntec J6-J7
PG60: Berger STA4.5
PG70 - PG81: Berger STA6
PG60 - PG70 - PG81: Siemens SQN72
BERGER STA4.5 BERGER STA4.5 Siemens SQN72
”Air adjustment in high flame” cam
I
ST2
III
Air adjustment in low flame - Stand-by - Ignition cam
II
ST1
I
Auxiliary cam for the opening consent to the second fuel valve
III
MV
II
VR
M
I
II
III
ST2
MV
ST1
III
II
I
AUTO/MAN