


-----------------------------------------------------------------------------------------------------------------------------------------------------------------------------------------------------------------------------------------------------------------------------------------------------------------------------------------------------------------------------------------------
RU 16
UTV 82
RU 17
To set the time zone, make sure the display shows the time with the
ZONE
icon. Then
press and hold
MODE
.
Press UP (▲) or
DOWN
(▼) to adjust value in steps of 30 min. Press and hold either
button for fast advance. Press
MODE
to confirm your selection.
SELECT THE CLOCK/CALENDAR DISPLAY
Each time you press
MODE
, you may rotate from one of the following displays to the
next:
- Hour: Minute: Second
- Hour: Minute: Weekday
- Hour: Minute: Weekday of the Time Zone
- Hour: Minute: Second of the Time Zone
- Day: Month
• WAKE-UP ALARM FUNCTION
There are three time alarms available on the main unit:
* Weekday Alarm
The alarm sound will be activated and the icon will flash on weekdays (Mo-Fr) when it
is armed and the alarm time is reached.
* Single Alarm
The alarm sound will be activated and the icon will flash when it is armed and the alarm
time is reached. Once it finished, it will be disabled automatically
* Pre-Alarm
The pre-alarm will be activated and the icon will flash if the temperature of channel 1 is
falling to +0 ºC or below.
It is programmable 15, 30, 45, 60 or 90 minutes earlier than the weekday alarm or single
alarm time.
ACTIVATING / DEACTIVATING THE TIME ALARMS
1. Press
ALARM
to rotate between:
- Weekday Alarm Time (displays OFF if weekday alarm deactivated)
- Single Alarm Time (displays OFF if single alarm deactivated)
- Pre-Alarm Time (displays OFF if pre-alarm deactivated)
2. When the above alarms are displayed, pressing UP (▲) will activate, pressing
DOWN
(▼) will deactivate the corresponding alarm.
Note:
Press
MODE
anytime during above alarm selection mode to return to normal clock
display.
SETTING THE TIME ALARMS
1. Press
ALARM
to select the alarm which you wish to configure.
2. Press and hold
ALARM
until hour starts flashing in the display
3. Set Alarm Hour:
Press
UP
(▲) or
DOWN
(▼) to adjust. Press and hold either button for fast changes.
Press
ALARM
to confirm your selection.
4. Set Alarm Minutes:
Press
UP
(▲) or
DOWN
(▼) to adjust. Press and hold either button for fast changes.
Press
ALARM
to confirm your selection
5. Upon completion the display will be returned to the alarm selection screen.
Note: Pre-alarm cannot be activated if weekday alarm or single alarm is not enabled.
STOP THE ALARM SOUND
The alarm will sound for 2 minutes with increasing intensity.
To stop it, press
ALARM
during the Alarm Sound to disable the alarm.
Note: For weekday alarm, pressing
ALARM
will only disable the alarm for the current
day. The alarm will be activated again the next day (if it falls within Monday to Friday).
If the Alarm is not interrupted by pressing the ALARM key while the sound is active, it
will repeat itself after 8 minutes for 3 times. If you want to stop the alarm in one of the 8
minute periods, you have to do as described in “Activating/Deactivating the Time Alarms”.
• TROUBLESHOOTING
In case of a malfunction, always check the batteries and replace them in the main unit
and in the sensor(s) with new ones.
Please also check below issues before contacting customer service.
Summary of Contents for UTV-82
Page 2: ...RU 2 UTV 82...
Page 3: ...UTV 82 RU 3 433 0 50 o 0 70 10g C 7 B D...
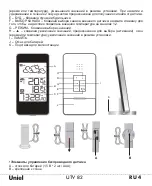
Page 4: ...RU 4 UTV 82 1 5 2 A B A B H D G I E F J C K 2 E F 1 2 G H I J K...
Page 5: ...UTV 82 RU 5 2 6 1 2 Chanel 1 3 2 4 2 20 30 30...
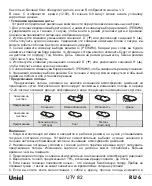
Page 6: ...RU 6 UTV 82 1 3 12 00 6 8 1 G 3 2 D H 3 3 G 12 24 4 D H 5 G 6 G 2 12 24 1 2 3 4 70 30 5 6...
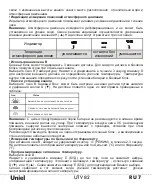
Page 7: ...UTV 82 RU 7 H 3 3 D D 0 G 2 3 C F D H Icon Status...
Page 19: ...161 311110 86 571 86262828...
Page 20: ......