-----------------------------------------------------------------------------------------------------------------------------------------------------------------------------------------------------------------------------------------------------------------------------------------------------------------------------------------------------------------------------------------------
RU 16
UTV 82
code and will then no longer be recognized by the display unit. You can resolve this
problem by:
- removing the batteries from the display unit and replacing them with new ones
or
- if the batteries are still O.K., repeating the logging in procedure as described above by
pressing and holding the▼ button for 3 seconds and while the wave icon is blinking, press
and hold the ▼ button again for 3 seconds. The temperature indicator will start to blink
indicating that a new sensor is being searched for and will be logged in.
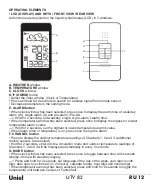
VIEWING REMOTE (CHANNEL) TEMPERATURE
Select the TEMPERATURE window.
Static Display: Press the
CHANNEL
button to select measurements from different
remote sensors (channel 1, 2 or 3).
Channel Auto-Scan Display: To enable an automatic scan of all present channels, press
and hold
CHANNEL
, until the icon is displayed. The measurements from each
remote channel will be alternately displayed with a 5 seconds viewing.
NOTE:
the channel auto-scan feature can be activated only if there are more than one
remote sensors operating and are set to different channels.
PROGRAMMING TEMPERATURE IN CELSIUS OR FAHRENHEIT
Select the TEMPERATURE window.
Press and hold
MODE
button for 3 seconds to toggle the temperature unit in Celsius (ºC)
or Fahrenheit (ºF).
TEMPERATURE ALARM
Select the TEMPERATURE window.
Press
ALARM
button selecting the desired alarm, the upper temperature alert with icon
(if disabled, display shows
OFF
), or lower temperature alert with icon (if disabled,
display shows
OFF
).
Press and hold
ALARM
button until the temperature digits flashing. Adjust the
temperature digits using the
UP
(▲) or
DOWN
(▼). Press and hold either button for fast
setting. Press the
ALARM
to confirm selection and return to the temperature alarm
selection screen
ACTIVATING OR DEACTIVATING TEMPERATURE ALARMS:
Once the above alerts are displayed, press the
UP
(▲) to enable or
DOWN
(▼) to disable the
alert.
VIEWING MAX/MIN READINGS
Select the TEMPERATURE window.
Press the
MEM
button to read the minimum temperature of all sensors (indoor and
remote) with the MIN, next MEM press the maximum values with the
MAX
icon and then
back to the current values.
RESETTING TEMPERATURE MEMORIES
Select the TEMPERATURE window.
Press and hold the MEM button for 3 seconds to clear all max/min memories.
• CLOCK WINDOW
For all operations described in Chapter 4.3, press
UP
(▲) or
DOWN
(▼) until the
TIME
icon, in the left corner of the time window, begins to flash.
HOW TO SET THE CLOCK MANUALLY
To set the clock manually, make sure the display shows the time (
not
the
ZONE
) and then
press and hold MODE.
Now it will show the language. You may choose among English (En), German (DE),
French (Fr), Italian (IT), Spanish (SP), Dutch (Du) and Swedish (SW). Press
UP
(▲) or
DOWN
(▼) to change it.
Press
MODE
to confirm. Repeat the same procedure to set the year, month, day,
day-month format, 12/24 hour format, hour and minute. During the setting, press and hold will
change the value rapidly.
If there is an item you do not wish to change, simply press
MODE
to bypass the item.
After the last setting, pressing
MODE
will exit the setting mode and return to the clock
mode.
HOW TO SET THE TIME ZONE
Summary of Contents for UTV-82
Page 2: ...RU 2 UTV 82...
Page 3: ...UTV 82 RU 3 433 0 50 o 0 70 10g C 7 B D...
Page 4: ...RU 4 UTV 82 1 5 2 A B A B H D G I E F J C K 2 E F 1 2 G H I J K...
Page 5: ...UTV 82 RU 5 2 6 1 2 Chanel 1 3 2 4 2 20 30 30...
Page 6: ...RU 6 UTV 82 1 3 12 00 6 8 1 G 3 2 D H 3 3 G 12 24 4 D H 5 G 6 G 2 12 24 1 2 3 4 70 30 5 6...
Page 7: ...UTV 82 RU 7 H 3 3 D D 0 G 2 3 C F D H Icon Status...
Page 19: ...161 311110 86 571 86262828...
Page 20: ......


