Uniden TRU 8880 Series Owner'S Manual Download Page 73

T H E   I N T E G R A T E D   A N S W E R I N G   D E V I C E   [ 7 1 ]

w w w . u n i d e n . c o m

4) Enter a command within 15 seconds; each command there after must be entered 

within 2 seconds. You may select a command from the following chart:


* For the Repeat a Message function, press 

0

 then 

1

 within about four seconds to 

repeat the previous message, or press 

0

 then 

1

 after about four seconds to repeat 

the current message.

** For the Memo Record and Greeting Message Record function, the first time you 

enter the corresponding command, it starts the Recording function. If you want 
to stop the recording, press 

0

 then 

7

,

 8

 or 

5

.

5) After the command has finished, you hear intermittent beeps indicating that the 

system is in the command waiting mode. You may enter another command at this 
time from the chart above.

6) When you are finished, hang up to exit the system. The answering system 

automatically returns to standby.
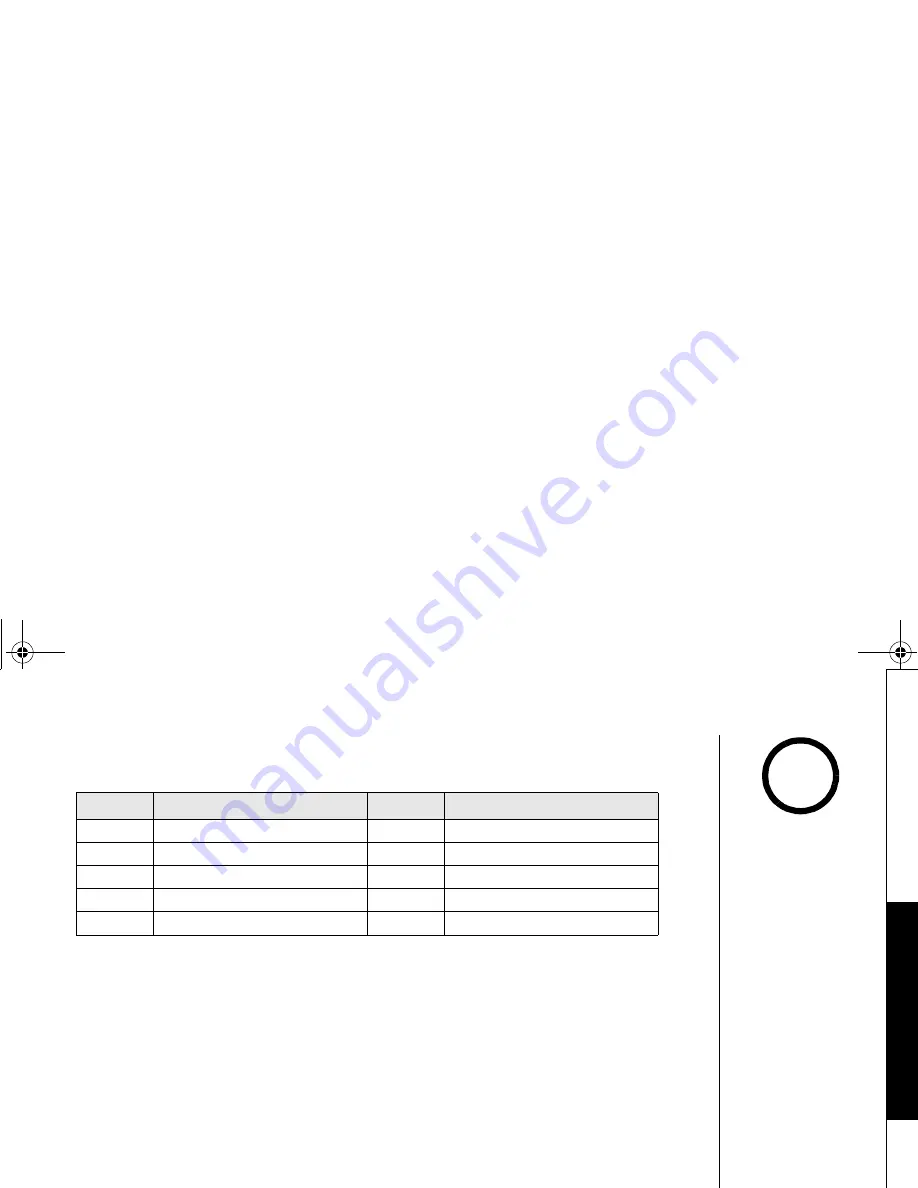
Command

Function

Command

Function

0

 then 

1

Repeat a Message*

0

 then 

6

Answering System On

0

 then 

2

Playing incoming Messages

0

 then 

7

Memo Record/Stop**

0

 then 

3

Skipping a Message

0

 then 

8

Greeting Message Record/Stop**

0

 then 

4

Deleting a Message

0

 then 

9

Answering System Off

0

 then 

5

Stop Operation

1

 then 

0

Help

•Time stamp will not be 

heard until you have set 

the time. See "Setting 

Day and Time" on page 

29 or 60.

•The system will only 

playback messages for 

four minutes and then it 

returns to the command 

waiting mode. To 

continue playing your 

messages, press 0 then 2 

again within 15 

seconds.

•If you enter an incorrect 

PIN code three times, 

you will hear a beep and 

the system will return to 

standby.

•During the remote 

operation, 

Line Remote


appears on the display.

•If the answering system 

is recording an incoming 

message, the recording 

operation is cancelled 

when you start remote 

operation.

•For your convenience a 

remote operation card is 

provided for you to use 

while away from home 

(refer to page 92).

note

TH

E IN

TE

G

R

A

T

ED 

AN

S

W
E

R

I

N

G DE

VI

CE

TRU8880_1st.book  71 ページ  2004年1月7日 水曜日 午後6時30分

Summary of Contents for TRU 8880 Series

Page 1: ...TRU 8880 SERIES OWNER S MANUAL ...

Page 2: ......

Page 3: ...ps for Entering Names and Special Characters 44 CALLER ID 50 Caller ID and CIDCW Caller ID on Call Waiting 50 Viewing the Caller ID List 51 Deleting a Caller ID Message 52 Using the Caller ID Message List 53 Call Waiting Deluxe Features 55 THE INTEGRATED ANSWERING DEVICE 56 The Integrated Telephone Answering Device 56 Turning the Answering System On Off 57 Setting up your Answering System 58 Using...

Page 4: ... unit for explanation purposes As an Energy Star Partner Uniden has determined that this product or product models meets the Energy Star guidelines for energy efficiency Energy Star is a U S registered mark 5 8GHz Digital Expandable Integrated Answering Device 10 Multi Handset Expandability Hands Free Duplex speakerphone in the Handset Base Caller ID Call Waiting Deluxe subscribe through local tel...

Page 5: ...gital transmissions The result is a more secure conversation with the clarity of digital sound extended range and minimal interference from other cordless phones IntegriSound Built in sound quality which provides life like conversations With DirectLink mode you can use 2 or more handsets as radio transceiver walkie talkies Be sure to visit our web site www uniden com Uniden is a registered tradema...

Page 6: ... 8 9 vol P 37 17 10 tone P 39 44 11 speaker P 34 12 intcom hold P 75 35 13 Headset Jack Cover 14 talk flash P 34 35 15 end P 34 16 cid P 51 17 P 44 18 phonebook P 42 19 Handset Microphone 20 Handset Charging Contacts 2 1 4 3 5 6 7 8 9 10 11 12 19 20 14 17 18 15 16 13 Play Skip Repeat Retrieve TAD message with Handset Remote Keys C O F U TRU8880_1st book 4 ページ 2004年1月7日 水曜日 午後6時30分 ...

Page 7: ...icrophone 28 memo record P 68 29 do not disturb P 38 DND LED 30 clock menu P 59 31 find hs intercom P 75 32 Message Counter Display 33 repeat select P 67 34 skip select P 67 35 Base Speaker 36 delete P 68 37 speaker P 34 speaker LED 38 mute P 39 39 volume and P 37 40 hold P 35 41 set P 60 42 DC IN 9V Jack 43 TEL LINE Jack 44 Base Antenna C O F U TRU8880_1st book 5 ページ 2004年1月7日 水曜日 午後6時30分 ...

Page 8: ...ppears when you mute the handset Talk The Speaker icon appears when the handset speaker phone is used Talk The Privacy icon appears when the Privacy Mode is turned on Talk The Recording icon appears while recording a conversation 570 CPFUGV 0GY 4 07 Ringer off icon when the ringer is off day of the week and time battery icon Handset ID and Banner Number of new Caller ID calls received If there are...

Page 9: ... the phone Confirmation Done Deleting Deleted Making a call Also the animation display changes depending on the ringer volume setting Out of Range Unavailable Low Battery 9GNEQOG 2NGCUG 9CKV PF QPG GNGVGF 6CNM 76 9 07 4KPIGT 8QNWOG 4 07 4KPIGT 8QNWOG 4 07 4KPIGT 8QNWOG 4 07 1WV 1H 4CPIG 7PCXCKNCDNG QY CVVGT D I S P L A TRU8880_1st book 7 ページ 2004年1月7日 水曜日 午後6時30分 ...

Page 10: ...ear while the handset is charging The function of each soft key is determined by the icon that appears directly above it For example when the handset is in standby mode pressing soft key 1 will redial the last dialed number When the handset is in talk mode pressing soft key 1 will mute the microphone Complete information on the features controlled by the soft keys can be found under each feature I...

Page 11: ... window by a street with heavy traffic Avoid microwave ovens Avoid excessive moisture extremely low temperatures dust mechanical vibration or shock Avoid personal computers Avoid heat sources such as radiators air ducts and sunlight Avoid television sets and other electronic equipment For maximum range Keep the antenna free of obstruction When the handset is not in use place the handset in an upri...

Page 12: ... the connector s wire colors to the polarity label in the battery compartment the connector notches fit into the grooves of the jack only one way Push the battery pack connector into the jack until it clicks into place 3 Make sure you have a good connection by gently pulling on the battery wires If the connection is secure the battery jack will remain in place 4 Place the battery case cover back o...

Page 13: ...check to see that the AC adapter is plugged in and the handset makes good contact with the base charging contacts 4 After installing the battery pack in handset charge your handset for least 15 20 hours before plugging into the phone line 5 Once the handset battery pack is fully charged connect the telephone line cord to the TEL LINE jack and to a telephone outlet Use only the supplied AD 830 AC a...

Page 14: ...ll mount adapter into the notches on the base 5 Plug the AC adapter into a standard 120V AC wall outlet Hook the cord on the notch of the wall mount adapter 6 Plug the telephone line cord into the telephone outlet Hook the cord on the notch of the wall mount adapter 7 Align the mounting slots on the base with the mounting posts on the wall Then push in and down until the phone is firmly seated DO ...

Page 15: ...essive lengths Make sure the wall material is capable of supporting the weight of the base and handset Use 10 screws minimum length of 1 3 8 inches with anchoring devices suitable for the wall material where the base unit will be placed 1 Insert two mounting screws into the wall with their appropriate anchoring device 3 15 16 inches apart Allow about 1 8 of an inch between the wall and screw heads...

Page 16: ... is received Connecting the Charger 1 Connect the AC adapter to the DC IN 9V jack and to a standard 120V AC wall outlet 2 Set the charger on a desk or tabletop and IMPORTANT If you purchase a TCX800 extra handset please register the handset to the original main base before use The TCX800 will not operate until it is registered If you change a global setting in one handset you change that particula...

Page 17: ...base the handset ID will be assigned 1 Before registering the extra handset the battery pack MUST be charged for 15 20 hours 2 Place the extra handset in the main base unit to begin registration 3 While the handset is registering Handset Registering will appear in the LCD When Registration Complete is displayed the handset has been registered to the base If Registration Failed appears please try t...

Page 18: ... settings Function Default Settings Function Default Settings Ringer Tone Flicker Day Time SUN 12 00 AM Distinctive Ring On CW CWDX CW on CWDX off Auto Talk Off Dial Mode Tone Anykey Answer Off Area code None Banner Security code 80 Language LCD English Ring Time Toll Saver Contrast level 5 Recording Time 1 minute Key touch tone On Message alert Off Animation Screen On Call Screen On For Global Se...

Page 19: ...MENU soft key to access the main menu Use vol and vol to scroll through options Press the OK soft key to make a selection Press the BACK soft key to return to the previous screen Press end to exit the menu KTGEV KPM QFG 4QQO QPKVQT CPFUGV 5GVWR 1 G E T T I N G S T A R T E D TRU8880_1st book 17 ページ 2004年1月7日 水曜日 午後6時30分 ...

Page 20: ... feature Using DirectLink Mode 1 Press the MENU soft key and select the DirectLink Mode menu To enter DirectLink mode press ENTER appears 2 Press the ENTER soft key to enter DirectLink mode You will hear a confirmation tone and DirectLink Mode Complete appears 3 To return to normal mode press the CANCEL soft key and then the OK soft key or return the handset to the cradle 6Q GPVGT KTGEV KPM OQFG R...

Page 21: ...t key and select the Room Monitor menu To Room Monitor appears 2 Select the handset or base you want to monitor by using vol or vol 3 Press the OK soft key RoomMonitor appears and you hear sounds in the room where the handset or the base is installed 4 To turn off the Room Monitor press the END soft key Monitor using handset or base unit 4QQO QPKVQT 㨬㨭 CPFUGV 0 This feature only works when the han...

Page 22: ... Song When the Irish Eyes Are Smiling Irish Eyes Aura Lee Let Me Call You Sweet Heart Sweetheart Star Spangled Banner Star Spngl Old MacDonald Old MacDld You must set a separate ringer tone on the base and on each handset 1 Press the MENU soft key Select the Handset Setup menu and then the Ringer Tone submenu 2 Press vol or vol to move the pointer You will hear the ringer or melody as you scroll t...

Page 23: ... distinctive rings to multiple phonebook memory locations Switching the setting to Distinctive Off disables distinctive ringing all incoming calls will have a normal ring tone Switching to Distinctive On activates all programmed distinctive ring memory locations 1 Press the MENU soft key Select the Handset Setup menu and then the Distinctive Ring submenu 2 Press vol or vol to select On or Off 3 Pr...

Page 24: ...Off 3 Press the OK soft key You will hear a confirmation tone Setting the Anykey Answer Any Key Answer allows you to answer the phone by pressing any number key tone or on the handset 1 Press the MENU soft key Select the Handset Setup menu and then the Anykey Answer submenu 2 Press vol or vol to select On or Off 3 Press the OK soft key You will hear a confirmation tone WVQ 6CNM 1P 1HH 6 1 P MG PUY...

Page 25: ...ner submenu 2 Use the number keypad 0 9 tone or the DELETE soft key to enter or edit the name 3 Press the OK soft key You will hear a confirmation tone Selecting a Language Language selects which language the menu display will use Choose from English French or Spanish 1 Press the MENU soft key Select the Handset Setup menu and then the Language submenu 2 Press vol or vol to choose English Français...

Page 26: ...s the OK soft key You will hear a confirmation tone Setting the Key Touch Tone Key Touch Tone is the tone your keypad makes when keys are pressed You can turn this tone on or off 1 Press the MENU soft key Select the Handset Setup menu and then the Key Touch Tone submenu 2 Press vol or vol to select On or Off 3 Press the OK soft key You will hear a confirmation tone QPVTCUV 1 G 6QWEJ 6QPG 1P 1HH 6 ...

Page 27: ...K soft key You will hear a confirmation tone See Animation Displays Handset only on page 7 for all the available screens Answering System Setup This main menu option allows you to set up the built in answering device Setting a PIN Code Security code selects a two digit Personal Identification Number PIN code A PIN code is required to play your messages from a remote location 1 Press the MENU soft ...

Page 28: ...ess vol or vol to select a Ring Time Toll Saver 2 Times 4 Times or 6 Times 3 Press the OK soft key You will hear a confirmation tone Setting the Record Time Record Time sets the duration for recording the incoming messages You have three record time options The options 1 minute or 4 minutes set the duration for recording the incoming messages Announce only answers the call but prevents the caller ...

Page 29: ...y You will hear a confirmation tone Turning the message alert tone off by pressing any key To quickly turn off the Message Alert tone press any key on the base unit the tone will automatically deactivate Turning the message alert tone off from a remote location When all new messages are played back using the remote playback feature see pages 70 to 73 the Message Alert tone will automatically deact...

Page 30: ...ish 3 Press the OK soft key You will hear a confirmation tone Setting the Call Screen Without answering the call Call Screen allows you to listen from the base to the incoming message being left by the caller 1 Press the MENU soft key Select the Answ Setup menu and then the Call Screen submenu 2 Press vol or vol to select On or Off 3 Press the OK soft key You will hear a confirmation tone CPIWCIG ...

Page 31: ...en the Day Time submenu option 2 Press vol or vol to select the day of the week and then the soft key 3 Press vol or vol to set hour and then press the soft key 4 Press vol or vol to set minute and then press the soft key 5 Press vol or vol to choose AM or PM and then press the SAVE soft key You will hear a confirmation tone C 6KOG 10 5 8 For setting the Day and Time the idle time out is extended ...

Page 32: ...t area code number in the Area Code option your local area code does not appear in the Caller ID message For calls received from outside your local area code you will see a full 10 digit number Note If your calling area requires 10 digit dialing do not program this option 1 Press the MENU soft key Select the Global Setup menu and then the Area Code submenu 2 Press the number keypad 0 9 to enter a ...

Page 33: ...s otherwise set the unit to pulse dialing If your phone system requires pulse dialing and you need to send DTMF tones in certain situations during a call you may switch over to tone dialing refer to Tone Dialing Switch over on page 39 1 Press the MENU soft key Select the Global Setup menu and then the Dial Mode submenu 2 Press vol or vol to select Tone or Pulse the initial setting is Tone 3 Press ...

Page 34: ...ndby mode select Deregister HS in the menu and press the OK soft key Deregister HS appears 2 Press vol or vol to select Yes and then the OK soft key When de registration is complete you will hear a confirmation tone and Deregistration Complete appears 3 After de registering the handset place the handset to the base to register You must re register the handset before you can use it GTGIKUVGT 5 GU 0...

Page 35: ...ee conversations You can easily switch a call from normal conversation to hands free conversation To switch a call press speaker during the call 6CNM 76 07 For best performance talk alternately with the caller in a quiet room You can decrease the speaker volume if you or the other party has difficulty hearing note B A S I C S TRU8880_1st book 33 ページ 2004年1月7日 水曜日 午後6時30分 ...

Page 36: ...radle 1 Press speaker 2 Listen for the dial tone 3 Dial the number OR Dial the number and then press speaker To hang up Press end or return the handset to the cradle AutoStandby To enter a pause within the dialing sequence When you dial the number in standby mode press PAUSE soft key P appears in the display which represents a pause To set Autotalk see page 22 or to set Anykey Answer see page 22 T...

Page 37: ... returns to standby mode 1 During a call press intcom hold on the handset or hold on the base The call will be put on hold If you leave a call on hold for more than 10 seconds the display screen will read Line On Hold 2 To talk to the caller press talk flash or speaker on a handset or speaker on the base The phone will return back to the call QNF VQ VTCPUHGT CPFUGV CPFUGV 6 1 You must subscribe th...

Page 38: ...up press end Deleting a Redial Record 1 With the phone in standby mode press the REDIAL soft key 2 Press vol or vol repeatedly to display the number to be deleted 3 Press the DELETE soft key 4 Press vol or vol to choose Yes 5 Press the OK soft key The redialed number is deleted Storing a Redial Record 4GFKCN 6 6 6 5614 4GFKCN 5614 4GFKCN 5614 vol or vol vol or vol GNGVG 4GFKCN GU 0Q 1 If the numbe...

Page 39: ...n the handset and ten levels on the base Pressing the volume up key or volume down key on the handset or base during a call will change the earpiece or speaker volume This setting will remain in effect after the telephone call has ended If you press the volume up key when the earpiece is at the maximum volume level an error tone sounds The error tone also sounds if you press the volume down key at...

Page 40: ...ering system on automatically The answering system setting will reset to the original setting when you cancel the DND If you press answer on off when the DND and the answering system is on both of the DND and the answering system will turn off Temporarily Muting the Ringer You can also mute the ringer individually on a handset or on the base When the phone is ringing pressing end on the handset yo...

Page 41: ...hone press mute on the base to mute the microphone To cancel muting press mute again or press speaker Tone Dialing Switch over If your telephone company requires pulse dialing you can switch over to tone dialing after the call connects This feature is useful when you need tone dialing to use any automated menu systems such as telephone bank tellers telephone prescriptions refills customer support ...

Page 42: ...ithin 30 seconds and then press talk flash or speaker mode Privacy Mode Privacy mode prevents interruption from other registered handsets or the base This works only when the phone is in use 1 Press the MENU soft key on the handset 2 While you are using the Phone press vol or vol to move the pointer to Privacy Mode and then the OK soft key Privacy Mode On and appear in the display To exit Privacy ...

Page 43: ... Outside line Handset Handset Base 1 Initate the call normally Once the call is in progress other people can join in the call 2 To join a conference call from a handset press talk flash or speaker to use the handset speakerphone To join a conference call from the base press speaker 3 To leave a conference call simply hang up as you normally would All other parties will remain connected 4 To end a ...

Page 44: ...hen the phone is in standby mode press phonebook The following items appear 1st line The number of the phonebook locations used 2nd line How to search press the number keypad vol or vol 3rd line How to store press the STORE soft key 4th line The BACK COPY and STORE soft keys 2 Press the STORE soft key Store Edit Name appears 3 Enter the name up to 16 characters by using the 2JQPGDQQM 5GCTEJ 㨲 㨱 5V...

Page 45: ... SPD1 SPD0 8 Press the OK soft key You will hear a confirmation tone and Done appears in the display Chain Dialing The memory locations in the handset are not limited to phone numbers You can also store a group of numbers up to 20 digits that you need to enter once your call connects This is referred to as Chain Dialing An example of this is a bank account number Store the account number in one of...

Page 46: ...ters With each press of a number key 0 9 the displayed character appears in the following order Upper case letters first lower case letters next and finally the number corresponding to the key If you make a mistake while entering a name Number of times key is pressed P H TRU8880_1st book 44 ページ 2004年1月7日 水曜日 午後6時30分 ...

Page 47: ... 3 five times 7 Press 7 eight times 8 When finished press the OK soft key To continue to store the telephone number proceed to step 5 in Phonebook Storing Phone Numbers Names Distinctive Rings and Speed dial on page 43 If the next character uses the same number key you must press to move the cursor over Otherwise the next time you press the number key it changes the character that was previously s...

Page 48: ...honebook locations appear in alphabetical order from first to last when you press vol from last to first when you press vol You can also use the letters on the number keys to select the first letter of the desired name Press a number key 2 9 and 0 once for the first letter twice for the second letter and so on The first location that begins with the letter you entered appears For example to search...

Page 49: ... to dial see Viewing the Phonebook on page 46 3 Press the DIAL soft key The number in the displayed phonebook location is dialed 4 To hang up press end Speed Dialing If you store a phone number in a speed dial memory location 10 locations SPD1 SPD0 you can use the speed dialing feature When the phone is in standby mode press and hold a number key 0 9 associated with the speed dial until the phone ...

Page 50: ... Store Edit Name appears 2 Follow the steps 3 to 7 under Phonebook Storing Phone Numbers Names Distinctive Rings and Speed Dial on page 42 to complete the editing operation 3 Press the OK soft key You will hear a confirmation tone b Deleting the Stored Data 1 When the phonebook location to be deleted appears press the DELETE soft key Delete Memory appears 2 Press vol or vol to move the pointer to ...

Page 51: ...t key 4 Press vol or vol to select One Memory or All Memories and then press the OK soft key If you select All Memories Are you sure appears on the display screen Press vol or vol to select Yes and then press the OK soft key If you select One Memory press vol or vol or the number key 2 9 and 0 to select the phonebook location you want to export and then press the COPY soft key 6Q YJKEJ WPKV CPFUGV...

Page 52: ... Caller ID message is not stored when you have stored 100 of the phonebook locations When you have stored 100 of the phonebook locations and Caller ID messages in total the earliest Caller ID message is overwritten 1 When the Caller ID message is received the display shows the caller s phone number along with the date and time The incoming call information is stored in 2 CPG 5OKVJ 6 5614 The date ...

Page 53: ...s Viewing the Caller ID List The Caller ID list stores information for incoming calls even unanswered calls You can store up to 100 Caller ID messages and Phonebook locations including Speed Dials for each handset You can view the Caller ID list through the handset during a call or when the phone is in standby mode 1 Press cid The summary screen appears The screen shows the The number of calls fro...

Page 54: ...nless you exit and re enter the operation 3 To finish the viewing operation press end or the BACK soft key or talk flash during a call Deleting a Caller ID Message Deleting Information from the Caller ID List 1 When the phone is in standby mode view the Caller ID information to be deleted see Viewing the Caller ID List on page 51 2 Press the DELETE soft key Delete Caller ID appears 3 Press vol or ...

Page 55: ...D list Standby mode 1 When the phone is in standby mode select the Caller ID message see Viewing the Caller ID List on page 51 2 To have the phone dial a 1 before the displayed Caller ID number press tone To have the phone dial the stored area code before the displayed Caller ID number press 3 Press talk flash or speaker on the handset The displayed phone number dials CNNGT 0GY 6QVCN 6 GNGVG NN GU...

Page 56: ... in memory you will hear a beep and This data is already stored appears The number will not be stored 2 To complete the setting follow the steps 4 8 in Phonebook Storing Phone Numbers Names Distinctive Rings and Speed dial on page 43 When a long distance call has been set 1 appears in the display If a call comes in via a telephone system that does not offer Caller ID service no information is stor...

Page 57: ...o select an option For example press vol 4 times press vol 2 times 3 Press the OK soft key A confirmation screen will appear and the phone returns to the call UM VQ QNF 6GNN WU QTYCTF CNN 1 QTYCTF CNN PUYGT TQR QPHGTGPEG 1 QPHGTGPEG TQR KTUV TQR CUV 1 To activate features and display the CWDX soft key select CW On CWDX On in the CIDCW option See page 30 You can also answer a waiting call immediate...

Page 58: ...you re away from your phone Features Digital Tapeless Recording Up to 12 minutes of Recording Time Call Screening Personal or Default Pre recorded Outgoing Messages Voice Prompts for ITAD Setup English Spanish or French Time and Day Announcement Remote Message Retrieval Toll Saver Conversation Recording Voice Memo Message Alert On Off Retrieve TAD Messages using Handset T H E I N T E G R A T E D A...

Page 59: ...ar a confirmation tone The message counter displays the number of messages stored in memory If the display Functions Default Setting Reference Page To activate the clock and time stamp you must setup the Time function Base Handset Answer On Off On 57 Time SUN 12 00 AM 60 29 Security Code 80 61 25 Ring Time Toll Saver 61 26 Record Time 1 minute 62 26 Message Alert Off 63 27 Language English 64 28 C...

Page 60: ...ve finished recording your greeting press greeting set or play stop You will hear a confirmation tone and your recorded greeting plays back for you Choosing between the two outgoing messages When the phone is in standby mode press greeting Press greeting again when the outgoing message is played Each time greeting is pressed the outgoing message is switched between the pre recorded and the persona...

Page 61: ...top to exit the menu mode or clock menu to move to the next menu option You can also set these menus from the handset See Answering System Setup on page 25 for instructions clock menu clock menu clock menu clock menu clock menu clock menu clock menu clock menu Time Security Code Ring Time Record Time Message Alert Language Call Screening Return to Standby For your convenience voice prompts will gu...

Page 62: ...nounced 5 Press set to select the hour 6 Press skip select or repeat select until you hear the correct minute setting The numbers 00 through 59 appears on the base as each minute is announced 7 Press set to select the minute 8 Press skip select or repeat select until you hear the correct AM or PM setting The message counter displays or 9 Press set to select the AM PM setting A confirmation tone so...

Page 63: ...nces the new PIN code Setting the ring time The ring time setting allows you to set the number of rings the caller hears before your answering system plays the outgoing message You can set the ring time to answer after two four or six rings Setting TS Toll Saver the answering system picks up after two rings if you have new messages and after four rings if there are none This way if you make a long...

Page 64: ...one sounds the system announces the new record time Announce only feature The Announce only feature plays a pre recorded outgoing message or your own personal outgoing message but it will not allow the caller to leave a message To set Announce only follow the steps in Selecting the message record time To choose between the pre recorded message or your own personal greeting press greeting when the ...

Page 65: ...nds the system announces the current setting you have selected When the first new message is received the alert tone will begin to sound Turning the message alert tone off by pressing any key You can also turn off the Message Alert tone by pressing any key on the base unit The tone will deactivate until another new message is received The tone will also deactivate when all messages are played back...

Page 66: ...lect the language 3 Press set A confirmation tone sounds the system announces the new setting in the selected language Call screen You can use your answering machine to screen calls before you answer them 1 Press clock menu seven times The current Call Screen setting on or off appears on the base 2 Press skip select or repeat select to choose or 3 Press set A confirmation tone sounds and the syste...

Page 67: ...tically From the handset 1 Press the SCREEN soft key when the system is answering To mute the Call Screen press the MUTE soft key when the system is answering 2 To answer the call press talk flash speaker or any number key tone or when Any Key Answer is set to on To cancel the call screen press end The answering system will disconnect If you set the call screen to off you can not screen a call If ...

Page 68: ...ay that each message was received is announced after the message is played The message counter will then display the number of current stored messages 2 When all new messages have been played you hear a confirmation tone and the system announces End of messages The system returns to standby 3 After you have reviewed your new messages you can play your old messages by again pressing Once you have l...

Page 69: ...ssage group 3 Press play stop at any time to stop reviewing messages and return to standby The message counter shows the number of messages stored in memory Skipping a message 1 Press play stop to review your messages The number of stored messages is announced 2 Press skip select at anytime to skip to the next message Each time skip select is pressed the system scans forward one message If you hav...

Page 70: ...again When you try to delete all messages without first listening to your new messages you hear several short beeps followed by an announcement Please playback all messages This protects you from accidentally erasing messages you have not yet reviewed Voice memo The voice memo function allows the user to record messages more than 2 seconds and within 4 minutes 1 Press and hold memo record You hear...

Page 71: ...using the base speaker phone press and hold memo record on the base until you hear a confirmation tone The unit begins recording and flashes on the display A confirmation tone that can be heard by both parties sounds during recording 2 To stop recording press play stop or memo record You hear a confirmation tone Every state has different regulations governing the recording of conversations over th...

Page 72: ...your telephone number and wait for the system to answer If the answering system is off it will answer after about 10 rings and sounds a series of beeps 2 During the greeting message or a series of beeps when the answering system is off press 0 and enter your PIN code within 2 seconds 3 The answering system announces the current time and the number of messages stored in memory You hear To play inco...

Page 73: ...ically returns to standby Command Function Command Function 0 then 1 Repeat a Message 0 then 6 Answering System On 0 then 2 Playing incoming Messages 0 then 7 Memo Record Stop 0 then 3 Skipping a Message 0 then 8 Greeting Message Record Stop 0 then 4 Deleting a Message 0 then 9 Answering System Off 0 then 5 Stop Operation 1 then 0 Help Time stamp will not be heard until you have set the time See S...

Page 74: ...does not answer within 6 seconds you hear a beep and the phone will return to standby If you receive a call the remote operation is cancelled During the remote operation appears on the base If you have new messages and old messages after you have reviewed your new messages you can play your old messages by pressing 2 again 3 Enter a command within 30 seconds Select a command from the following cha...

Page 75: ...ommand You may enter another command at this time from the chart above 5 When you are finished press end to exit the system The answering system automatically returns to standby 1 Repeat a Message 6 Answering System On 2 Playing incoming Messages 7 Memo Record Stop 3 Skipping a Message 8 Greeting Message Record Stop 4 Deleting a Message 9 Answering System Off 5 Stop Operation 0 Help Guidance The v...

Page 76: ...DirectLink standby mode press the DirecLink soft key example of DirectLink from handset 1 2 Select the handset to which you wish to DirectLink with by pressing the number keys 0 9 Your handset will then page the other handset 3 On the receiving handset press talk flash the ANSWER soft key or if Any Key Answer is on press any number key tone or 570 CPFUGV KTGEV KPM QFG 0 KTGEV KPM 6Q KTGEV KPM C JC...

Page 77: ...e CANCEL soft key on the initiating handset 3 To answer the page on a handset press talk flash intcom hold or the ANSWER soft key or find hs intercom or speaker on the base If Any Key Answer is enabled pressing a number key tone or will answer the page If AutoTalk is enabled you can answer the page by simply picking up the handset To answer a page on the base press find hs intercom or speaker 4 To...

Page 78: ...ase to transfer the call to within 10 seconds To select the handset or the base press vol or vol and then press the OK soft key If you select All all other handsets and the base will be paged The call will automatically be placed on hold and an intercom tone sounds To cancel the transfer press talk flash or speaker on the initiating handset 3 To answer the page on a handset press talk flash intcom...

Page 79: ...3 On the receiving handset to answer the call press talk flash or intercom hold Or press any number key tone or when Any Key Answer is on or pick up the handset from the cradle when AutoTalk is on To cancel intercom press speaker on the base 4 To hang up the intercom call press end on the hanset or find hs intercom on the base 5 To speak to the caller press talk flash on the receiving handset M U ...

Page 80: ...Register the handsets by following step 2 3 in Registering the handset on page 15 Installing the Beltclip To attach the beltclip Insert the beltclip into the holes on each side of the handset Press down until it clicks To remove the beltclip Pull either side of the beltclip to release the tabs from the holes Headset Installation Your phone may be used with an optional headset To use this feature i...

Page 81: ...mage from fire or electrical shock only use the Uniden battery model and Uniden adapter model specifically designated for this product Power Failure During the period that the power is off you will not be able to make or receive calls with the telephone Caution Use only the specified Uniden battery pack BT 446 Do not remove the batteries from the handset to charge them Never throw the battery into...

Page 82: ...he charging contacts on the handset once a month Using water only dampen a cloth to clean the charging contacts Then make sure to go back over the charging contacts with a dry cloth before returning the handset to the base to charge Caution Do not use paint thinner benzene alcohol or other chemical products Doing so may discolor the surface of the telephone and damage the finish QY CVVGT contacts ...

Page 83: ...nd BT 446 and AD 0005 with your phone If the handset is left off of the base the actual Talk mode duration will be reduced respective to the amount of time the handset is off the base Recharge your phone on a regular basis by returning the handset to the base after each phone call When the operating time becomes short even after the battery is recharged please replace the battery With normal usage...

Page 84: ...ke or receive calls Check both ends of the base telephone line cord Make sure the AC adapter is plugged into the base and wall outlet Disconnect the AC adapter for a few minutes and then reconnect it De register the handset see De register the Handset on page 32 and register the handset see Register the Handset on page 15 Make sure that you are not too far from the base Make sure the line is not i...

Page 85: ... page 15 The handset doesn t communicate with other handsets De register the handset see De register the Handset on page 32 and register the handset see Register the Handset on page 15 Make sure that you have registered all handsets The handset or the base can t join the conversation Make sure there are not 2 handsets already using the 3 way conference feature Make sure that another handset or bas...

Page 86: ...ng the correct PIN number Make sure that the touch tone phone you re using can transmit the tone for at least two seconds If it cannot you may have to use another phone to access your phone Time stamp cannot be heard Make sure you have set the time see Setting Day and Time on page 29 or 60 If you still have a problem Call our customer hotline at 1 800 297 1023 Symptom Suggestion T R O U B L E S H ...

Page 87: ...he battery pack disconnected for at least 3 days 4 Once the handset is completely dry reconnect the battery pack and the battery cover 5 Recharge the handset s battery pack for 20 hours before using again Base 1 Disconnect the AC adapter from the base unit cutting off electrical power 2 Disconnect the telephone cord from the base unit 3 Let dry for at least 3 days IMPORTANT You must unplug the tel...

Page 88: ...outlet and refer servicing to qualified service personnel under the following conditions A When the power supply cord is damaged or frayed B If liquid has been spilled into the product C If the product has been exposed to rain or water D If the product does not operate normally when following the operating instructions Adjust only those controls that are covered by the operating instructions Impro...

Page 89: ...pany for information about their installation Hardwired Jack Some equipment is wired directly to a phone jack and these types of installations require a modular jack converter This type of installation is not difficult however you should contact your Uniden telephone dealer or a telephone supply store for advice about the proper adapter or converter for your particular situation Connecting the Tel...

Page 90: ...t provides an indication of the maximum number of terminals allowed to be connected to a telephone interface The termination on an interface may consist of any combination of devices subject only to the requirement that the sum of the Ringer Equivalence Numbers of all the devices does not exceed five RADIO EQUIPMENT The term IC before the radio certification number only signifies that Industry Can...

Page 91: ...0 21 22 23 24 25 26 27 35 36 37 38 39 40 41 42 43 44 45 46 47 48 49 50 51 52 53 54 55 56 57 58 59 60 61 Name Phone No 69 70 71 72 73 74 75 76 77 78 79 80 81 82 83 84 85 86 87 88 89 90 91 92 93 94 95 Name Phone No Memory List TRU8880_1st book 89 ページ 2004年1月7日 水曜日 午後6時30分 ...

Page 92: ...Memo TRU8880_1st book 90 ページ 2004年1月7日 水曜日 午後6時30分 ...

Page 93: ...ringer 21 E F G H Earpiece volume 37 Expanding your phone 14 General information 81 hands free conversation 33 Headset installation 78 I J K L I C notice 88 Important safety instructions 86 Intercom 75 Key touch tone 24 Language 23 Liquid damage 85 M N O Making a call 33 Message alert 63 Mute 39 P Q Phonebook Privacy Mode 40 R Receiving a call 33 Redialing a call 36 Register the handset 15 Remote ...

Page 94: ...ed in memory and the voice prompts 3 To quit hang up the phone Turn on the answering system remotely 1 Call your phone and let it ring 10 times until you hear a beep 2 Press 0 and then enter your PIN code 3 Press 0 then 5 to stop the announcement 4 Press 0 then 6 to turn the answering system on C U T REMOTE OPERATION CARD Remote access away from home 1 Call your phone number from a touch tone phon...

Page 95: ...Skipping a Message Deleting a Message Stop Operation Answering System On C U T Task Key Repeat a Message Playing incoming Messages Skipping a Message Deleting a Message Stop Operation Answering System On C U T Task Key Repeat a Message Playing incoming Messages Skipping a Message Deleting a Message Stop Operation Answering System On Memo Record Stop Greeting Message Record Stop Answer System Off H...

Page 96: ...FG 4QQO QPKVQT CPFUGV 5GVWR 1 6Q GPVGT KTGEV KPM OQFG RTGUU 06 4 06 4 CPFUGV CPFUGV CUG CPFUGV CPFUGV CPFUGV CPFUGV CPFUGV 6Q 4QQO QPKVQT CPFUGV CPFUGV 1 QPVTCUV G 6QWEJ 6QPG PKOCVKQP 5ETGGP P MG PUYGT CPPGT CPIWCIG 4KPIGT 6QPGU KUVKPEVKXG 4KPI 0 5 6 5 672 WVQ 6CNM 1 570 CPFUGV KTGEV KPM QFG 0 KTGEV KPM Handset MENU or OK Enter or OK OK TRU8880_1st book 94 ページ 2004年1月7日 水曜日 午後6時30分 ...

Page 97: ...9 5 672 1 9 TGC QFG KCN QFG C 6KOG 1 5 672 1 PUY 5GVWR NQDCN 5GVWR GTGIKUVGT 5 1 GTGIKUVGT 5 GU 0Q 1 GTGIKUVTCVKQP QORNGVG 1 2NCEG JCPFUGV QP OCKP DCUG VQ TGIKUVGT or or OK CPFUGV 5GVWR PUY 5GVWR NQDCN 5GVWR 1 OK OK OK or Handset M A IN ME N U F LO W C H A RT TRU8880_1st book 95 ページ 2004年1月7日 水曜日 午後6時30分 ...

Page 98: ...y matters regarding the operation of this unit available accessories or any other related matters Thank you for purchasing a Uniden product Hours M F 8 00 AM to 5 00 PM CST www uniden com For information on the accessibility features of this product please call 1 800 874 9314 V TTY May be covered under one or more of the following U S patents 4 523 058 4 595 795 4 797 916 5 381 460 5 426 690 5 434...

Page 99: ......

Page 100: ...THANK YOU FOR BUYING A UNIDEN PRODUCT REGISTER ONLINE TODAY FO R A CCESSO R IES G O O N LIN E W W W U N ID EN CO M ...

Reviews: