background image

Select left selection        

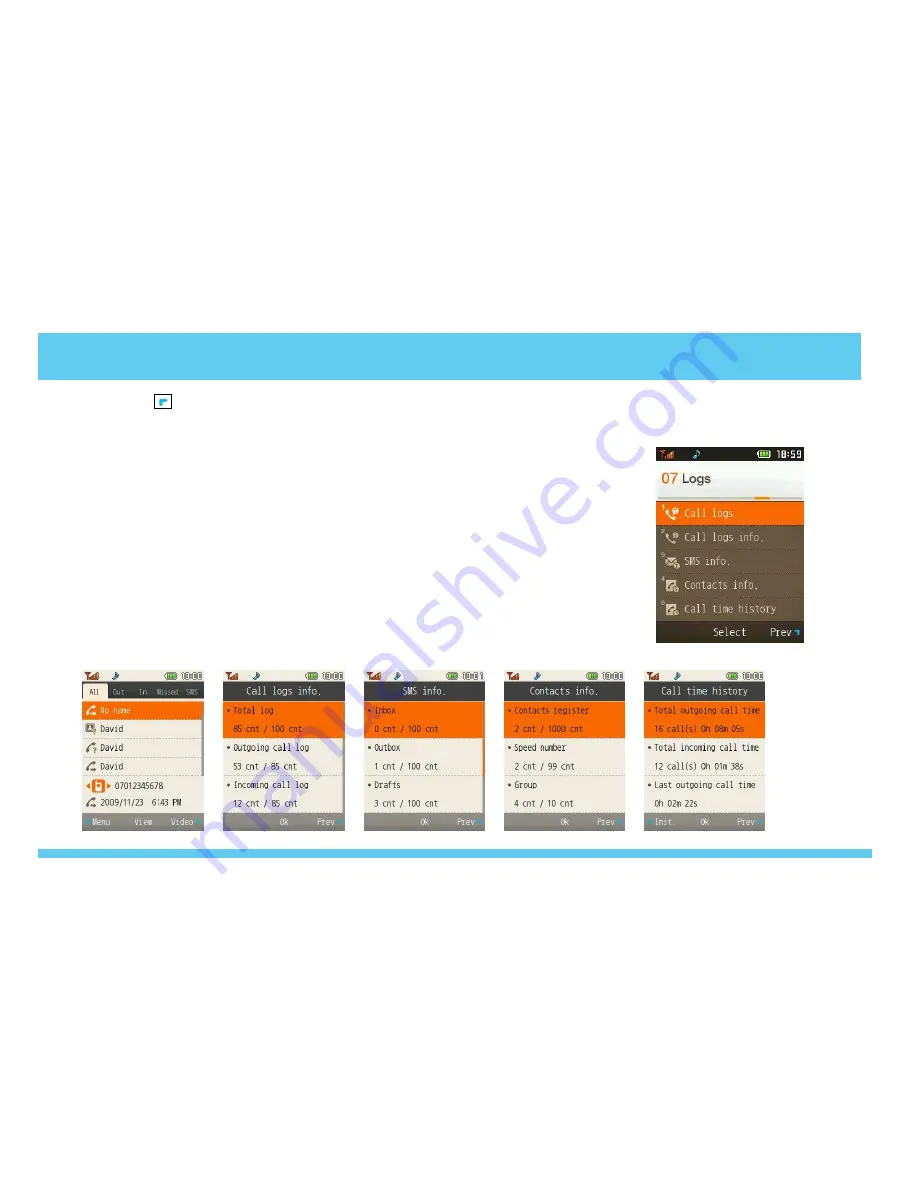
Menu > Logs > Call history

Log information about the communication history of the device. The device registers missed , received calls and SMS history up to 100. 

To move to another tab press the <CRL> then use the <direction Key>

Call logs info

To view the total number of calls, Select 

Menu > Logs > Clogs info

Logs

SMS info

To view the total number of messages, Select 

menu > logs > SMS info

Contacts info

To view the total number of contacts registered, speed dials and groups, Select 

Menu > logs > Contacts info

Call time history

To view the total time of outgoing and incoming calls, Select 

Menu > logs > Call time hist.

32

Summary of Contents for SQ-3500

Page 1: ......

Page 2: ...ications and instructions for SQ 3500 phone operation This manual must be read before operating the product The SQ 3500 phone access point is required to use this product Usage of the SQ 3500 access point provided in the full package is recommended ...

Page 3: ...teries and accessories for the SQ 3500 provided by our company If you use unauthorized batteries or accessories it can reduce the life of the SQ 3500 cause explosions or damage If this occurs free servicing is avoid Correctly install the SQ 3500 in compliance with instructions Otherwise abnormal operation of the SQ 3500 or a reduction in its life span may occur Record and keep the information cont...

Page 4: ...is can cause visual impairment Refrain from the use of SQ 3500 and leave the power cord for the charger unplugged when it is thundering and flashed lightning Thunderbolts can cause severe physical injuries or fires Do not disassemble the SQ 3500 temporarily or apply shocks to device If the device is damaged when you disassemble it or inflict shocks on the device it causes electric shocks electric ...

Page 5: ... Charge Battery Life 6 Inserting Removing a micro SD card 8 Power On Off 9 Names Function of Device Parts 10 Display Indicators 11 Calling Method 12 Phone Book 20 Messaging 27 Display 28 Sound Settings 29 Tools 30 Multimedia 31 Logs 32 Settings 33 Before going to service Center 43 3 ...

Page 6: ...le Battery Manual Adapter The Basic Components as shown below may be different from the original For safety in use please purchase authentic products If you want to purchase additional batteries or chargers contact your dealer 4 ...

Page 7: ...Use only batteries authorized by the company when you replace batteries following the diagram below Battery installation method Battery removal If the battery is inserted upside down the SQ 3500 phone will not work Please turn off the power before removing the battery from the SQ 3500 phone a sudden power off can cause problems Battery Replacement 5 ...

Page 8: ...mp on the charger flickers Separate the battery from the charger and then re fits into the charger It is still flickering Then cleans the charging terminal and charge the battery When the lamp doesn t stop flickering apply to the dealer Features Charging Charging Complete Charging Lamp RED GREEN TimeTaking to Charge Battery Life 6 ...

Page 9: ... not permanent Model Standard Model Charging time 3 hours 30 minutes Battery life continuous calling Voice 6 hours Video 3 hours TimeTaking to Charge Battery Life The successive use time and standby time of batteries are the estimates of the company s laboratory which can vary from the figures in the manual depending on the patterns used 7 ...

Page 10: ...rd slot with the contact surface facing down and press it until it locks into place 3 Close the side cover Remove the micro SD card 1 Make sure that no application is currently accessing the micro SD memory card 2 Open the side cover of the micro SD slot 3 Press the micro SD card slightly in to release lock and pull the card out Important Do not remove the memory card in the middle of an operation...

Page 11: ... the power keep pressing for 3 seconds or more If anything abnormal takes place or if the power button does not work while using aWi Fi phone start the phone after removing and inserting the battery Turn on the power after waiting for 5 seconds or more when you restart the phone Power On Off 9 ...

Page 12: ... user defined function 14 Volume Control 15 MIC 16 Micro SD Insert hole 17 Earphone 18 Earpiece 19 Speaker 20 Camera 21 Back Camera 1 Send Key Used for receiving and making call 2 End Key Used to end a call and to switch the power ON OFF 3 Clear Key Removing characters or moving to previous screen 4 Vibration shortcut Press and hold to vibrate 5 Key Lock Lock and unlock the keypad ...

Page 13: ...e selected the sound setting Mute button displayed when the volume is set to 0 Vibration Mode Silent Mode An Alarm is set You have one or more unread messages in the Inbox folder Setting to call forwarding service Remaining battery life Full Low Empty Connecting to network Display Indicators 11 ...

Page 14: ...Voice Calls Call Connect In standby enter the numeric keys and then press the key Call quality may be reduced at increased distance away from the access point Calling Method 12 ...

Page 15: ...Call connect In standby enter the numeric keys and then press Call quality may be reduced at increased distance away from the access point Calling Method Video Calls 13 ...

Page 16: ...want to call SelectVIDEO in the menu if you want to make a video call Speed dialing You can speed dial saved numbers to make calls quickly and easily During stand by enter the speed dial number but press the last number longer to make a call If you enter the speed dial number and press SEND key it does not work as the speed dial And the speed dial doesn t work by using video call only voice call C...

Page 17: ...arch Press a part of the number you want to call to auto search the phonebook and display the results Select a phone number and press the OK key Press theVIDEO key to make a video call Under Development Calling Method 15 ...

Page 18: ...the SEND key to take an incoming call Press the END key to reject an incoming call Using the menu during a voice call Mute This function stops your caller from hearing your voice temporarily The caller s voice can still be heard 16 Using the Menu During aVoice Call ...

Page 19: ... call Change Camera To converts the current video preview to back or front camera sight Preview Off Off the preview Mute This function stops your caller from hearing your voice temporarily The caller s voice can still be heard View my picture Turns off your picture and displays your caller s picture only Changes to Hide my picture when your picture is in display Using the Menu During a Video Call ...

Page 20: ...ve a missed call press and the last one of those calls will be answered To see calls that have arrived in your absence from the call list press or use the Left selection key Menu Logs Call history Missed call 18 ...

Page 21: ... call 1 Press the to put the call on HOLD 2 Dial the 3rd party numbers and place a new call 3 Select the left selection key Menu Transfer while 3rd party is connected to execute transfer function CallWaiting While you are on active call your phone will receive an alert message to indicate another incoming call Press to answer the incoming call If you want to switch between calls press ...

Page 22: ... these letters digits will be displayed Search by group Select a group to search in unspecified standard groups custom groups Shortcut key search Enter a set shortcut number to search for a phone number Enter the name of the person you want to call and press the View key to call a number saved in the phone book Press the key to edit the saved details Press the Send key to call a found number You c...

Page 23: ...ble with video calling A video call will be converted to a voice call if the dialed number does not support video calling or if the video call receiver is in an area where video calls cannot be made 3 Add new contacts from phonebook 1 Press and select Add contacts on the Phone Book Menu Phone Book 1 Phone Number Search Menu for a saved number 21 ...

Page 24: ...om Phonebook menu 6 Phone Number Search Delete All Press and select Delete all from Phonebook menu Press Yes after entering the password to delete all saved numbers Take note that if you select Delete All all stored phone numbers will be deleted Check again before deleting as deleted phone numbers cannot be recovered Phone Book 1 Phone Number Search Menu for a saved phone number 22 ...

Page 25: ...and press OK to save E Mail Address Save an e mail address Messenger Save messenger details Ringtone Assign a ring tone Birthday Save a birthday Can be saved on the scheduler Memo Save a memo Up to 65 alphabet characters can be saved 2 Add new contacts Menu Contacts Add contacts Add a new phone number and other details Up to 1 000 phone numbers can be saved Each type of phone number can be selecte...

Page 26: ...You can add new number in standby mode Dial a phone number and press SAVE during stand by to save phone numbers Phone Book 24 ...

Page 27: ...and press SET 2 Search for a phone number in the phone book 3 Select a phone number and press SELECT to complete the setting View Speed Dial Number List Displays a list of saved speed dial numbers Clear All Clears all saved speed dial numbers Select a speed dial number and press to make a call Phone Book Move Moves a phone number to a different speed dial number Clears an assigned speed dial numbe...

Page 28: ...up name and ring tone Up to 10 groups can be set Group name Enter a group name 24 alphabet characters Group ring tone Assign a ring tone to a group Incoming call from a phone number assigned to a group will sound the selected ring tone However the group ring tone will be ignored if another ring tone is assigned in the phone book Phone Book 26 ...

Page 29: ...he place where the messages sent out are saved The time the message was sent out and the receiver information is shown Draft Draft is the place where the messages in process are kept A message is put in the Draft folder when you saved the text you just keyed into the message and it is kept in the Draft folder until sent out Messaging Messaging folders Create a text message Select Menu Messaging Ne...

Page 30: ...e the clock type of the time format in stand by screen Select Menu Display Screen Banner To select the type of the banner as a phone number or greeting in your phone s stand by screen Select Menu Display Banner Set banner Greeting Select Menu Display Banner Set banner Input text This option enables you to set welcome as a greeting to be displayed in your phone s stand by screen To change the Greet...

Page 31: ...you of an incoming voice call The alert type allows you to choose between Ringing Ringtone Vibrating and Silent Volumes To adjust the ring volume and incoming message alert volume Select menu Sound settings Volumes Etiquette Mode Select menu Sound settings Etiquette mode to choose vibrating mode to notify you of an incoming voice call and to set key tone and alarm to silent mode 29 ...

Page 32: ...alarm and return to standby mode press CRL or Right selection Key Tools Unit converter To convert unit to different unit Select menu Tools Unit converter From this submenu you can use unit converter of Length Weight Width Bulk and Temperature Calendar To view the calendar Select menu Tools Calendar 30 Memo pad To view the memo Select menu Tools Memo pad ...

Page 33: ...a To optimize the use of Multimedia insert a memory card in your device To use multimedia Select left selection Menu Multimedia The player supports files formats such as MP4 MP3 JPG PNG GIF and BMP Multimedia 31 ...

Page 34: ...e CRL then use the direction Key Call logs info To view the total number of calls Select Menu Logs Clogs info Logs SMS info To view the total number of messages Select menu logs SMS info Contacts info To view the total number of contacts registered speed dials and groups Select Menu logs Contacts info Call time history To view the total time of outgoing and incoming calls Select Menu logs Call tim...

Page 35: ...ou select Wi Fi the following display will appear 1 Display registered Wi Fi profile Top SQ 3000 can be registered Wi Fi up to 4 If there is no registered Wi Fi profile Wi Fi profile do not appear 2 Display scanned AP list Bottom Display strength signal and SSID of scanned AP Hidden AP will not display 33 ...

Page 36: ...onfigure server and port of NAT 5 Networking setting You can set Network DHCP or manually Wi Fi Menu lists Refresh Refresh the scanned AP Detail Detail information of selected AP Profile add Add new profile Delete Delete selected item It will be displayed on the menu when you select the registered AP list View registered See registered Access Point It will be displayed on the menu when you select ...

Page 37: ...ing You can set Network DHCP or manually 3 Add profile as Temporary Select OK or Temp 1 Security setting You can configure security to use WEP WPA PSK WPA EAP WPA2 PSK WPA2 EAP 2 Account Password You can configure the ID PWD and Mode MD5 PEAP TTLS for authentication 3 STUN You can configure server and port of NAT 4 Networking setting You can set Network DHCP or manually 35 If you add a profile as ...

Page 38: ... Settings Reset to default Left selection key Menu Settings User settings Reset to default To reset all preference settings and delete all personal data such as contacts message WLAN and SIP information 36 ...

Page 39: ...me settings Start timeout Picture Frame Settings Digital Photo Frame You can use the SQ 3500 as a Digital Photo Frame when it s on the cradle To make a digital photo frame with the SQ 3500 copy images to the Micro SD card and insert Micro SD card into the SQ 3500 The function of the digital photo frame supports an image of up to 30pcs The function of the digital photo frame supports four different...

Page 40: ...election key Menu Settings Time zone You can select country and city of the country Time zone NTP server To update the time date and time zone information with the NTP server automatically select Left selection key Menu Settings System NTP server 38 ...

Page 41: ...t the forwarding option you want from Unconditional when you want to divert all incoming calls Busy when your number is busy to No Answer when you don t answer an incoming call Call Forwarding 39 Auto answer To set the auto answer function select Left selection key Menu Settings Auto answer You can accept the incoming calls automatically without answering from the registered number ...

Page 42: ...es Basic Info My phone number Firmware version MAC address Wi Fi Info Displays the access point or wired wireless router the Wi Fi phone is connected to SSID Signal Strength BSSID Security Channel Beacon Interval Network info Displays the IP address netmask gateway and DNS address Information 40 ...

Page 43: ...ptions will appear Phone number Enter your registered phone number from SIP server User name Enter your authorized user ID Password Enter your authorized password Domain Enter the SIP server s domain address Proxy Enter the address of SIP server SIP Settings 41 You can select symbol in Phone number User name Domain Proxy Left selection key Menu Symbol ...

Page 44: ...all the functions mentioned above on the manual Firmware upgrade To download the new firmware manually via HTTP server Select Left selection key Menu Settings System Firmware upgrade Regulatory Domain To adjust Wi Fi channeling of the country Select Left selection key Menu Settings System Regulatory Domain NTP server Please refer to page 38 Select Left selection key Menu Settings System NTP Server...

Page 45: ...a contact part to cradle re fit into the phone and turn it on Wi Fi phone shows poor call condition during calls Check whether it is too far from AP Electric waves might have become weak due to obstacles such as walls or electro magnetic disturbance might have taken place Turn off the power of AP and on again in 3 seconds If volume is low adjust it properly by using volume key WiFi phone has charg...

Page 46: ...the power of Wi Fi phone after temporarily maintaining a distance of 1 5 3 meters between AP andWi Fi phone If the problem still continues refer to the part of Check Points by Error Message in page 50 of this manual IfWi Fi phone screen displays and check the following If is displayed even after turning off and on the power of Wi Fi phone check if LAN cable is properly connected to the Internet po...

Page 47: ... 802 11a 5150MHz 5250MHz A band 5725MHz 5850MHz D band Operating Channel 802 11b g Ch1 Ch 13 802 11a A Band Ch36 Ch40 Ch44 Ch48 D Band Ch149 Ch153 Ch157 Ch161 Ch165 Transmission Output 802 11b g Under 10mW MHz 802 11a A Band Under 2 5mW MHz D Band Under 10mW MHz Dimensions 125 L x 58 W x 17 T Weight 135g Temperature Range Operation 32 to 122 F 0 C 50 C Relative humidity 10 90 Battery 3 7V 1450mAh ...

Page 48: ...cause harmful interference to radio communications However there is no guarantee that interference will not occur in a particular installation If this equipment does cause harmful interference to radio or television reception which can be determined by turning the equipment off and on the user is encouraged to try to correct the interference by one or more of the following measures Reorient or rel...

Page 49: ...http www udcsystems com ...

Reviews: