


8
WPP 15 TE | Version 1.06
Machine description
The hydraulic workshop press must be transported up-
right only. Do not stack hydraulic workshop presses on
top of each other. Do not place any other objects onto
workshop presses.
Blank metal parts have been greased to protect them
from humidity and dirt.
Transport using industrial trucks/pallet trucks:
The hydraulic workshop press must be positioned on an
even, stable surface (e.g. a pallet) and be secured in the
event of transport using a suitably dimensioned pallet
truck or industrial truck.
Packaging
All packaging materials and packing aids are suitable for
recycling and must always be disposed of using mate-
rial-based recycling systems.
Packaging materials made of cardboard must be shred-
ded and disposed of as part of waste paper recycling.
The foils are made of polyethylene (PE), padding is
made of polystyrene (PS). Dispose of these substances
at a recycling centre or hand them over to the relevant
waste disposal company.
Storage
As a rule, the hydraulic workshop press must be stored
in a clean condition and a dry, clean and frost-free envi-
ronment. The pistons must be fully retracted.
6
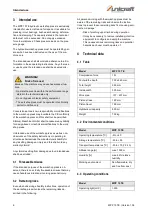
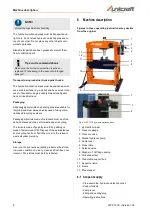
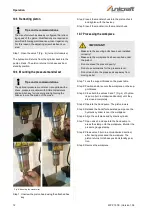
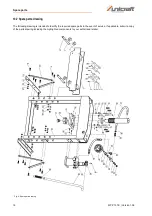
Machine description
Figures in these operating instructions may deviate
from the original.
Fig. 4: WPP 15 TE hydraulic workshop press
1 Hydraulic cylinder
2 Pressure gauge
3 Pressure valve
4 Manual hydraulic pump
5 Pump lever
6 Press table
7 Release valve
8 Stopper of oil filling opening
9 Crossbeam feet
10 Press table support bolt
11 Support prisms
12 Frame
13 Press tappet
6.1 Scope of supply
- Pre-assembled, hydraulic workshop press
- Support prisms
- Pump lever
- Filling and venting plug
- Operating instructions
NOTE!
Protect the machine from humidity.
Tips and recommendations
Make sure the corrosion protection is active or
replaced (if necessary) in the event of prolonged
transport.
1
2
3
4
6
5
9
13
12
11
10
3
7
8


