


14
WPP 15 TE | Version 1.06
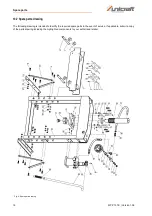
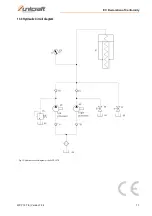
Maintenance and repairs
11.2.2 Visual inspection
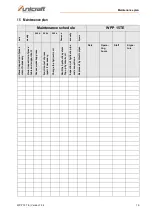
11.2.3 Maintenance tasks
11.2.4 Recommended processing materials
11.2.5 Lubrication
Maintenance inter-
vals and operating
hours
Maintenance point
Daily
Visual inspection of the hydraulic workshop press for dirt, clean if necessary
Weekly
Visual inspection of the hydraulic workshop press, in particular the press table and support
bolts:
if necessary, replace damaged components or request repairs
Weekly
Visual inspection of the hydraulic workshop press, in particular the functions of the hydraulic
components and checking for oil leaks (pump, hoses, cylinders, pressure gauge, etc.):
If necessary, replace damaged components
200
Functional inspection of the entire hydraulic workshop press to verify the machine com-
pletes all steps and operates correctly and safely:
If necessary, request repairs
Annually
Have the hydraulic pipes and connections checked by an authorised person. In the event of
increased usage periods, frequent or increased pressure pulses or severe external influ-
ences the machine must be checked once every six months.
If necessary, have damaged pipes replaced.
Maintenance inter-
vals and operating
hours
Maintenance task
200
Lubricate the hydraulic workshop press (all moving parts, bearings and guides).
300
Change the hydraulic oil.
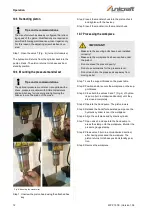
When necessary
Vent the hydraulic system.
When necessary
Top up hydraulic oil and then vent the hydraulic system.
6 years
Have hydraulic lines replaced. Every two years in the event of increased usage periods.
Processing material
Specification
Manufacturer/type
(non-binding recommenda-
tion)
Quantity
Hydraulic oil
ISO 32
Viscosity from 22 to 25 mm²/s
OMV HYDRAL 32
Grease
SO XM 2
OMV SIGNUM M 283
As required
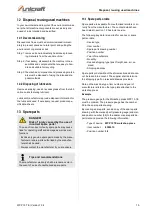
Machine component
Lubrication point
Lubrication medium
Manual hydraulic pump
Stamp
Shaft on the switching valve
Grease:
Apply grease to the listed components using a greased
brush.
Remove excess lubricant using a dry and lint-free cloth.


