background image


69      System Configuration 

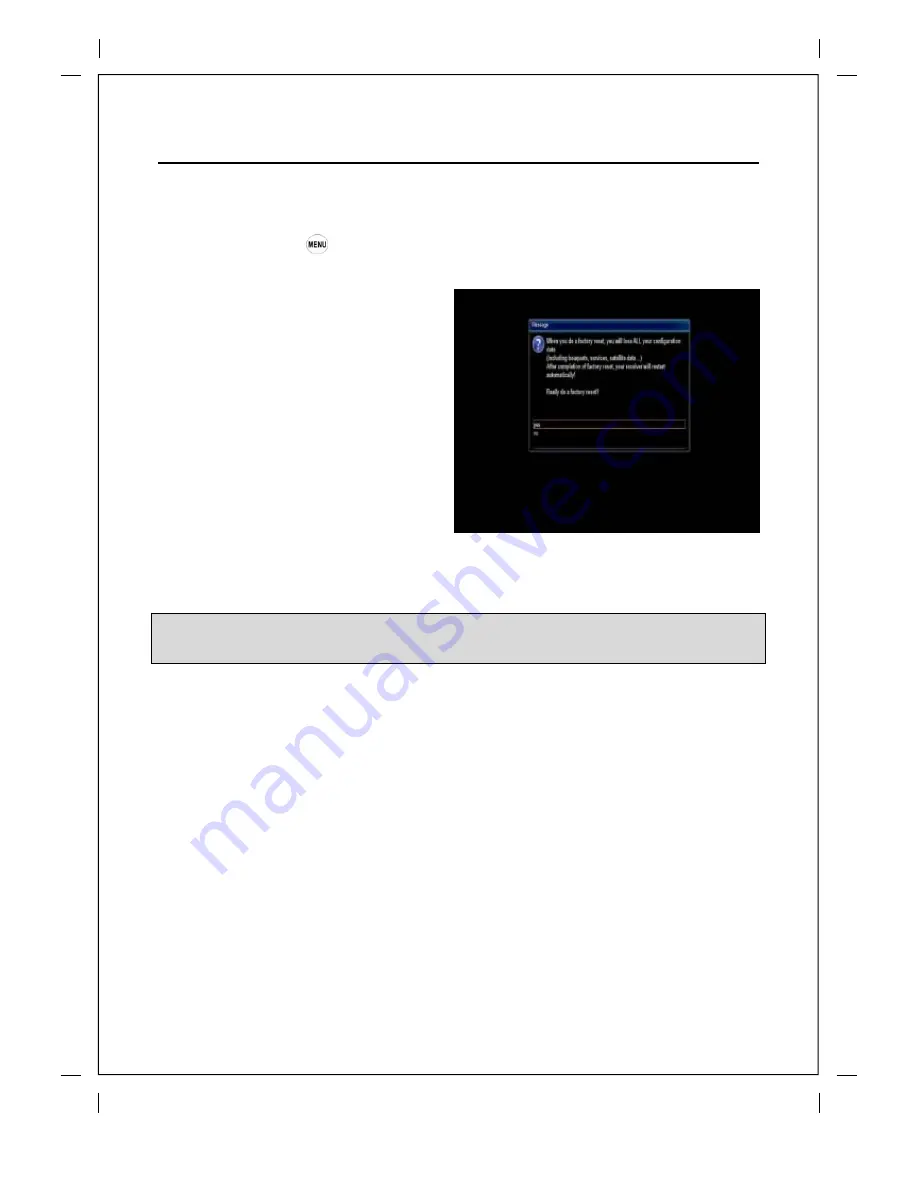
5.2-5. Factory Reset   

How to use >

 Press 


 ‘Setup’ 

 ‘Factory Reset’ 


If you want to erase all installed service list 

as well as all configurations, run the Factory 

Reset process. Select YES in the below 

menu to run the factory reset. 

Upon the completion of factory reset process, your UNIBOX HD1 will reboot automatically and 

start the First Time Installation process. 


NOTE: If you do this factory reset, all of your configuration data including bouquets, service lists, 

satellite parameters, and so on will be erased. 


Summary of Contents for HD1

Page 1: ...ceiver Instruction Manual Instruction Manual Instruction Manual Instruction Manual Instruction Manual The UNIBOX HD1 digital receiver is fully compliant with the international Digital Video Broad casting DVB standard and thus is able to receive digital broadcasts of that standard ...

Page 2: ......

Page 3: ...e or shock Do not alter bend or twist the power cord or plug Be sure to route the power supply cords so that they won t be walked on or pinched by items around it Keep the power cord away from any heating appliances to avoid melting the cover vinyl If the cord is damaged do not plug in the product and be sure to get the cord replaced When unplugging grip the power plug not the cord If any of the f...

Page 4: ...nces that are exposed to electromagnetic influences such as a TV or a VCR Do not use any attachments or accessories that are not recommended by the manufacturer This may cause hazards to the product and will void the warranty 3 Installation and Maintenance Before connecting or disconnecting the satellite cable to the product be sure that the product is unplugged Failure to do so may cause damage t...

Page 5: ...is product when it is out of order Continued use when defective can cause serious damage to it and you Do not put any alien items into or block the slots or ventilation openings of the product This can cause damage to the product and reduce the life span 5 Warranty Be aware that any adjustments or handling such as but not limited to opening the casing other than what is specified here will void yo...

Page 6: ...al Access 8 1 5 Technical Specifications 10 2 Installation of UNIBOX HD1 12 2 1 Connecting Satellite Cable 12 2 2 Connecting the TV 13 2 3 Connecting Power 14 2 4 Power On Off 15 3 First Time Installation 16 4 Basic Operations 24 4 1 Channel List 24 4 2 Switching Channel 27 4 3 Program Information 28 4 4 Volume Control 29 ...

Page 7: ... 12 Recording 38 4 13 Recording Play 42 4 14 Managing Recording Files 43 5 System Configuration 44 5 1 Main Menu 44 5 2 System Setup 46 5 2 1 System Configuration 46 A V Settings 47 Video Enhancement Settings 48 Customization 49 Record 50 Subtitle Settings 51 Language Selection 51 Selecting Time Zone 52 Hard Disk Setup 52 Initialize Hard Disk 53 Network Setup 53 ...

Page 8: ... 58 Manual Scan of Services 59 5 2 3 Common Interface CAM 61 5 2 4 Parental Control 62 5 2 5 Factory Reset 65 5 2 6 Cross EPG 66 5 2 7 OSD 3D Setup 67 5 2 8 Checking H W S W Information 68 Service Information 68 System Information 69 6 Menu Structure 70 7 Troubleshooting 74 8 Copyright GNU GPL 76 ...

Page 9: ...talled appropriately 1 1 Main Features 400 MHz MIPS Processor Linux Operating System Media Player Downloadable Plug ins supported 1 x Smartcard Readers 1 x Common Interface MPEG2 H 264 Hardware Decoding 1 x DVB S2 Tuner 8 digit Segment VFD 512MB NAND Flash 512MB DDR SDRAM 10 100MB Ethernet Interface 3 x USB 2 0 RS 232 HDMI 1 x SCART S PDIF for digital bit stream out optical EPG supported Automatic...

Page 10: ...ns Front Panel Power Power On Display Displays the current menu information VOL Volume control down VOL Volume control up CH Switches channel up CH Switches channel down USB Connect a USB storage device CI Module slot Smartcard reader slot ...

Page 11: ... A SCART connector is provided for TV using a SCART cable RS 232 RS 232 data port is provided HDMI Connects to TV using a HDMI cable for both audio and video signals Ethernet Connects the PC or another set top box of ET USB Connects the USB memory stick or external HDD On Off Switch Powers on off Power Inlet Connects the detachable power cord ...

Page 12: ...eys Enters a service number for service change or to specify values for menu options Prev Previous channel Next Next channel Color Keys Each key is assigned a specific function that may be different in each menu Red mainly used for REC Cancel etc Green mainly used for OK Yellow Blue Menu Displays the main menu Info Displays the service information box It is also used to display more information ab...

Page 13: ...through the scanned channel list Previous channel Home Fast Rewind Fast rewinds at up to 128 times faster than the normal speed x2 4 8 16 32 64 128 Stop Stops playing of a recording and goes to the live mode ll Play and Pause Fast Forward Fast forwards at up to 128 times faster than the normal speed x2 4 8 16 32 64 128 Color RED Recording Displays the recording menu ...

Page 14: ...he following instruction Make sure that the Smartcard remain inserted while viewing Insertion of CAM Conditional Access Module There are several Conditional Access Systems CAS that UNIBOX HD1 supports To be able to watch channels that are encrypted in such CAS as Nagravision NDS Irdeto Viaccess etc users need to purchase a CAM that is corresponding to each CAS as well as Smartcard to decrypt those...

Page 15: ...Reader Slot 1 ea Common Interface 1 ea USB 1 x USB 2 0 Buttons 5 Power Volume Up Down Channel Up Down Rear Panel Power Switch 1 ea Sat IF input output 1 x F type socket Connection TV VCR 1 x Scart socket Video Audio output digital 1 x HDMI Audio output digital Standard optical S PDIF USB 2 x USB2 0 Ethernet 1 ea RS 232 1 ea Power Mains voltage 95 250 50 60 V Hz ...

Page 16: ...720 x 576 lines 576p 720p 1080i 1080p 30 Video decoding MPEG 2 MPEG 4 compatible Input data rate 2 45 MSymb s S N 53 dB Audio Decoding AC3 MPEG 4 AAC HE MPEG 1 Layer1 2 and 3 Sampling rate 32 4 1 48 KHz S N 65 dB LNB LNB supply horiz vert 14 18 Max 400mA Control signal 22 KHz ToneBurst DiSEqCTM 1 0 1 1 1 2 General Dimensions W x H x D 260 x 60 x 190 mm Weight without HDD App 3 KG ...

Page 17: ...perly 2 1 Connecting Satellite Cable UNIBOX HD1 is integrated with a satellite tuner and one of the first steps is to connect satellite cable to UNIBOX HD1 in order to gain optimal signal quality You can either choose one of the following connection methods depending on the equipment you have A A Satellite Cable In case you have a separate satellite cable providing a broadcast signal you can confi...

Page 18: ...V HDMI connection is recommended Most HDTVs have HDMI connectors to ensure the highest picture quality In the rear panel of UNIBOX HD1 one HDMI connector is available for this purpose Connect your TV to UNIBOX HD1 using a HDMI cable as follows B Connecting TV SCART Cable In case your TV is analogue TV SCART cable is the most common method Connect your TV to UNIBOX HD1 using SCART cable as follows ...

Page 19: ...X HD1 Connect the power cord to the connector at the rear panel of UNIBOX HD1 Connect the power cord to a power outlet Turn on the power switch at the rear panel NOTE AC input condition Nominal Voltage Range 100 240 VAC Maximum Voltage Range 90 264 VAC Nominal Frequency 50 60 Hz Maximum Frequency Range 47 63 Hz ...

Page 20: ...m if you turned it off by this switch Standby Mode POWER key is normally used to turn the power of UNIBOX HD1 on or off If you press POWER it instantly switches your UNIBOX HD1 off or on In this mode the system is not completely shut down and thus it takes a shorter time to turn it on and off Deep Standby Mode Deep Standby is used to reduce the standby power consumption UNIBOX HD1 is designed to b...

Page 21: ...tep Step 1 Video Input Selection UNIBOX HD1 will automatically probe the video input port Press OK if you can see this page on your TV Or you can select a different input port HDMI SCART or YPbPr Use UP DOWN key to scroll up and down to find the input port you want NOTE OK key is used for confirmation and turns to the next step Press EXIT key to return to the previous page ...

Page 22: ...Use UP DOWN key to scroll up and down to find the mode you want Step 3 Brightness Adjust the backlight level to a value suiting your taste If you are happy with the result press OK Step 4 Contrast Use the contrast setting to turn up the brightness of the background as much as possible If you have done that press OK ...

Page 23: ...UNIBOX HD1 Use UP DOWN key to scroll up and down to find the language you want Step 6 Configuring Satellite Connection From now on you need to configure the satellite connection You have two options Use wizard to setup basic features Exit wizard You are strongly recommended to use wizard as it is designed to guide you through the configuration process ...

Page 24: ...through to mode to make the TUNER 1 be internally connected to the TUNER 2 Equal to mode to use the same configuration as that of Tuner B Advanced for an advanced user configuration If you choose Simple configuration mode the following picture will appear The five modes are available for the satellite cable connection between LNB and your UNIBOX HD1 as below ...

Page 25: ...e a single satellite with a single LNB The cable from LNB is directly connected to UNIBOX HD1 ToneBurst A B This option is used if you want to receive two satellites using a ToneBurst switch DiSEqC A B This option allows you to configure two satellites in Port A and Port B ...

Page 26: ...1 First Time Installation DiSEqC A B C D This option allows you to configure four satellites in Port A Port B Port C and Port D Positioner This option is used when you have a motorized satellite antenna ...

Page 27: ...Chapter3 First Time Installation 22 Step 8 Parental Control Option Here you can choose whether to enable the parental control option If you press OK you will be asked to enter PIN number ...

Page 28: ......

Page 29: ...tions 4 1 Channel List How to use Press If press Navigation UP DOWN key this will activate Channel Selection Menu Four types of the channel lists are available to help you manage your channel selection RED It displays the list of all scanned channels ...

Page 30: ...25 Basic Operations GREEN It displays the list of all satellites scanned Per each satellite channels are arranged according to Services Provider and New YELLOW It displays the list of providers ...

Page 31: ...election list by Pressing UP or DOWN key Go to All lists by pressing RED key Select the channel that you want to add to the Favorites list Press MENU key on the selected channel and the following menu appears Choose add service to bouquet and press OK Go to the Favorites list by pressing BLUE key to confirm that the selected channel is correctly included in the list ...

Page 32: ...p and down to select the channel that you want to tune into LEFT RIGHT key If you press LEFT or RIGHT key the previous or subsequent channel of the current channel is tuned in CHANNEL key If you press CHANNEL key the previous or subsequent channel of the current channel is tuned in Channel Number Enter a channel number and it will instantly tune into the channel NOTE If channel change is not done ...

Page 33: ...he current channel SNR Signal to Noise Ratio Signal Level AGC Automatic Gain Control Signal Strength The name of the current channel Remaining time of the current program The current program The next program REC Highlighted in red when recording is in progress CAS Encrypted program Text Highlighted when the program provides Teletext 16 9 Screen ratio RED to activate recording GREEN to call up Subs...

Page 34: ...ute or unmute the audio temporarily by pressing MUTE key 4 5 Selecting Audio Track How to use Press You can check what audio tracks are available to choose by pressing AUDIO key By using UP DOWN key and Color key you can select a different audio language or Stereo sound NOTE Available options on this menu will differ depending on the service ...

Page 35: ...subtitle of the current program if the program provides the subtitle Press SUBTITLE key and Subtitle selection menu appears as below Available subtitles if any will display By using UP DOWN navigate the list to select a subtitle that you want to play and press OK to activate it ...

Page 36: ...an enjoy Music Photo and Video contents stored on the internal HDD and or a USB memory stick plugged into UNIBOX HD1 If you play Media Player the following player will appear Go into any directory of the HDD or plugged USB Select a file to play and press OK Supported formats are mainly JPG MP3 AVI etc In the same way you can play the recording files stored on the HDD ...

Page 37: ...ndby mode using this menu Three color keys are used to setup this sleep timer RED This option is used to enable or disable Sleep Timer GREEN This option is used to choose between Standby mode and Deep Standby mode YELLOW This option is used to choose whether to be asked of confirmation before system shutdown BLUE This option is used to use time of currently running service ...

Page 38: ...hrough the Teletext page by using UP DOWN key to select a text page Also just simply enter the page number that you want to read MUTE key Once you activated Teletext you can toggle between the live mode and the Teletext page by pressing MUTE key instantly In this case loading of the Teletext page takes place instantly VOLUME key If you want to enlarge the page press VOLUME key ...

Page 39: ...Chapter4 Basic Operations 34 VOLUME Key If you want to reduce the page size press VOLUME key ...

Page 40: ...is used to setup a new timer for recording or zapping Name Displays the name of the selected program Description Displays a short description of the selected program Timer Type Select Zap for channel tuning reservation Select Record for recording reservation Repeat Type Select Once for one time of zapping or recording reservation Select Repeated for repeated zapping or recording reservation Repeat...

Page 41: ...ing YELLOW NOTE To add a timer for recording or zapping press GREEN BLUE Multi EPG Press BLUE to activate EPG Selection Multi EPG window You can move the previous or next program within the same channel by using YELLOW Previous BLUE Next NOTE Not all channels provide EPG information and thus in case of no EPG data nothing will be displayed except for the channel name You can switch to another chan...

Page 42: ...appear on the left upper side of the screen In this state Timeshifted recording is running until you press either PLAY or PAUSE again You can restart viewing of the program If you want to stop Timeshifted recording and to return to the live mode press STOP key You will be asked of Yes or No to stop Timeshift NOTE What is different from normal recording is that Timeshifted recording is not meant to...

Page 43: ...ng Instant Recording How to use Press long RED Press long RED key to start the recording of the current program Five recording options are given Add recording stop after current event This option is used when you want to end recording when the current program ends Add recording enter recording duration This option is used when you want to manually set the length of recording by entering a certain ...

Page 44: ...ecording indefinitely This option is used when you want to keep recording running without a specific end time Recording will continue unless you stop it Don t record This option is used to exit from this menu without recording Recording by Timer How to use Press Timer You can manage recording process using Timer List menu Press MENU and select Timer on the menu ...

Page 45: ... for each different function RED Delete This option is used to delete a timer GREEN Add This option is used to add a timer YELLOW Disable This option is used to disable the timer and X mark will appear NOTE if you want to enable the disabled timer press YELLOW again ...

Page 46: ... that the HDD on your UNIBOX HD1 has enough free space available for recording If the free space on the HDD is not sufficient recording might stop before the defined end time Stop Recording How to use Press RED Stop Recording If you want to stop recording press RED again while recording is running Select Stop Recording ...

Page 47: ...iles menu Press Filelist to activate this menu Select the file that you want to play It will instantly replay the file and display the recording infobar This infobar gives you the following information of the recording Title of the recording Total duration of recording Remaining time Progressive bar Elapsed time ...

Page 48: ... file press MENU key while Recorded files menu is on Select Delete to delete Other than delete in this menu you have options in sorting and listing of the recording files Sort by date List style default List style compact with description List style compact List style single line Hide extended description ...

Page 49: ...ic Operations 44 4 15 Interactive Media How to use Press If you want to play interactive media in Internet press BLUE key It shows a popup menu Select MyTube Player It will connect the Media site Wait a few seconds ...

Page 50: ...ic Operations It displays the search menu You can input text on the search bar by the remote controller Use Numeric keys to input text Or press BLUE key It shows a virtual keyboard This is a virtual keyboard ...

Page 51: ...erations 46 Please wait a few seconds while searching media It displays a searched list Select a media from the list Use Navigation keys and OK key It plays the media You can control the player with PLAY PAUSE STOP keys ...

Page 52: ... stop the media press STOP key It shows a popup menu And select Yes It will stop the player It returns the previous page after stopping the player If you want to exit the MyTube Player press EXIT key It shows a popup menu And select Yes ...

Page 53: ... variety of system setting options as detailed as possible You can fine tune your UNIBOX HD1 to be your OWN system to fit your taste This chapter will guide you through the entire menu of system configuration Prior to System Configuration please take a notice on the menu structure of UNIBOX HD1 first 5 1 Main Menu How to use Press ...

Page 54: ...nformation of the current Channel About menu provides the detailed information of the H W and S W system of your UNIBOX HD1 For more information please refer to the 5 2 8 Checking H W S W Information Plug ins Activates Plug in browser of UNIBOX HD1 Using this browser you can log onto the designated website and you can download a variety of new plug ins Setup Provide all of the system settings For ...

Page 55: ...stem Service Searching Common Interface Parental Control Factory reset Cross EPG OSD 3D Setup Software management 5 2 1 System Configuration How to use Press Setup System Here you can find most of the necessary settings that you might need to optimize your UNIBOX HD1 in the way you like it Please read the followings carefully ...

Page 56: ... this mode Amongst the parameters given in this menu the following ones are generally what you need to decide for the audio and video Video output Here you need to decide which video output you want to use between your TV and UNIBOX HD1 The available options are as below HDMI SCART Mode You need to decide which resolution to use according to the video output above and your TV amongst the following...

Page 57: ... be down mixed from AC3 to Stereo NO is used when you do not want to set the audio output to be down mixed from AC3 to Stereo If NO is on and you are using only HDMI connection there can be no audio sometimes if the program that you are watching provides AC3 only This option is recommended when you are using S PDIF connection Video Enhancement Settings How to use Press Setup System Video enhanceme...

Page 58: ...menu can be displayed in three different formats Simple Intermediate and Expert NOTE RED is for cancel and GREEN is OK OK key of RCU is not working in this mode Amongst the options given in this menu the following ones are generally what you may need to know Enable multiple bouquets If you set this option at YES it will enable multiple bouquets ...

Page 59: ...tch to the service to record or not Margin before record minutes If you enter a number here for example 5 the recording will begin 5 minutes before the defined time If it is 0 it means that the recording starts exactly at the defined time This option comes in handy just in case that a program starts earlier than the original schedule Margin after record If you enter a number here for example 5 the...

Page 60: ...Settings You can set subtitle in this menu Using LEFT RIGHT key you can set a color position etc After setting press GREEN to confirm and save the changed setting Language Selection How to use Press Setup System Language A variety of languages are available for the OSD of UNIBOX HD1 ...

Page 61: ...for your UNIBOX HD1 After selecting a time zone press GREEN to confirm and save the changed setting Hard Disk Setup How to use Press Setup System Harddisk Harddisk setup You can set the duration of time after which HDD is to be put into standby mode Here you can choose from No standby 10 or 30 seconds 1 2 5 10 20 30 minutes 1 2 4 hours Once you set this option press GREEN key to confirm the change...

Page 62: ...work Setup How to use Press Setup System Network UNIBOX HD1 is integrated with standard 10 100Mbps Ethernet with RJ 45 connector standard You are recommended to use this network capability of UNIBOX HD1 to fully enjoy the system You can setup the network settings through this Network Configuration menu In the Network Configuration menu you will see five sub menus as follows ...

Page 63: ...Ethernet If you set this option at NO the Ethernet will not work Use DHCP YES is used to use DHCP Dynamic Host Configuration Protocol If you set this option at YES it will automatically detect the correct IP address NO is used when you want to use a certain fixed IP address In this case you need to enter correct addresses in each field Nameserver settings ...

Page 64: ... use DHCP You need to enter the address of the Nameserver Network test When you are not sure whether the network configuration has been done correctly or not you can run this test Restart Network This option is used when you want to reboot the Ethernet of your UNIBOX HD1 ...

Page 65: ...t top box and there are a lot of Skins available for Linux set top box Using this menu you can use a different Skin other than the default one NOTE It takes some minutes since the change of Skin requires a complete system shutdown Please wait patiently until the system reboots with a newly selected Skin ...

Page 66: ...n channel scanning automatically or manually Tuner Configuration How to use Press Setup Service Searching Tuner Configuration If you run the First Time Installation process refer to the 3 First Time Installation the Tuner A is already configured You can check the information of Tuner A and which satellites are scanned by Tuner A as follows ...

Page 67: ...matic Scan menu there are two options to choose from as below Clear Before Scan YES is used when you want to delete the existing channel list before you start the automatic scan If you want to keep the existing list select NO Press OK to activate the automatic scan This will take some minutes As the scan proceeds you will see the progressive bar and the newly found services underneath ...

Page 68: ...alues that you need to decide as below Amongst other things the below parameters are what you need to decide prior to performing manual scan Tuner You need to decide which tuner you want to use for manual scan System Here you have two options between DVB S SD and DVB S2 HD Frequency You need to enter the exact frequency of the transponder that you want to scan Symbol Rate You need to enter the exa...

Page 69: ... to scan the TP not just based on the existing TP data but also using new TP data if there is TP data newly transported from the TP Naturally YES option takes longer while it may results in a better scan result Clear Before Scan YES is used when you want to delete the existing channel list before you start the automatic scan If you want to keep the existing list select NO Only Free Scan Here you h...

Page 70: ...ed to have a proper CAM and a Smartcard UNIBOX HD1 is integrated with two Common Interface slots If you have two CAM modules and keep them inserted in your UNIBOX HD1 it will reduce the trouble of changing CAM If you have inserted one or two CAMs you can check the information of the inserted CAMs through this menu as below ...

Page 71: ...up Parental Control If you want to prevent certain channels from being accessed by others you can do so using this menu Go to Parental Control menu by pressing MENU Setup Parental Control Set the parental control option at YES using LEFT RIGHT key The menu will change as below ...

Page 72: ... need to enter a new PIN code twice Protect services You need to set this option at YES if you want to lock certain channels with PIN code Parental control type This option will be activated only if you set Protect services at YES Here there are two options White list This option is used to block all channels except those channels in the parental control list Black list This option is used to bloc...

Page 73: ... for Protect services Edit service list Here you can add services that you want to lock with PIN code Services will be arranged in the alphabetical order and you can select an alphabet to enter into the list where you can find the channel that you want to lock Once the selected channel is locked next time when you or anyone else wants to tune into this service the menu asking for PIN code will app...

Page 74: ...run the Factory Reset process Select YES in the below menu to run the factory reset Upon the completion of factory reset process your UNIBOX HD1 will reboot automatically and start the First Time Installation process NOTE If you do this factory reset all of your configuration data including bouquets service lists satellite parameters and so on will be erased ...

Page 75: ...System Configuration 70 5 2 6 Cross EPG How to use Press Setup Cross EPG UNIBOX HD1 provides XML TV providers Open TV providers XEPGDB providers Scripts providers and MHW2 provides You can set the configuration ...

Page 76: ...71 System Configuration 5 2 7 OSD 3D Setup How to use Press Setup OSD 3D Setup UNIBOX HD1 provides OSD 3D modes Select Auto Off Side by Side or Top and bottom ...

Page 77: ...OX HD1 this is the menu that you need to use Also here you can check very detailed information of a specific service Service Information How to use Press Information Service In this menu you can see all the parameter data of the current channel The service information is well arranged in four sections as below Service info PIDs Transponder Tuner Status ...

Page 78: ...ion System Information How to use Press Information About This menu is for you to check the current system of your UNIBOX HD1 You can see the following information S W version Detected NIMs for both Tuner A B Detected HDD ...

Page 79: ...N A N A N A Information Service Service Informations N A N A About About N A N A Plugins Plugin browser N A N A N A Setup System A V Settings A V Setup N A Video enhancement settings Video Enhancement Setup N A Customize Setup N A Record Setup N A Subtitle settings Setup N A Auto language selection Setup N A Harddisk Harddisk setup Setup Initialization Select HDD Filesystem Check Select HDD Conver...

Page 80: ...ezone Setup N A HDMI CEC Setup HDMI CEC Setup N A Skin Choose Your Skin N A Video Fine Tuning Brightness Contrast Service Searching Tuner configuration Select Tuner Tuner Settings Automatic Scan Service Searching N A Manual Scan Service Scan N A Positioner setup N A N A Satfinder Satfinder N A Common Interface Slot1 N A N A Parental control Parental control setup N A N A Factory reset N A N A N A ...

Page 81: ... providers N A N A Update XEPGDB providers N A N A Download now N A N A Force CSV import now N A N A Force EPG DAT conversion now N A N A Force EPG reload N A N A Info about database N A N A About N A N A OSD 3D Setup 3D mode Setup N A N A Software management Manage extensions Extensions management N A Software update N A N A Software update Offline N A N A Software restore Image Wizard N A ...

Page 82: ...sion N A N A Advanced Options Advanced restore Restore Choose backup location N A Choose backup files Backup Packet management IPKG upgrade Choose upgrade source Select IPKG source Standby Restart Sleep Timer Set Timer N A N A Standby N A N A N A Restart N A N A N A Restart GUI N A N A N A Deep Standby N A N A N A ...

Page 83: ...ding access smartcard 2 Problem with audio quality Check if your audio cable is connected correctly Check the volume level of your TV and the product Check if the product or TV is on mute Check the audio option if it is correctly selected for the program that you are currently watching 3 Remote control problem NOTE If the antenna is covered with snow or the RF signal is weakened by heavy rain the ...

Page 84: ...blem Make sure if tuner configurations are all correctly made Check if the antenna cable s are properly connected 5 Encrypted channel viewing problem Check if you have the appropriate Smartcard and or CAM Take the Smartcard and CAM out and re insert them to re initialize Check if your system correctly detects the smartcard and CAM 6 Recording problem Check if the HDD has a sufficient space for rec...

Page 85: ...he Free Software Foundation s software and to any other program whose authors commit to using it Some other Free Software Foundation software is covered by the GNU Lesser General Public License instead You can apply it to your programs too When we speak of free software we are referring to freedom not price Our General Public Licenses are designed to make sure that you have the freedom to distribu...

Page 86: ...t making the program proprietary To prevent this we have made it clear that any patent must be licensed for everyone s free use or not licensed at all The precise terms and conditions for copying distribution and modification follow TERMS AND CONDITIONS FOR COPYING DISTRIBUTION AND MODIFICATION 0 This License applies to any program or other work which contains a notice placed by the copyright hold...

Page 87: ...es under the terms of this License c If the modified program normally reads commands interactively when run you must cause it when started running for such interactive use in the most ordinary way to print or display an announcement including an appropriate copyright notice and a notice that there is no warranty or else saying that you provide a warranty and that users may redistribute the program...

Page 88: ...code to be distributed under the terms of Sections 1 and 2 above on a medium customarily used for software interchange or c Accompany it with the information you received as to the offer to distribute corresponding source code This alternative is allowed only for noncommercial distribution and only if you received the program in object code or executable form with such an offer in accord with Subs...

Page 89: ...me you redistribute the Program or any work based on the Program the recipient automatically receives a license from the original licensor to copy distribute or modify the Program subject to these terms and conditions You may not impose any further restrictions on the recipients exercise of the rights granted herein You are not responsible for enforcing compliance by third parties to this License ...

Page 90: ...es so that distribution is permitted only in or among countries not thus excluded In such case this License incorporates the limitation as if written in the body of this License 9 The Free Software Foundation may publish revised and or new versions of the General Public License from time to time Such new versions will be similar in spirit to the present version but may differ in detail to address ...

Page 91: ...he program prove defective you assume the cost of all necessary serving repair or correction 12 In no event unless required by applicable law or agreed to in writing will any copyright holder or any other party who may modify and or redistribute the program as permitted above be liable to you for damages including any general special incidental or consequential damages arising out of the use or in...

Reviews: