8
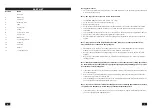
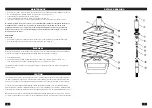
PART LIST
Position
Name
1
End piece
2
Main body
3
Safety nut
4
Reduction piece
5
Jaws
6
Upper cover
7
Spring
8
O ring 18 × 2.4 mm
9
Upper cover
10
Main body
11
Connecting platform
12
Long arm
13
Short arm
14
Handle
15
Connecting block
5
Using your machine
•
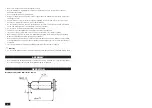
Chose the appropriate rivet cast (1) with the correct diameter based on the rivet shaft. The rivet shaft must
move freely in the opening.
Note. The opposite rivet casts are stored in the handle.
•
The available diameters are 2.4 mm, 3.2 mm or 4.1 mm.
•
Screw the correct rivet cast in the gun cylinder (2).
•
Release the safety nut (3).
•
Screw out the cylinder thread (2) but make sure that small part of the cylinder still remains in the thread.
•
Turn the riveting pliers upwards. Hold the gun (10) with one hand and press the lever down with your
other hand.
•
Turn the cylinder of the pliers (2) in order to set the position so the inner part is touching the three jaws (5).
•
Secure the position of the cylinder (2) by tightening the safety nut (3).
•
Push the shaft of the rivet inside the rivet cast opening and inside the three jaws until it sits on the front
surface.
Note. After you pushed the rivet shaft between the jaws (5), you cannot pull it back out.
The jaws will close in thanks to the spring (7).
•
The diameter of the rivet holes in the adjoining parts, must be 0.1 mm larger than the outer rivet shaft
diameter. The holes must be perpendicular to ensure maximum joint strength.
•
Push the rivet in the riveting pliers straight down in to the perpendicular holes in the parts to be joined
together.
•
By pressing on the handle along its axes you will press the rivet completely down, while performing the
riveting operation.
Note. Below the adjoining parts must be sufficient room for the rivet. The joining parts must
be sufficiently strong or they must be appropriately supported by auxiliary pieces to prevent
deformation of the joining parts.
•
If the shaft of the rivet is not pressed down appropriately, continue in the riveting operation. Pull and press
on the handle again.
•
After you have successfully finished the riveting, the remaining shaft of the rivet will get torn out and the
remaining piece will stay closed in the jaws.
•
Turn the riveting gun up side down and push on the remaining shaft with a new rivet to drive the shaft out.
The new rivet will be automatically fastened in the pliers.
Note. If you do not want to continue working, push on the remaining shaft with the new rivet,
only make sure that the new rivet will not get fastened inside the pliers.
•
If the safety nut (3) or the opposite rivet cast (1) get loose during work, tighten it immediately. Otherwise
you will not get strong and high-quality joint.


