


01622 933 853
www.ultra-soft.co.uk
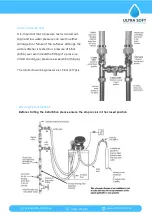
Connecting The Softener
Once you have completed the installation of the valves set the valves as follows:
Softener Inlet And Outlet Valve CLOSED
Bypass Valve OPEN
You can now safely return the stop cock to the open position. Using the hoses provided (if
installation kit ordered) connect the straight end of the hose having first inserted the
washer provided to the softener inlet and outlet valves.
Connect the angled end to the water softener. The softener inlets and outlets should be
indicated either with the words inlet or outlet or with an embossed directional arrow on
the softener tails. Normally the softener tails are in a configuration of three with the
centre normally being the waste outlet.
Waste Pipe Installation
Connect the waste pipe to the waste outlet on the softener and run the hose to either an
up stand or outside drain, a minimum air gap of 20mm must exist at the end of the drain
line. Softened water will have no adverse effect on a septic tank. Should you need to
extend the drain hose this can be done by connecting to a 15mm copper tube for a
maximum run of 8 meters with a minimum daytime pressure of 40 psi. Ensure the drain
hose is not kinked or obstructed in any way as this will lead to an overflow of the softener.
The drain pipe can run uphill to a max of 1 meter with a min water pressure of 40 psi
Overflow Connection
The overflow connection is the white ½” hose spigot on the rear or side of the cabinet. The
overflow must be run downhill through an outside wall without kinks or restrictions. It is
recommended the overflow hose be visible when it exits the outside wall.
01622 933 853
www.ultra-soft.co.uk


