background image

PIPELINE CLEANING & TELEVISING EQUIPMENT

PIPELINE CLEANING & TELEVISING EQUIPMENT

General DVR Use

1. 

When navigating through the DVR’s menu, you may 


use the wireless remote control or the keypad located  


on the system.

2. 

The main menu can always be accessed when  


watching live video by pressing the menu button. 

File Transfer Information

1. 

When transferring files from the DVR to a PC, it is 


highly recommended that it is done via the USB cable 


and not an SD card. Transfer times are much faster


when using a USB cable.

2. 

Transferring via USB cable allows the user to view  


files almost instantaneously. Editing, moving, and  


deleting files is also very simple.

3. 

A computer will see the DVR as an external hard  


drive. This allows the user to manipulate the data as if  


the files were on the computer itself. 

4. 

The maximum size SD card that can be used with the  


DVR is 2 GB.

5. 

Transfer rates when using an SD card are almost  


one and a half times the length of the recording being  


transferred. 

3. 

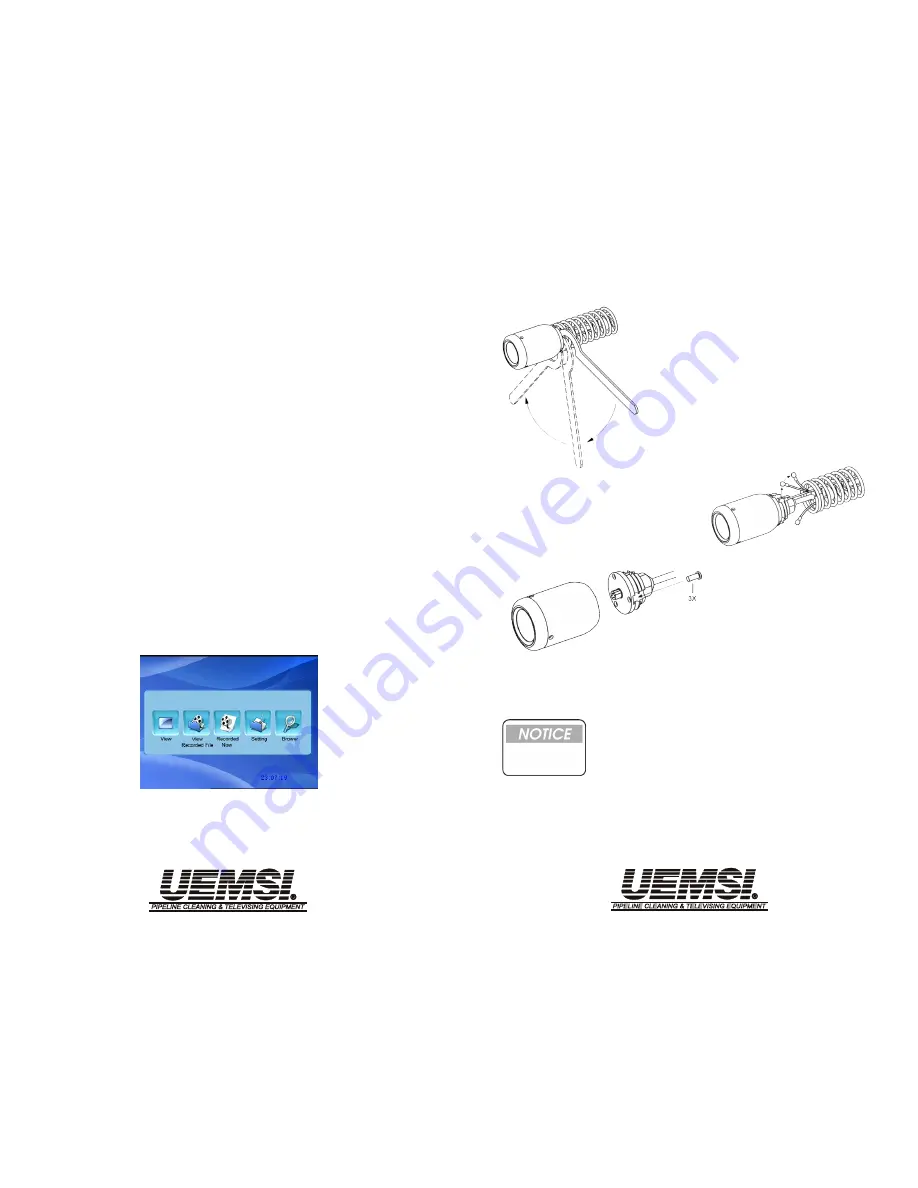
Once the main menu appears there are 5 options:     


View, View Recorded File, Record Now, Setting, and  


Browser.

-21-

NOTE: 

To reassemble, follow steps in reverse 

order. The connector on the back of the camera 

head is keyed so pay particular attention to the 

orientation when reinstalling. After reinserting 

the tow cable ends, rotate the camera head approximately 2-1/2 

turns counterclockwise so that when the camera is threaded 

onto the front spring connector, the end result will be straight 

and untangled tow cables. 

If the tow cables are tangled they 

can cut the curly power cord.

Camera Head Removal (Spring Termination)

3

Use  a  screwdriver  to 

remove the three combi-

nation screws that fasten 

the  camera  head  to  the 

cable/connector end. 

(Fig. 3).

1

To  detach  the  camera  head 

from  front  spring  connector, 

hook  the  spanner  wrench 

onto  the  end  of  the  spring. 

Simultaneously,  rotate  the 

spanner  wrench  and  camera 

head  in  opposite  directions. 

(Fig. 1)

2

Release  tow  cable  ends 

(Fig. 2), allowing the spring 

to be pushed away from the 

camera head.

Figure 1

Figure 2

Figure 3

Slide the camera head off of the connector. Pay particular 

attention to the O-ring, check it for wear and for proper 

alignment.

-26-

4

Summary of Contents for DVR Procam

Page 1: ...NT OPERATION AND MAINTENANCE MANUAL for UEMSI DVR PROCAMTM MINI CAMERA SYSTEM Corporate Office 800 666 0766 262 783 6666 Web Site www uemsi com E mail info uemsi com P N 55 1900 600 2009 Corporate Off...

Page 2: ...rage Guidelines Product Usage Guidelines SECTION Il SYSTEM DESCRIPTION General System Components Mini Camera Head Push Reel Power Control Unit PCU Lid Stay Camera Controls Power Switch AC Power Switch...

Page 3: ...or to operating the system UEMSI Camera Warranty UEMSI mini camera systems and locators have a one 1 year conditional warranty from the date of purchase This includes internal circuitry and mechanical...

Page 4: ...PIPELINE CLEANING TELEVISING EQUIPMENT PIPELINE CLEANING TELEVISING EQUIPMENT SECTION I SAFETY 5 SECTION VI WARRANTY INFORMATION 42...

Page 5: ...ance of each heading is listed below WARNING Maintenance operating procedures or techniques that if not followed may result in injury CAUTION Maintenance operating proce dures or techniques that if no...

Page 6: ...ee terminal grounded recepta cle The unit should be operated only from the type of power source indicated on the rating plate Figure 1 Figure 2 DC Operating Guidelines This unit is designed for use wi...

Page 7: ...rect sunlight Leaving it in an enclosed vehicle in direct sunlight near a heater etc can cause de formation of the case and electrical cables Using this product in areas that are colder than 32o F 0o...

Page 8: ...PIPELINE CLEANING TELEVISING EQUIPMENT PIPELINE CLEANING TELEVISING EQUIPMENT SECTION Il SYSTEM DESCRIPTION 9 Spring Termination Instructions 38...

Page 9: ...an illuminate pipe up to 10 in diameter depending which camera head is used and the pipe conditions The video monitor and power supply control unit are contained in a durable impact resistant carrying...

Page 10: ...dome cover contains two O rings and is fastened with three stainless steel flathead screws While the lighthead dome cover can be removed for service opening the camera further by an unauthorized servi...

Page 11: ...n the maintenance section of this manual Push Reel The push reel Fig 2 3 safely stores and dispenses the video push cable and camera head It is lightweight and contains wheels for mobility A brake han...

Page 12: ...eatures of the PCU The lid is comprised of the 10 4 color LCD monitor and an equipment storage bag The lower portion of the case is comprised of the DVR camera controls battery compartment and interfa...

Page 13: ...rol is turned clockwise The lighthead voltage can reach up to approximately 12V 14 Figure 2 7 33 AC Battery Charger Trickle This battery charger is built to charge UEMSI branded bat teries at a trickl...

Page 14: ...which allows for around 120 hours of continuous recording DVR Remote Control The wireless DVR remote control allows the user to control the unit while operating from a distance There is an infrared se...

Page 15: ...window with distance time date and two lines of pre programmed text Also included in the system is a digital footage head with encoder This mounts on the push reel and comes with an upgraded interconn...

Page 16: ...t Camera DC AC Fuse Figure 2 11 Figure 2 12 Figure 4 1 Figure 4 2 30 Pro Eye Self leveling Color Camera Head This camera head is an upgrade to the standard CM 1 camera head The Pro Eye automatically k...

Page 17: ...r To replace push in the silver cap terminal while turning counter clockwise Fig 2 13 Replace only with a 10A 32V type 3AG fuse Camera Fuse Located on the faceplate this fuse protects the camera and c...

Page 18: ...ned on 5 In most cases the monitor will show a screen that reads Checking Hard Drive Allow the system to go through this process 6 After a short time the camera video should appear 19 3 Wipe the light...

Page 19: ...In the event that the camera head must be removed from the video push cable locate a 9 64 hex wrench Remove the three stainless steel socket head cap screws on the rear of the connector Once the conne...

Page 20: ...d 3 Once the main menu appears there are 5 options View View Recorded File Record Now Setting and Browser 21 NOTE To reassemble follow steps in reverse order The connector on the back of the camera he...

Page 21: ...n that will pop up is the file with the last recording made on the DVR The item in red is the selected option 6 Record Now will start a recording and the screen will go back to live video 7 In the Set...

Page 22: ...user to look through files on the DVR is by connecting to a computer via USB port The system must be off when connecting to a computer Power Down Procedure 1 When powering down the unit it is highly r...

Reviews: