background image

13

12

Delete

Video File
Picture File

OK

BACK

UP

DOWN

DEL

OK

BACK

UP

DOWN

PICTURE

VIDEO

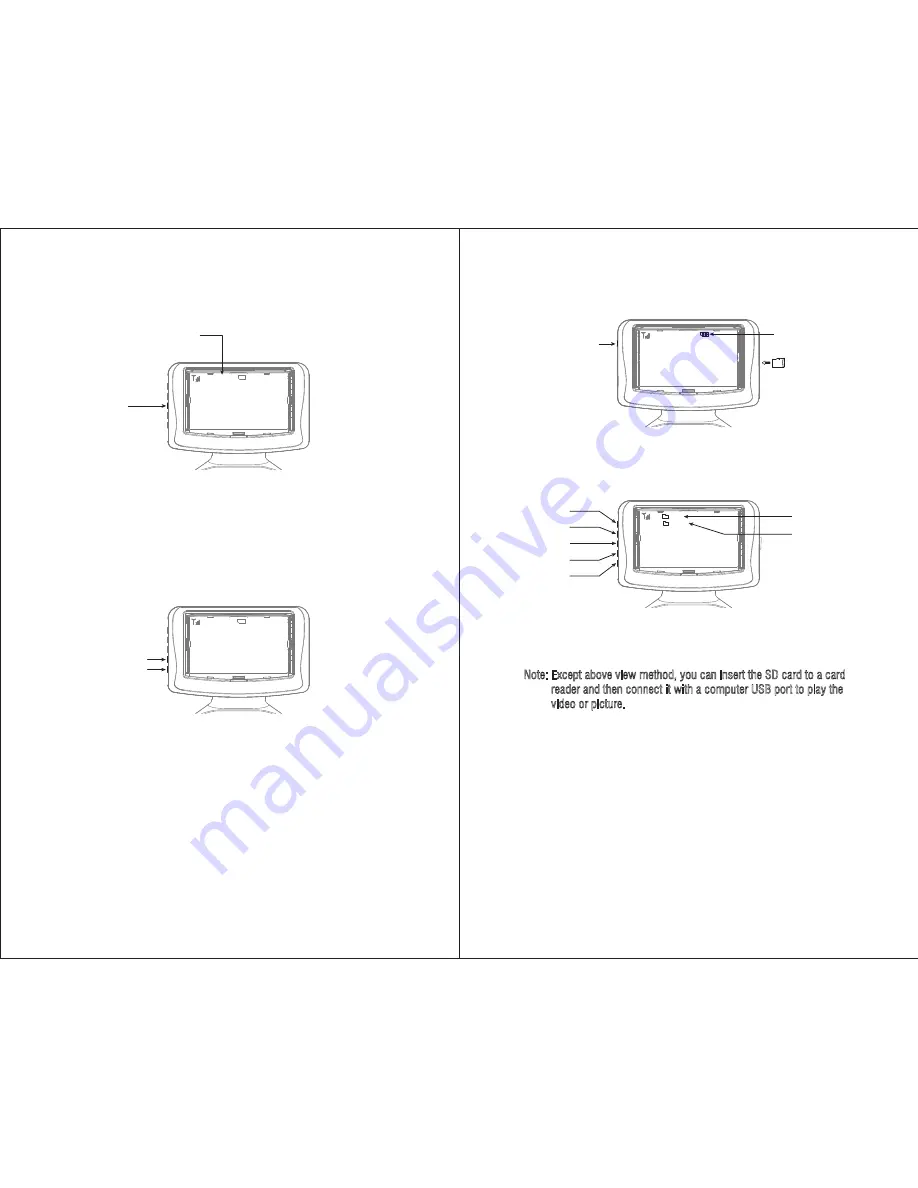
Press “UP” or “DOWN” button to choose a video file or picture file and
then press “OK” button to select a file. Press “UP” or “DOWN” button
again to choose a video or picture, and then press “OK” button to play.
Note: Except above view method, you can insert the SD card to a card
         reader and then connect it with a computer USB port to play the
         video or picture.

To Delete File

Press “DEL” button to delete file directly when viewing the video or
picture. Or press “UP” or “Down” button to select a video or picture
after entering the video or picture file, and then press “DEL” button and

the screen will appear                            Choose “YES” by “UP” or

 “DOWN” button and then press “OK” button to delete the file. Or
choose “NO” and then press “OK” to return. 

DEL XXXXXX ?

   YES     NO

To View Stored Video and Picture 

Take out the SD card from the camera and insert it to the card slot in the
right side of the display screen. A white SD card icon will show on the
screen. Press “VIEW” Button to view the file. 

View Button

White SD Card Icon

Insert the SD card to

card slot 

VIEW

REC

SNAP

UP

DOWN

To Take Picture

Press SNAP Button and the “JPG” Icon will flash briefly, and then the

picture will be stored in SD card automatically.

To Adjust the Screen Brightness

Press “UP” or “DOWN” button to adjust the screen brightness.

Up Button (brighter)

Down Button (darker)

SD

VIEW

REC

SNAP

UP

DOWN

1. SNAP Button

2. “JPG” Icon

VIEW

JPG

SD

REC

SNAP

UP

DOWN

Summary of Contents for Tercel

Page 1: ...6 Flying Preparation 7 Pre flying Instruction 8 Operation Instruction of Camera 10 To Record Video 11 To Take Picture 12 To Adjust the Screen Brightness 12 To View Stored Video and Picture 13 To Delete File 13 Flying Control 14 Spare Parts 21 Exploded View 22 Troubleshooting Guide 23 Heading Hold Mode 16 Altitude Hold Mode 17 High Medium Low Speed Mode 18 Replacement of Propeller and Motor 19 Reco...

Page 2: ... caused by improper operation as we could not control the procedure of installation use and operation of this drone 3 Safe operation Please operate the RC drone in accordance with your physical status and flying skill Fatigue listlessness and improper operation may increase the rate of accident 4 Keep away from rotating parts Rotating Parts can cause serious injury and damage Keep face and body aw...

Page 3: ...ra Rotate Down the Camera Rigiht Stick Forward Backward Left Right Flying Stick Altitude Hold Mode Left Right Rotation Trimmer Forward Backward Left Right Flying Trimmer SD Card Slot Power Switch and Indicator Light 2 3 18 Screws 2 3 18 Screws Left Stick Throttle Rotation Stick High Medium Low Speed Mode Heading Hold Mode Battery Box Main Specification Drone Size Drone Weight 485 485 150mm 380g Ma...

Page 4: ...ttery with metal product to avoid short circle Stop using the battery if the battery swell up damaged or seriously heating etc Put the battery and charger on the ground and keep away from inflammable when charging to avoid accident OFF ON Propeller Guard Installation Diagram 1 7 6PB Screws Camera Gimbal Installation Diagram 1 To install the propeller guard to the drone and make sure the propeller ...

Page 5: ...Pre flying Instruction 1 Turn on the transmitter switch and the indicator light starts to flash rapidly Push the Left Stick all the way up then all the way down Picture 1 2 The indicator light flashes slowly which indicates the transmitter enters code pairing search Picture 1 Picture 2 Power Switch 3 Connect the battery plug and the drone plug 2 Pull out the battery box from the drone rear Press a...

Page 6: ...ts paired camera automatically Next time you need not to pair again If you want to pair the transmitter with other camera Restart the transmitter and repeat step 1 and step 2 Notice Do not move the Left Stick while pairing the camera and the transmitter to avoid inadvertently starting the drone Press PAIR Button PAIR EXIT To Record Video After successful pairing the screen will enter video menu an...

Page 7: ...then press DEL button and the screen will appear Choose YES by UP or DOWN button and then press OK button to delete the file Or choose NO and then press OK to return DEL XXXXXX YES NO To View Stored Video and Picture Take out the SD card from the camera and insert it to the card slot in the right side of the display screen A white SD card icon will show on the screen Press VIEW Button to view the ...

Page 8: ... drone to the left and push the Right Stick to the right to fly to the right 4 To fly Forward and Backward Push the Right Stick up to fly the drone forward and pull the Right Stick down to fly the drone backward 5 If the drone rotates to the left or right Press the Right Rotation Trimmer till balance if the drone rotates to the left and press the Left Rotation Trimmer till balance if the the drone...

Page 9: ... lights flashes which indicates the heading hold mode is ready To turn off Heading Hold Mode press the heading hold mode button again and the drone LED lights turns solid which indicates the heading hold mode is off Note The drone body lights flash rapidly when you turn on the heading hold mode and altitude mode Prerequisite Position the drone in such a way that its front is your front see Picture...

Page 10: ...peller A and CW Motor for Propeller B or the drone can not fly High Medium Low Speed Mode Press the High Medium Low Speed Mode button of the transmitter The transmitter will beep once for Low Speed Mode twice for Medium Speed Mode and three times for High Speed Mode High Medium Low Speed 1 The Altitude Hold Mode is available only when the Throttle Left Stick more than 40 The drone will exit from A...

Page 11: ...data from my computer mobile disk Or you can insert the SD Card to the LCD transmitter to view the photo and video Spare Parts For convenience the spare parts are listed for you to choose which can be purchased from local distributor Please refer to the exploded view below to check the circled icon 16 11 8 7 15 U842 2 17 USB Charger for Drone Battery U842 2 18 Transimitter Battery U842 2 01 Upper ...

Page 12: ... Misoperation 3 Operate the drone step by step in accordance with the user manual 4 The electronic component is damaged for frequent crash 4 To buy spare parts from local seller and replace damaged parts 1 The Propeller deformed seriously 1 Replace Propeller 2 The drone battery is too low 2 Recharge the drone battery 3 Incorrect installation of Propeller 3 Install the Propeller in accordance with ...

Reviews: