


PAGE 2 OF 9
0719 IH-1265
TO LOAD A LABEL ROLL
1. Press the form-feed button to eject the labels that
protected the printer during shipment.
2. Open the top cover and remove any packing
material inside the label compartment.
3. Remove the label spool from inside the cover.
4. Hold the spool spindle in your left hand and place
the label roll on the spindle so that the labels feed
from underneath and the left edge of the label roll is
flush against the side of the spool. (See Figure 5)
5. Place the spool guide onto the right side of the
spool and press
the guide tightly
against the label
roll, leaving no
gap between the
roll and the spool.
(See Figure 5)
NOTE: The
label roll must
fit snugly
against both sides of the label spool (with
no gaps) to avoid drifting as the label feeds
through the printer.
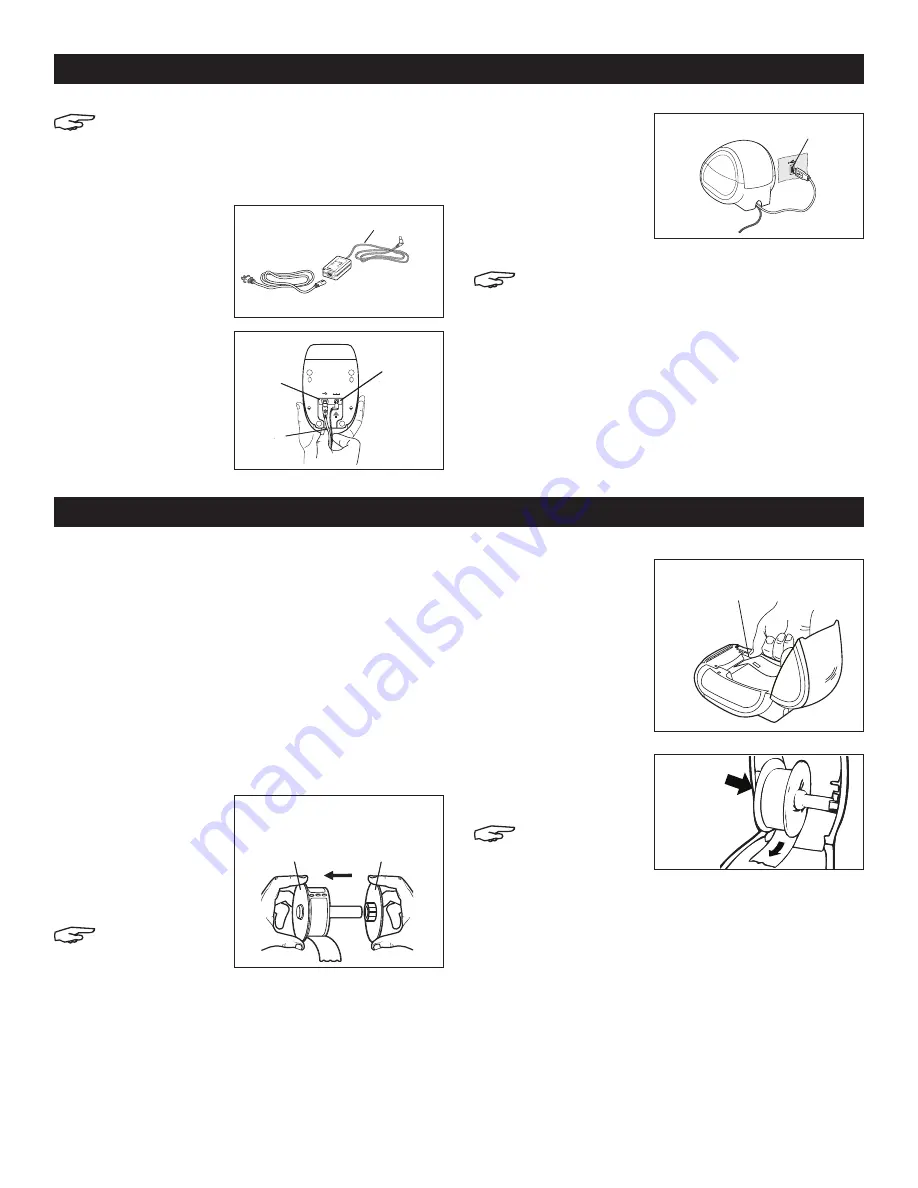
6. Insert the label
spool into the slot
in the printer cover
with the labels
extending from
underneath the roll.
(See Figure 6)
7. Align the left edge
of the label with
the left edge of
the label feed
slot and insert the
label into the slot.
(See Figure 7)
NOTE: The
printer feeds
the labels,
stopping
at the beginning of the first label. If the printer
does not feed the labels, make sure the first
label is fully inserted and then press the
form-feed button.
8. Lower the top cover.
NOTE: For Windows, do not connect the printer
to your computer until instructed to do so
during the software installation.
TO CONNECT THE POWER
1. Plug the power
cord into the
power adapter.
(See Figure 2)
2. Plug the power
adapter into the
power connector
on the bottom
of the printer.
(See Figure 3)
3. Plug the other end
of the power cord
into a power outlet.
4. Plug the USB cable
into the USB port on
the bottom of the
printer. (See Figure 4)
5. Insert the power and
USB cables through
the cable channel
and set the printer down. (See Figure 4)
NOTE: DO NOT CONNECT the other end of the
USB cable to your computer until asked to do
so during the software installation.
6. Connect the printer to your computer as follows:
a. For Windows: plug the USB cable into a USB
port ONLY when prompted during the software
installation.
b. For Mac OS X: plug the USB cable into a USB port
prior to installing the software.
CONNECTING THE PRINTER
LOADING LABELS
Switc
hing
Ad
apter
SHO
CK
HAZ
ARD
RIS
KO
FE
LEC
TRI
C S
HO
CK
DRY
LO
CAT
ION
US
EO
NLY
.
NO
N-S
ERV
ICE
ABL
E P
ART
S IN
SID
E.
FO
RU
SE
WIT
HIT
E O
NLY
.
END
AST
FO
R K
ONT
ORS
MAS
KIN
ER.
CAU
TIO
N
Tes
ted
to
com
ply
with
FC
C s
tan
dard
s
FO
R H
OM
E O
R
OFF
ICE
US
E
I.T
.E.
PO
WER
SU
PPL
Y
C
Mode
l N
o.:T
ESA
2-2
401
000
U.S
.P
/N:
908
19
Eur
ope
P/N
: 92
4883
INP
UT:
100
-24
0V-
50/
60H
z Ma
x0.
64A
OUT
PUT
:24
V --
-0
-1.0
A
MAD
E IN
CH
INA
LIS
TED
15W
M
E1
988
50
U L
U L
N10
926
Power Adapter
Power Cord
Figure 2
USB
24VDC
USB Port
Cable
Channel
Power
Connector
Figure 3
Spool
Spindle
Spool
Guide
Figure 5
Figure 7
Align label with left
edge of label feed slot
Figure 6
USB Port
Figure 4


