background image

PAGE 3 OF 9 

0719 IH-1265

PRINTING

PRINTING THE FIRST LABEL

The first time you open the application, you are asked 

to register the software. Registering the software ensures 

that you will be informed of any software updates.
During the registration process, you will be asked to 

enter the serial number for your label printer. The serial 

number is located on the bottom of the printer. 

To print your first label:

1.  Start DYMO Label software by doing one of the 

following:

•  For Windows, click 

Start

, then 

Programs>DYMO>DYMO Label v.8.

•  For Macintosh, double-click the DYMO Label icon  

in the 

Applications

 folder.

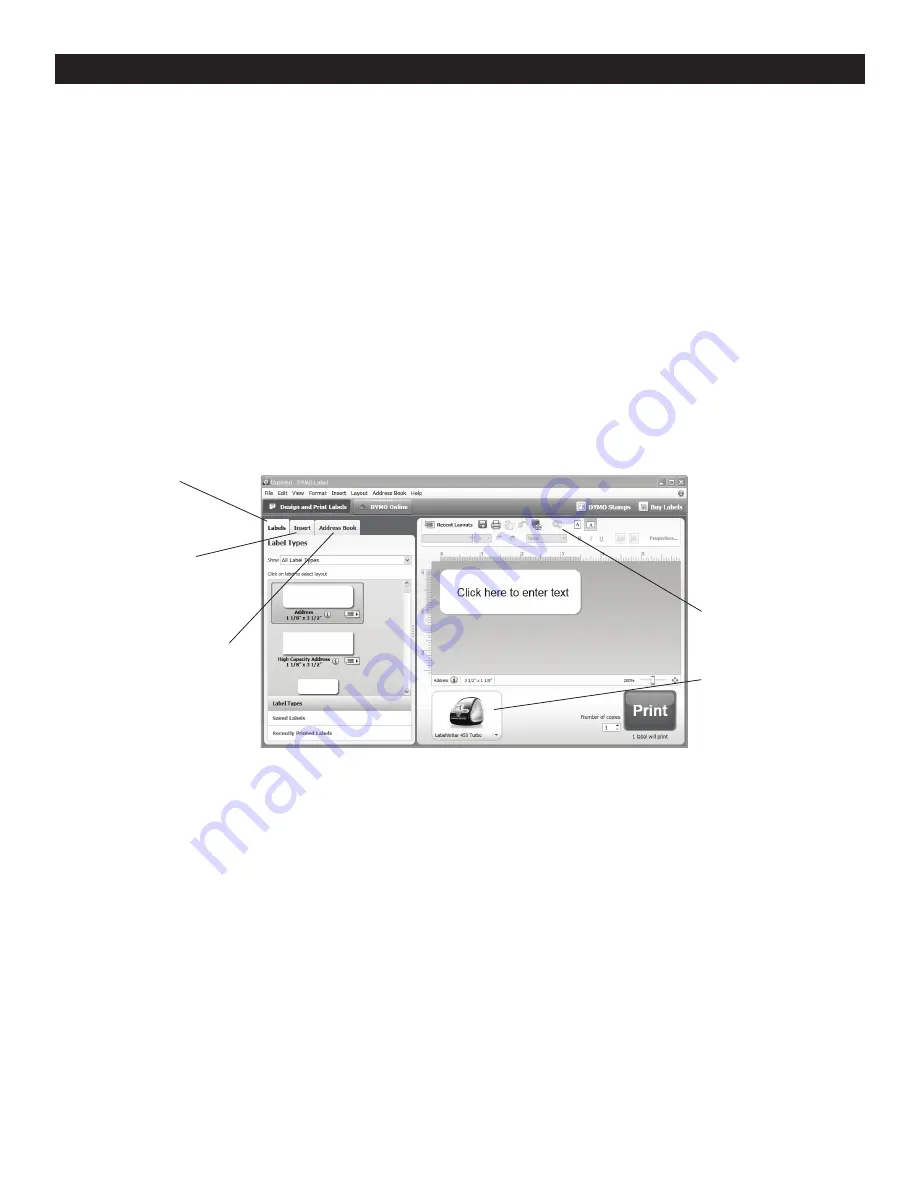
The first time you start DYMO Label software, a list of 

available label types is displayed on the left side of the 

window and an address label is displayed in the Edit 

area. (See Figure 8)

2.  Click once in the address label in the Edit area and 

type some text.

3.  Optionally, choose a font and a justification setting 

from the Formatting toolbar.

4.  Click 

Print 

to print the label. 

For complete details on using the software, refer to the 

online Help. From the Help menu, you can view the 

following:

• DYMO Label v.8 Help
• DYMO Label v.8 User Guide
• LabelWriter Printer User Guide

π

  CHICAGO • ATLANTA • DALLAS • LOS ANGELES • MINNEAPOLIS • NYC/PHILA • SEATTLE • MEXICO • CANADA

1-800-295-5510

uline.com

Figure 8

Visually choose label type 

and apply layouts.

Insert text, addresses, 

images, shapes, lines, 

barcodes, dates and 

counters.

Select a printer to

print your labels.

Verify and correct

addresses on your label.

Store your favorite addresses

in the Address Book or view 

your Outlook or Mac Address 

Book contacts; automatically 

insert addresses on your label.

Summary of Contents for DYMO LABELWRITER 450 TURBO H-1265

Page 1: ...reated labels Labels are the only supply you will ever have to buy Figure 1 depicts the major components of the printer The form feed button on the front of the printer advances a single label The lab...

Page 2: ...nter to your computer until instructed to do so during the software installation TO CONNECT THE POWER 1 Plug the power cord into the power adapter See Figure 2 2 Plug the power adapter into the power...

Page 3: ...the window and an address label is displayed in the Edit area See Figure 8 2 Click once in the address label in the Edit area and type some text 3 Optionally choose a font and a justification setting...

Page 4: ...la impresora avanza una nica etiqueta adhesiva El bot n de expulsi n de etiquetas adhesivas se utiliza para quitar las etiquetas de la impresora al cambiar el rollo La luz LED de estado permite deter...

Page 5: ...n 8 Baje la tapa superior NOTA En el caso de Windows no conecte la impresora a una computadora hasta que se le indique que debe hacerlo durante el proceso de instalaci n del software PARA CONECTAR A L...

Page 6: ...a 8 2 Haga clic una vez en la etiqueta de direcci n en la zona de edici n y escriba algo de texto 3 Opcionalmente puede elegir una fuente y una configuraci n de alineaci n en la barra de herramientas...

Page 7: ...imprimante distribue une seule tiquette Le bouton d jection d tiquettes est utilis pour retirer les tiquettes de l imprimante lors du changement de rouleau Le voyant d tat DEL vous permet de v rifier...

Page 8: ...ws ne raccordez l imprimante un ordinateur que lorsque vous en aurez re u l instruction lors de l installation du logiciel POUR BRANCHER L ALIMENTATION 1 Branchez le cordon d alimentation dans l adapt...

Page 9: ...tiquettes Le num ro de s rie est indiqu en dessous de l imprimante Pour imprimer votre premi re tiquette 1 D marrez le logiciel DYMO Label en effectuant l une des actions suivantes Pour Windows clique...

Reviews: