Type A Machines SERIES 1 User Manual Download Page 4


The Type A Machines Series 1 prints a 3D object by placing thin layers of plastic on top of each other until 
a finished object is built out of the layered plastic.  

To begin a 3D print, plastic is delivered to the Series 1 Tool Head in the form of “filament” (a long thin 
strand of plastic, wound onto a spool). The Series 1 then heats the filament to its melting point and pushes, 
or “extrudes,” the melted filament through the Extruder Nozzle. The Series 1 then moves the Nozzle in a 
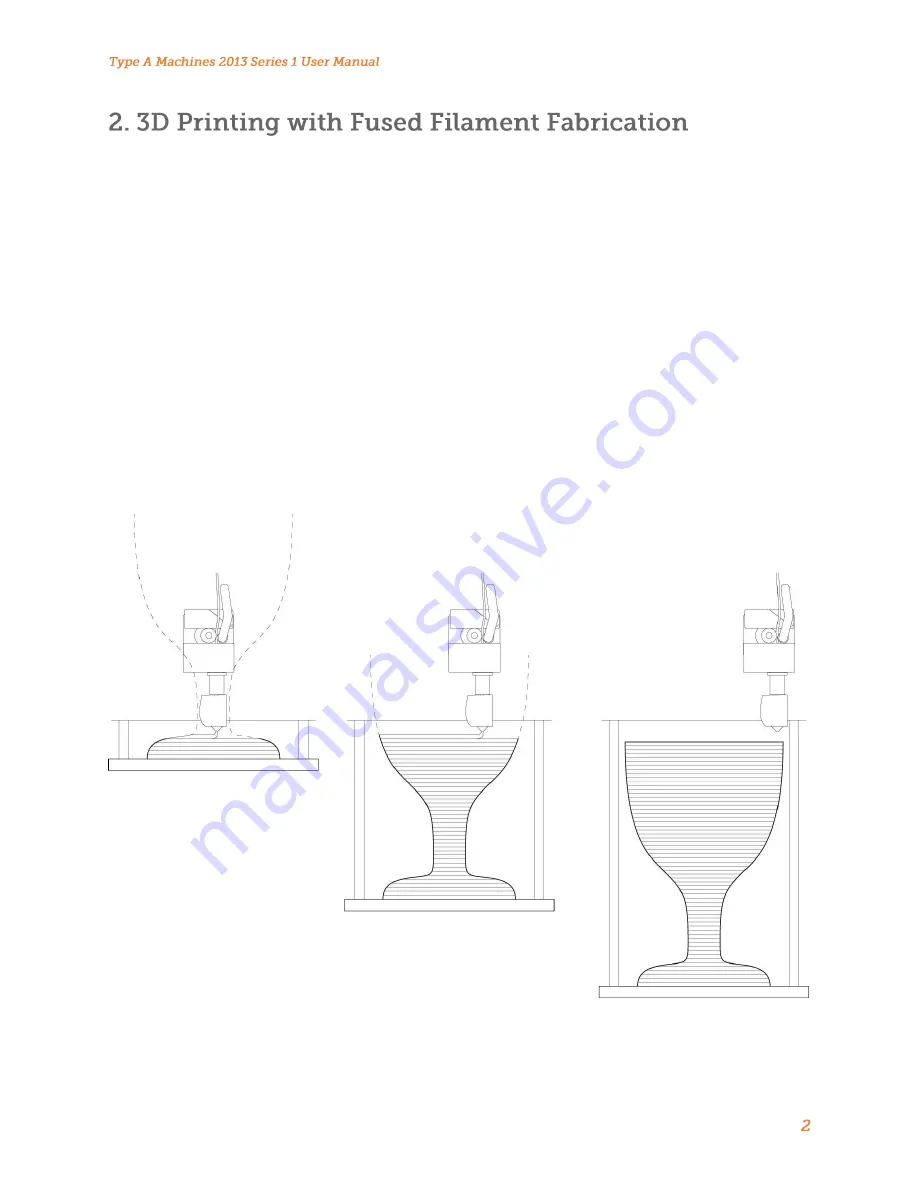
pattern while extruding plastic to draw a very thin cross section of the object that it is printing. The Tool 
Head fan cools the newly extruded plastic, solidifying it almost instantly. After each layer is completed, the 
printer moves the Build Surface down a tiny distance, and then extrudes the next cross section of melted 
plastic on top of the cooled layer below. 

This method of 3D printing is called Fused Filament Fabrication, or “FFF”. 


Figure 2.0. 1


Summary of Contents for SERIES 1

Page 1: ...for being in the 3D printing industry but what keeps us coming in every day is the awesome stuff you make In this guide you ll find all the resources you need to be up and printing in no time Our use...

Page 2: ...ution Speed 15 6 3 2 Infill 15 6 3 3 Load your STL file 16 6 3 4 Slice 17 7 Run A Print 18 7 1 Connect Series 1 Via Pronterface 18 7 1 1 Set Baud Rate 18 7 1 2 Set Com Port 19 7 1 3 Connect to your Se...

Page 3: ...3D Printed Object Sample PLA Power Cable Acrylic Build Plate taped and ready to go Filament Management System Upkeep Kit containing 7 MM wrench 2 5 MM Hex Key 2 MM Hex Key 1 5 MM Hex Key Insulated Cer...

Page 4: ...t and pushes or extrudes the melted filament through the Extruder Nozzle The Series 1 then moves the Nozzle in a pattern while extruding plastic to draw a very thin cross section of the object that it...

Page 5: ...reliable desktop 3D printer It features best in class build volume an innovative modular Hot End replacement system the Winchester quick release for fast filament loading fingertip Build Plate calibr...

Page 6: ...es offices and TechShop in San Francisco the Winchester Tool Head is designed to allow quick release and loading of both filament and the open source industry standard groove mount Hot End It has prov...

Page 7: ...motors The Z axis moves the Build Surface up and down using a lead screw shafts and a stepper motor The design of the Series 1 maximizes the machine area devoted to the buildable space This results i...

Page 8: ...r and command code from the Arduino to the motor drivers The RAMPS also serves as the connection point for most of the wiring in the machine This is where the sensors and heaters in the Tool Head and...

Page 9: ...ackaging insert between the Gantry and back of panel of the machine The Gantry and Tool Head should now move freely Check your package contents to confirm that your Series 1 shipped with all contents...

Page 10: ...igure 4 2 1 Do not disconnect any wires there is enough slack in the cables to allow switching Mid way down on the power supply through the metal grating you will see a switch with numbers on it There...

Page 11: ...ection 5 2 1 BEFORE connecting the USB cable Remember that you ll need to install the printer control software to operate your Series 1 Your Build Plate comes prepared with a blue square adhered to th...

Page 12: ...This small hole is the filament loading aperture Fully insert the free end of your PLA into the aperture and gently release the spring lever The PLA should now be pinched in between the pinch wheel an...

Page 13: ...ocate the unzipped files later In the unzipped folder your will see a file called 01_Mac_Pronterface The Pronterface Application is ready to go with no install required You can add a shortcut to Pront...

Page 14: ...a USB port on your computer Your computer should display a message that says that an Arduino device has now been connected The message may also show a COM number This is the port the printer will use...

Page 15: ...produced by slicing software GCode files can end gcode or gco GCode files must be made with settings specific to the printer that you want to print the file on The Setup Package file that you download...

Page 16: ...pe A Machines Setup Package The Setup Package includes a model of the Print bed for your reference Open the file called platform figure 6 3 2 KISSlicer now shows a visualization of the Series 1 Build...

Page 17: ...speed and resolution and it s a great place to start From the Style tab you will see the Infill slider control at the bottom of the settings are This controls the amount of plastic filling that will s...

Page 18: ...folder called Test Prints select one of the included STL files figure 6 3 6 Figure 6 3 7 shows a visualization of a loaded STL file If the file you loaded looks very small you may be having a unit con...

Page 19: ...els Paths button above the visualization to switch views This is now a visualization of your GCode You can now use the slider on the right of the visualization to slide your slice through the model If...

Page 20: ...face application 7 1 1 Before beginning your first print you will need to set the Baud rate for the connection Confirm that your Series 1 is connected via USB to your computer then highlight the field...

Page 21: ...d you may need to manually specify the COM port by clicking the drop down menu and selecting the correct one Click Connect The lights on the printer will flash and a Connecting message will appear in...

Page 22: ...have another GCode file that you want to print select it and open it After the file is loaded you will see a visualization of it appear in the window as well as some information appear on the right ha...

Page 23: ...turn on this helps solidify the printed part 5 The head will move to begin extruding your print It s a good idea to watch your first layer complete before walking away This is the most critical part o...

Page 24: ...ully pry the rest of the part off If your part is really stuck you can brace the build surface against the edge of a sturdy desk or counter and gently apply pressure to the outer edges to cause the bu...

Page 25: ...blue square gradually while using a credit card or squeegee to express any bubbles or voids Your Print Surface is now prepared To prepare the Build Plate with blue tape peel a length of tape about el...

Page 26: ...d After threading the music wire through once thread the music wire through again You can now reassemble the front clamp Insert high quality filament end into the Filament Aperture Manually push the f...

Page 27: ...unting clamps can come loose This will be apparent by the Hot End wobbling when touched or while printing To fix this turn the machine off and allow the head time to cool down Remove the front clamp o...

Page 28: ...ch temp Restart Pronterface Power machine off and on No Loud Motion dirty Shafts lubricate Shafts See Section 8 5 belt tension adjust belt tension See Section 8 3 Object will not detach from build sur...

Page 29: ...ustment knob works by triggering a micro switch under the upper back plate of the Series 1 It should be adjusted to trigger the switch when the Build Surface is just below the tip of the Extruder Nozz...

Page 30: ...the top of the build platform structure there is a graphic that shows which direction to turn the screw for the desired adjustment figure 9 1 4 It is best to go in turn increments at first Then either...

Page 31: ...and then tighten the lower nut to lock it in Clear the build plate of any prints or other materials Launch Pronterface move the build platform down Place the included 7mm wrench on the build plate in...

Page 32: ...d aside Slide the new Hot End into the mount with the wires facing left Reconnect the connectors carefully Screw the front clamp back on You have just installed a new Hot End If you re having trouble...

Page 33: ...X 10 1 260mm Build Area Y 9 05 230mm Build Area Z 9 45 240mm Build volume 729ci 14 35 liters Weight 16lbs 7 25kg Operating Baud Rate 203400 Operating Voltage 100 120 200 240VAC Internal Voltage 12 VDC...

Reviews: