23
S1686D-001-01
3.4.2 Installing Heat-sink Mounting Brackets
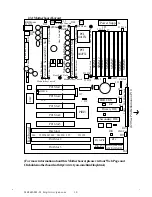
1. The heat-sink mount has two pins on the bottom and 4 pins on the top.
Notice that the bottom two pins are of different sizes. The size of the
pins and the holes in the motherboard will determine the correct orienta-
tion. A correctly installed bracket can be verified by noting the 4 pins on
the top. These 4 pins should be closest to the Pentium II CPU slot.
2. Insert the heat-sink mount into the holes on the motherboard. When
the bracket is properly inserted into the holes on the motherboard, you will
hear a clicking noise .
3. Lock the heat-sink mount to the board by inserting the two mounting
locks into the pins of the heat-sink mounting bracket which are now
below the motherboard. There will be a
click when the locks are securely
fastened.
3.4.3 Installing Pentium II Passive
Processors
1. Align the CPU with the CPU retention
module. Make sure the heat-sink is lined
up with the heat-sink mount bracket. If you put the CPU in the wrong
way, you may damage the CPU, the motherboard, and/or the socket.
2. Slowly press down on the CPU module until the CPU locks into place.
A clicking noise will be heard when the CPU is locked securely into the
module.
3.4.4 Installing Heat-sink Locks
The heat-sink lock has 4 notches which will correspond to the 4 pins on
the heat-sink mounting bracket. Gently slide the lock between the heat-
sink onto the heat-sink mounting bracket until both sides of the lock are
firmly secured. A clicking sound will be heard when the lock is securely
fastened to the heat-sink mounting bracket. To remove the lock from the
heat-sink mounting bracket, gently press the ends of the locks inward and
pull.
Mounting Bracket & Locks

