


3
TOOLS REQUIRED
-
¼” drive socket 5mm
-
¼” drive extension
-
¼” drive ratchet
-
3/8” square drive deep socket
- 14mm square drive deep socket
- Square drive ratchet wrench
-
Torque wrench (3/8” drive)
- Metric Allen Key set - 2.5mm,3mm, 4mm Allen key
- Non-marking spanners to tighten fittings
SUGGESTED LUBRICANTS AND
SEALANTS
- Loctite 243 Thread locker
- Loctite 567 Thread Sealant
- Resbond 907TS Red
- Penetrating oil
- Inox MX8 spray grease
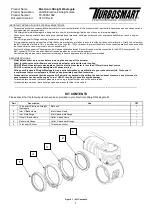
PART NUMBERS
TS-0565-1002
– eSWG54 Electronic Straight Gate
------------------------------------------------------------------------------------------------------------------------
QUICK START GUIDE
CAUTION!
It is important during the setup of the eGate, that some precautions are taken to ensure that the unit does not malfunction.
Firstly, the output from the ECU should be limited to 15%. As well as an inline fuse (5A-10A) or breaker to protect the eGate.
Once correct operation has been completed, initial safety setups can be lifted to operational limits.
HOW TO USE
The Turbosmart Straight Gate is a brand-new way to control boost pressure, it involves using an electric motor to drive the
position of the butterfly valve, this allows far greater control over conventional pneumatic boost control during its actuation
on the car. This paired with an aftermarket ECU controlling the straight gate, allows for plenty of new and safer ways to
control boost on your car.
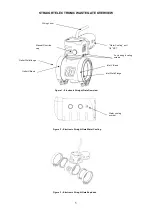
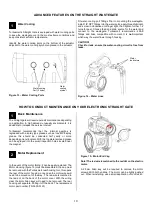
The Body will need to be fitted to the vehicle.
Please see the exploded drawing (figure 3).
This involves the two V Bands
clamps, the Inlet (fitted on the exhaust manifold), and the outlet which is where the regulated exhaust gases are bypassed.
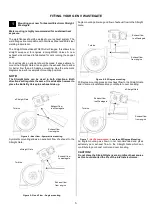
It is important to have the butterfly valve manually set to about the middle of its stroke. This will allow for an easier
installation. The Straight Gate can be used in both directions.
Please see below for a more detailed and helpful way of installing the Turbosmart Electronic Straight Wastegate.
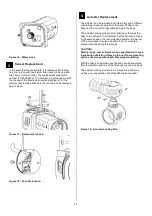
MAINTENANCE
Turbosmart Electronic Straight Wastegate will require periodic reapplication of spray grease such as Inox MX8 spray
grease, this is important that the manual override is used to move the butterfly valve through its range of motion, allowing
the grease to be applied throughout the entire butterfly valve gearbox. Turbosmart recommends that this is done regularly
at least half yearly or more in demanding temperature environments.
It is also important to check V Band tightness after the wastegate has run through a couple of heat cycles. To ensure that
the wastegate is seated and sealing correctly.
TEMPERATURE
The Turbosmart Electronic Straight Wastegate has a maximum thermal stress of 1250degC (2282degF) for 24hr if
thermally cooled with the water-cooling ports. It is important that the actuator internal housing
doesn’t go above a
temperature of 150degC (302degF) as this may cause damage to the internal electronics. Turbosmart recommends that
the eWastegate is water cooled and paired with good airflow over the body to help regulate temperature. Turbosmart also
recommends data logging the temperature sensor that is seen inside the actuator.
It is recommended that water cooling is in line with the turbo this will increase the longevity of the Electronic Straight Gate
and allow it to operate seamlessly. This does depend on the certain application and the rate and period at which the
Electronic Straight Gate is exposed to the high temperatures.


