background image

TRUST 738AV LCD POWER VIDEO 

4.8.4 

Connecting the camera to a TV 

The camera can be connected to a TV. You can then play all the recordings 
(including sound recordings) on the TV. The LCD screen will be turned off. A 
standard RCA AV cable is supplied with the camera. 

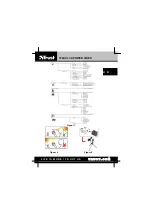
Connect the AV cable’s black connector to the camera (3, figure 10). 

Connect the white RCA plug to the audio input on the TV (if you have a stereo 
TV, the plug must be connected to the left-hand, white audio connection) (2, 
figure 10). 

U K

Connect the yellow RCA plug on the video input (usually yellow) on the TV (2, 
figure 10). 

Turn the TV on. 

Set the TV to display the video input signal. 

Turn the camera on. 

The TV will display the images which are normally displayed on the camera’s 
LCD screen. 

The TV can now be used to display the recordings and photographs. 


Note:


The camera’s AV output is not suitable for connecting to your TV’s 
aerial connection. The TV must have a video input.


Note

:  

If no image is displayed and a loud buzzing noise is heard via the TV 
speakers, then you have probably swapped the sound and image 
connections. Change over the sound and image plugs and try again. 

4.9 

Using the MP3 player 

4.9.1 

Saving MP3 files in the memory 

Turn the camera on. 

Connect the camera to the USB port of your computer (see item 7 of the 
Quick Installation Guide). 

Set the camera to the ‘Disk’ USB mode (see item 7 of the Quick Installation 
Guide). 

4  

Use Windows Explorer to open the ‘Removable Disk’. 

Make a new folder if the ‘Removable Disk’ does not yet have an MP3 folder 
(right-click on the white area of the Windows Explorer page). 

Copy your MP3 files from your hard disk to the MP3 folder. 


Note:


If a memory card is inserted into the camera, these files will be saved on 
the memory card. 

Note: 

Copying MP3 files to the camera requires a large amount of memory 
space. This will be at the expense of the memory space used for saving 
photographs or video clips. It is recommended to save your MP3 files to 
a separate memory card or to purchase a larger memory card. 

Tip: 

You can make your own MP3 files using programs such as Nero or 
Musicmatch Jukebox. More information can be found at 

www.nero.com


or 

www.musicmatch.com

. Free trial versions of these programs can be 

downloaded from these websites. 

4.9.2 

Playing MP3 files. 

Turn the camera on. 

Turn the mode switch to the ‘MP3’ position (E, figure 2). 

Press the direction button up or down to select the files which you wish to play. 

Mark the files which you wish to play using the play button (A, figure 3). 

A music symbol will appear when a track has been selected. 

The music symbol disappears when a track is unselected. 

Press the OK button (D, figure 3). 

Music will now be heard. 

Adjust the volume as desired by pressing the direction button to the left or right. 

13 

10  Press the direction button up or down to skip a selected track. 

Summary of Contents for 738AVl

Page 1: ...L I F E I S M O R E T R U S T U S T R U S T C O M 738AV LCD POWER VIDEO U K N L User s manual L I F E I S M O R E T R U S T U S T R U S T C O M ...

Page 2: ...ur product via our Internet site at www trust com register so that you will be eligible for optimal guarantee and service support You will also be automatically informed of the development of your and other Trust products L I F E I S M O R E T R U S T U S T R U S T C O M ...

Page 3: ...WER VIDEO L I F E I S M O R E T R U S T U S T R U S T C O M Figuur 1 Figuur 2 Figuur 3 Figuur 4 Figuur 5 Figuur 6 L I F E I S M O R E T R U S T U S T R U S T C O M L I F E I S M O R E T R U S T U S T R U S T C O M ...

Page 4: ...L I F E I S M O R E T R U S T U S T R U S T C O M 738AV LCD POWER VIDEO U K N L Figuur 7 Figuur 8 Figuur 9 L I F E I S M O R E T R U S T U S T R U S T C O M ...

Page 5: ...requirements and other relevant conditions of the applicable European directives The Declaration of Conformity DoC is available at www trust com 13807 ce Carefully read the following instructions before use The TRUST 738AV LCD POWER VIDEO does not require any special maintenance Use a slightly damp soft cloth to clean the camera Do not use aggressive substances such as white spirit to clean the de...

Page 6: ...738AV LCD POWER VIDEO Figuur 10 Figuur 11 Figuur 12 Figuur 13 Figuur 14 L I F E I S M O R E T R U S T U S T R U S T C O M ...

Page 7: ...emory card slot Slot for inserting an external SD MMC memory card 9 Video output For connecting the camera to a TV 10 USB connection For connecting the camera to a computer 11 Headphone connection Audio via headphones 12 Loud speaker Audio 13 LCD screen Operates as 1 Viewfinder for the camera 2 Displaying photographs and video clips 3 Displaying menus 14 LCD On Off detector Turns the LCD screen of...

Page 8: ...epending on the mode the camera is set to this button can be used as for 1 Zooming in and out 2 Changing the flash setting 3 Adjusting the exposure 4 Scrolling through the menus C Depending on the mode the camera is set to this button is used to 1 Open a menu 2 Delete files from the memory D Confirmation button for confirming menu selections Table 3 Direction button and confirmation button 4 Using...

Page 9: ...ips in the internal memory will no longer be visible Remove the memory card from the camera to access the photographs and video clips in the internal memory Note Format the card using the camera Do not use a card reader The camera cannot process the FAT32 or NTFS formats Note Make a backup of the files before using Windows Explorer in Windows XP This program may alter your photographs and this can...

Page 10: ...a short period of time A menu will be displayed This menu depends on the mode the camera is set to See figure 7 for the menu items which can be displayed on the LCD screen 3 Press the direction button B figure 3 a Downwards to move to the menu item below b Upwards to move to the menu item above c To the left to return to the previous menu item d To the right to select a menu item 4 Press the OK bu...

Page 11: ...ge Select English to display the menu in English Select Deutsch to display the menu in German Format Media Select Yes if you wish to format the memory Select No if you do not wish to format the memory Note If a memory card has been inserted into the camera this function only applies to the memory card and not to the internal memory Reset default Select Yes if you wish to return all the settings to...

Page 12: ...matic flash The camera detects whether it is necessary for the flash to be used Force to always use the flash Off to never use the flash Image Size Select 640 x 480 to take VGA quality photographs 1600 x 1200 to take photographs with a resolution of 2 Mpixels 2048 x 1536 to take photographs with a resolution of 3 Mpixels 2272 x 1704 to take photographs with a resolution of 4 Mpixels SelfTimer Sele...

Page 13: ...clip that you wish to delete using the direction button and then press the menu button C figure 3 If you have saved files you can choose from the following two options 1 Delete one choose this option if you wish to delete the selected recording 2 Delete all choose this if you wish to delete all the sound recordings 4 6 6 Digital video settings Turn the mode switch to the Camera position A figure 2...

Page 14: ...see the Quick Installation Guide Item 1 of the Quick Installation Guide 1 Open the LCD screen 2 Slide the lens cover downwards 3 Turn the camera on 4 The indicator next to the exposure button will be lit green Item 2 of the Quick Installation Guide 5 Set the camera to the Camera mode 6 Decide whether the macro setting is necessary and slide the switch to the correct position see chapter 4 6 7 7 If...

Page 15: ... lit constantly just before the photograph is taken A signal will be heard The photograph has been taken when the indicator is no longer lit 6 The automatic exposure function turns off automatically Note The automatic exposure function must be turned on using the menu each time that you wish to take a photograph using the automatic exposure function 4 7 3 Recording digital video clips Also see the...

Page 16: ...to the Audio Recorder mode F figure 2 3 Adjust the sound recording level by pressing the direction button to the left or right B figure 3 4 Press the record button A figure 3 5 The red indicator on the front of the camera will start to flash 6 The duration of the sound recording is displayed on the LCD screen 7 Press the record button to stop the sound recording 8 A file with a wav extension will ...

Page 17: ... 4 Press the menu button 5 Select Delete One from the menu 6 Press the OK button 7 Select Yes using the direction button 8 Press the OK button 9 The indicator next to the record button will flash orange 10 Please wait will be displayed on the LCD screen 11 The icons will then be displayed on the LCD screen again and the selected file will have been deleted Note MP3 files cannot be deleted in the w...

Page 18: ...n Guide 3 Set the camera to the Disk USB mode see item 7 of the Quick Installation Guide 4 Use Windows Explorer to open the Removable Disk 5 Make a new folder if the Removable Disk does not yet have an MP3 folder right click on the white area of the Windows Explorer page 6 Copy your MP3 files from your hard disk to the MP3 folder Note If a memory card is inserted into the camera these files will b...

Page 19: ...hen select Safe Mode from the menu which will be displayed 2 Click on Start Settings Control Panel and double click on the Add Remove Programs icon 3 Find all the programs for similar old devices and remove these by clicking on the Add Remove button When in the Safe Mode it is possible for some programs to appear twice In that case remove all the programs which appear twice 4 Restart the computer ...

Page 20: ... instructions The camera has been installed correctly once all the windows are closed The drivers for the camera s storage device have now been installed 4 Select the CAM USB mode in the Camera menu The settings are shown in figure 7 Windows will detect the camera and install the webcam component of the camera 5 Follow the on screen instructions You may require your original Windows CD ROM during ...

Page 21: ... to use 3 Follow the on screen instructions Note It is possible that you may receive a message concerning non certified audio drivers Continue the installation by selecting Continue Anyway This message does not affect the correct functioning of the camera This message only concerns the use of Photo Express 6 2 Photo Explorer 7 Ulead Photo Explorer 7 SE is a program which you can use to organize yo...

Page 22: ... 7 1 2 Downloading and saving photographs 1 Connect the camera as described in chapter 5 3 2 Check whether the camera is in the CAM USB mode 3 Follow the on screen instructions to save the files which are on the camera onto your PC 7 1 3 Using the PC camera function 1 Connect the camera to your computer 2 Check whether the camera is in the CAM USB mode 3 The Trust software will start automatically...

Page 23: ...ram s Help function Follow the instructions below to use the TRUST 738AV LCD POWER VIDEO in Photo Explorer 1 Connect the camera to the computer using the USB cable 2 Select the DISK USB mode in the Camera menu 3 Start Ulead Photo Explorer 4 The main window will appear The Set up Internet Connection window may also appear Click on the Skip for now button to close this window if it appears The Trust...

Page 24: ... by the program 5 The Recording wizard Audio Quality window will appear Adjust the audio quality and click on Next to continue Use the value recommended by the program 6 The Start to Record Video Mail window will appear 7 Click on the Record button to start recording 8 Read out aloud the text needed for the recording 9 Click on the Stop button to finish the recording 10 Click on the Next button to...

Page 25: ...ruction manual for making and burning video clips on CD ROMs and DVDs can be found by clicking Start Programs Ulead DVD MovieFactory SE User Manual 7 6 Using the camera as a webcam NetMeeting This is included in Windows You can download the latest version of NetMeeting by going to www microsoft com and searching under the headwords download netmeeting Make sure you have an Internet account install...

Page 26: ...essenger an instant message program which is included with most versions of Windows You must register with Microsoft to obtain a passport before this program will work See the MSN Messenger Help function for instructions on how to register Other organizations may have active ILS servers which can also be used Note When using NetMeeting and MSN Messenger you may contact people who have different op...

Page 27: ...to the CAM USB mode see figure 7 The error message Capture device was not detected is displayed The camera has been connected to a USB hub which does not have a power supply Connect the camera to a USB hub which has a power supply or to a USB port on your computer Windows 98 or Windows 95 is used The software only works correctly in Windows 98 SE Windows ME Windows 2000 and Windows XP The USB port...

Page 28: ...d by connecting the camera to the USB port Something must appear on the camera s LCD screen The camera does not react although the batteries are full The camera must be reset Disconnect the USB cable and remove the batteries from the camera Reinsert the batteries after approximately 10 minutes NiCd batteries are used Use Alkaline or rechargeable NiMH batteries The camera has not been used for more...

Page 29: ...ive an image in the application webcam Another application is open and is using the camera image Close the other application first before starting the program An old version of DirectX is installed Download the latest version of DirectX from www microsoft com Drivers for an old webcam are still installed Find these drivers and uninstall them see chapter 5 1 More than one monitor is configured for ...

Page 30: ...ion in Photo Express to alter the size to fit the frame There is noise in the photographs or the photographs are too dark The photographs are taken in dark surroundings Make sure there is sufficient light The contrast in the subject is too great Change the lighting or take the photographs closer by or further away The photographs are overexposed The photographs were taken in bright sunlight Take p...

Page 31: ...noise snow There is insufficient light Improve the lighting or select a different location The distance to the sound source is too great Move closer The volume of the computer speakers is set very low Increase the volume of the speakers The sound is very soft The microphone is blocked Make sure your finger does not cover the microphone 1 figure 1 The card was not empty The memory card contains rec...

Page 32: ...e date of purchase If there is a fault return the product to your dealer Include an explanation of the fault the proof of purchase and all the accessories During the warranty period you will receive a similar model if one is available If no similar product is available your product will be repaired Please contact our help desk for missing components such as the instruction manual software or other...

Page 33: ...on 0800 00TRUST 0800 0087878 Fax 31 0 78 6543299 Los habitantes de España pueden ponerse en contacto con lun viernes De las 9 00 a las 17 00 horas Oficina española Teléfono 34 0 902 160937 Fax 31 0 78 6543299 Osoby mieszkające na terytorium Polski powinny skontaktować się Od pon do pt w godz 09 00 17 00 Biuro w Polska Tel 48 0 22 8739812 Fax 31 0 78 6543299 Inwoners van Nederland kunnen contact op...

Reviews: