TRUST 738AV LCD POWER VIDEO
Tip
:
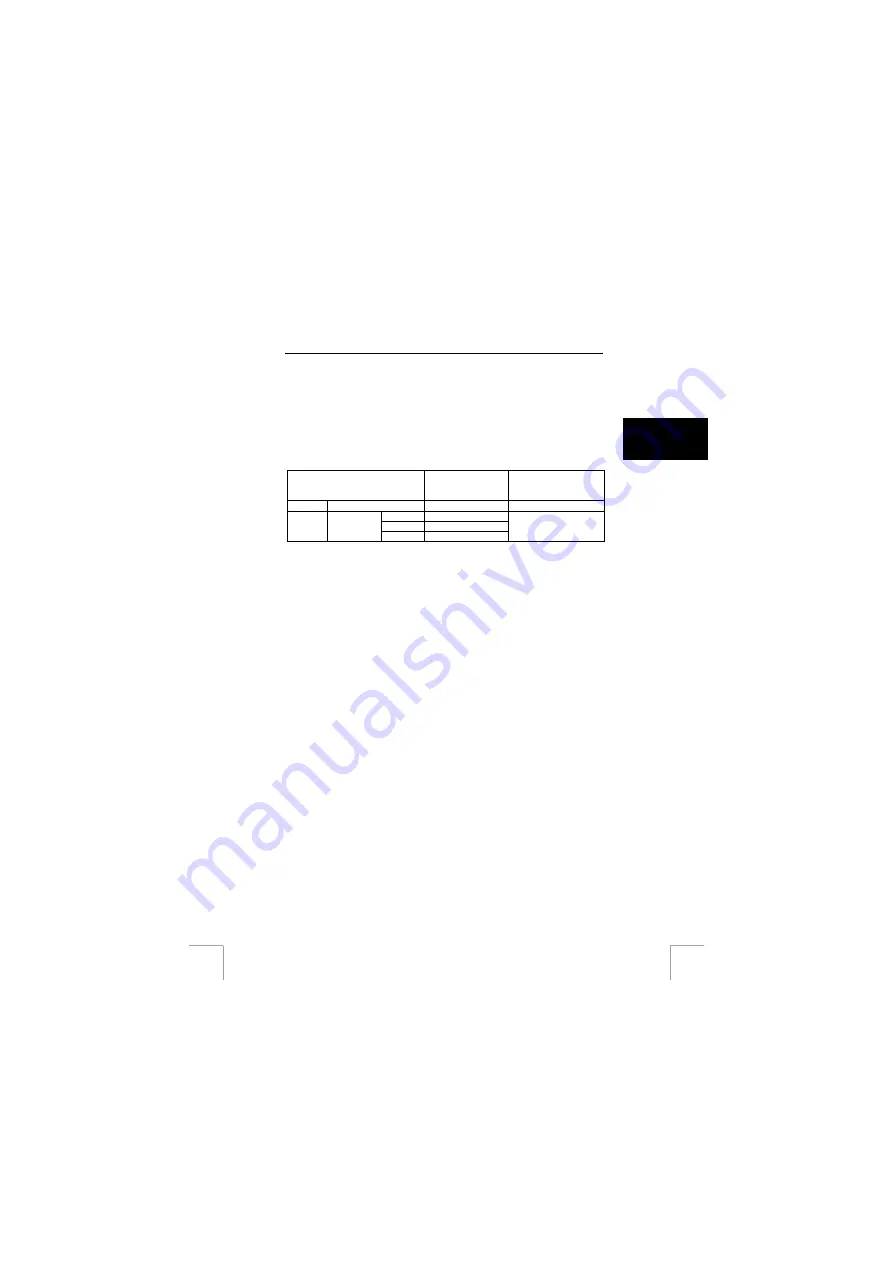
The maximum duration of the video clips that can be saved in the camera’s
internal memory depends on their resolution. An approximation is given in
table 12.
Tip
:
The result is better if the camera is not moved or only moved slowly whilst
recording. Quick movements may cause a jerky image. This is due to the
fact that the camera only records 10 images per second. This number
depends on the video recording mode.
U K
Comment
: The camera makes a new video clip each time it makes a video
recording. You can paste these clips together using the program
supplied with the camera. A lot of short clips are more difficult to edit
than a smaller number of longer clips.
Video mode
Recording
duration
Mm:ss
Images per second
VGA
640 x 480
01:15
10
Normal 03:51
Fine 02:38
QVGA
320 x 240
Best 01:54
20
Table 12: Total duration of a video clip using the internal memory
Note
:
The actual duration depends on the subject and can be up to 40% longer.
If you use a memory card and this becomes full, you can remove the
memory card and record video clips on the internal memory.
4.7.4
Memo recorder (sound recording)
Instructions for recording sound:
1.
Turn the camera on (see item 1 of the Quick Installation Guide).
2.
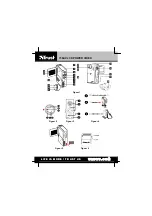
Set the camera to the ‘Audio Recorder’ mode (F, figure 2).
3.
Adjust the sound recording level by pressing the direction button to the left or
right (B, figure 3).
4.
Press the record button (A, figure 3).
5.
The red indicator on the front of the camera will start to flash.
6.
The duration of the sound recording is displayed on the LCD screen.
7.
Press the record button to stop the sound recording.
8.
A file with a .wav extension will be displayed on the LCD screen.
Instructions for playing a sound recording:
9.
Press the direction button up or down to select the desired wav file.
10.
Adjust the sound level by pressing the direction button to the left or right.
11.
Press the OK button (D, figure 3).
12.
The duration of the sound recording will be displayed.
13.
The sound recording will be heard.
14.
The sound recording will stop once it has been played in its entirety.
15.
The sound recording can be stopped manually by pressing the menu button
(C, figure 3).
Note
:
A maximum of 11 minutes of sound can be recorded on the internal
memory.
4.8
Viewing and deleting photographs and video clips
4.8.1
Viewing photographs and video clips
11
Photographs and video clips are viewed via the ‘Play’ menu. All the various types of
recordings (video, photograph or sound) can be played in this menu. The recordings
are displayed as icons. The files can only be played one at a time on the camera. If
you connect a TV to the AV output, you can view and listen to the files on the TV. To
open the ‘Play’ menu:

