TRUST SPYC@M 300
9
U K
6.1.4
Viewing live images
1.
Click on the ‘Live View’ button (D). Figure 5 will appear.
2.
Click on the ‘Snapshot’ button (N) to take a photograph of the live image (M).
The Web Album (see figure 3) will be opened and the photograph will be
visible.
3.
Click on the ‘Video’ button (Q) to record a video clip.
4.
Click on the ‘Video’ button again to stop recording. After a couple of seconds,
the recorded video clip will be visible in the Web Album.
5.
Double-click on the video clip to play it.
6.1.5
Deleting recordings from the Web Album
1.
Select the photograph you wish to delete from the Web Album by double-
clicking on it with the mouse or click on the ‘Select all’ button (M, figure 3) to
delete all the photographs.
2.
Next, click on the ‘Delete’ button (N, figure 3) to delete the selected
photographs.
3.
The selected photographs will now be deleted from the Web Album.
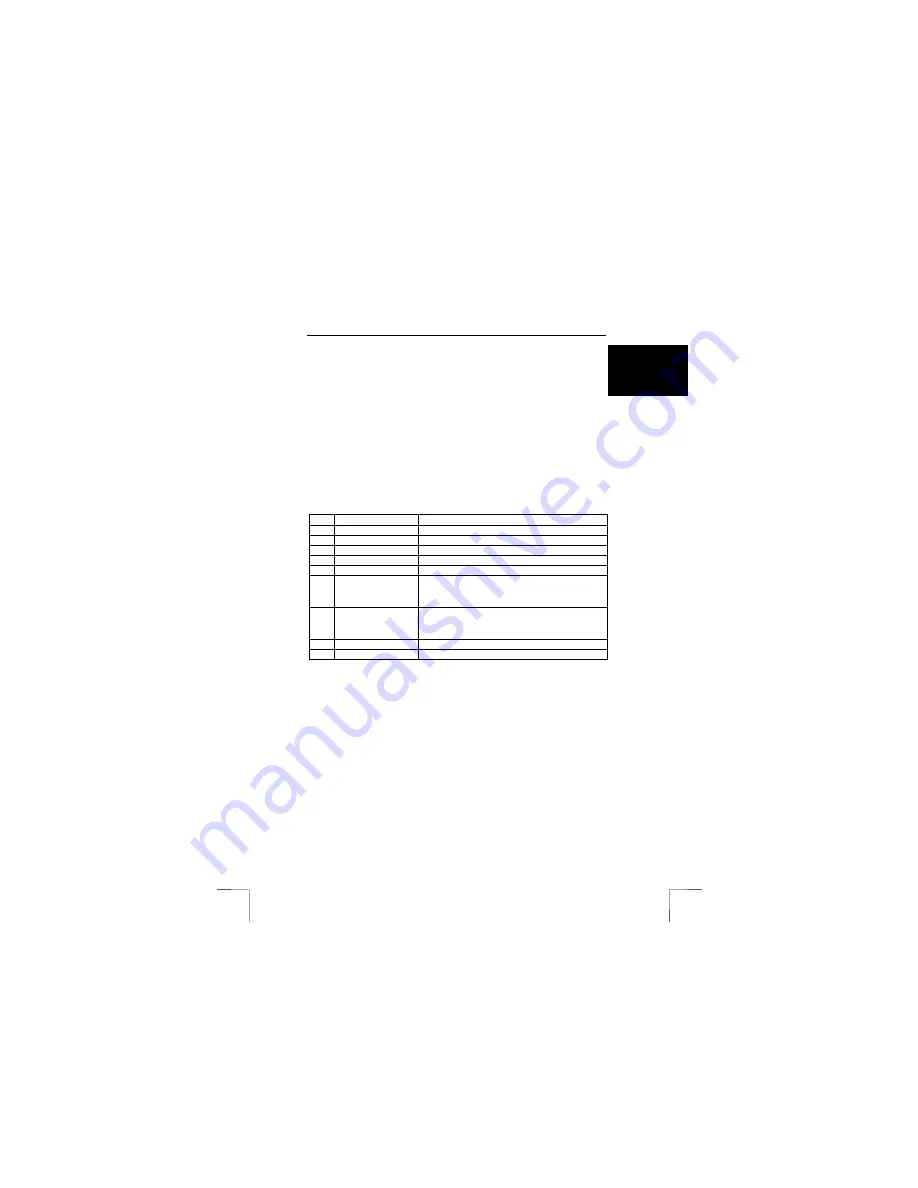
Table 4 gives a description of the Spyc@m Manager’s functions when set to ‘Live
view’. Use table 4 combination with figure 5.
Function
Description
M
Live image
The image displayed by the camera.
N
Snapshot
Takes a photograph of the current camera image.
O
Live View
Switches to the live image.
P
DSC function
Switches to photograph editing.
Q
Video
Records a video of the current camera image.
R
Video Source
Camera settings, such as the brightness, contrast
and colour.
S
Settings
Settings for the number of frames per second (fps).
T
Eject album window
Opens or closes the Web Album.
U
Video format
Settings for the colour depth and image size.
Table 4: SpyC@m 300 Manager - Live view
Note:
Do not remove the USB cable whilst downloading photographs.
6.2
Ulead Photo Express
6.2.1 Downloading
photographs
1.
Click on ‘Start – Programs – Ulead Photo Express 3.0 SE – Ulead Photo
Express 3.0 SE’. Figure 6 will appear.
2.
In the main Photo Express menu, select ‘Get’ and then select ‘Camera’.
3.
‘TRUST SPYC@M 300’ will now be seen for ‘Select data source’ in the top
left-hand corner of the window. You may have other cameras installed on
your computer. If this is the case, a different model may be visible. Select the
TRUST SPYC@M 300.
4.
Click on ‘Acquire’. A SPYC@M 300 window will appear.
5.
Select the photograph that you wish to transfer to Photo Express by clicking
on it with the mouse.
6.
Click on ‘Capture’ to transfer the photograph to Photo Express. Figure 6 will
now show the photograph you selected in the SPYC@M 300 window.
7.
Close the SPYC@M 300 window by clicking on ‘Close’.
8.
Double-click on the photograph. The photograph will now appear.
Summary of Contents for 12440
Page 4: ......


