
............ www.truemfg.com ............
True Food Service Equipment, Inc.
9
9
INSTALLATION / OPERATION INSTRUCTIONS
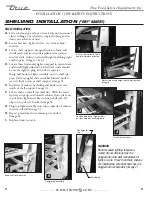
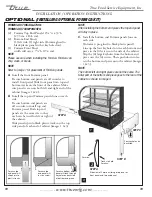
CASTOR INSTALLATION:
TOOLS REQUIRED:
• Castor wrench (if not included contact TRUE)
• Adjustable wrench
NOTE
Castors not available for hard wired models.
WARNING
Make sure unit is empty of all its contents (shelving,
shelving lighting). Make sure power supply has been dis-
connected.
A.
Curved glass can be damaged if you lay unit on its
back, side, or front. Use a 6" x 6" (15.2 cm x 15.2
cm) block of wood or equivalent. Slide the block
under the cabinet frame rail. This will support the
unit while installing castors.
B.
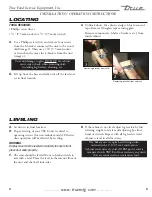
Leg levelers can be backed out by hand (image 1).
C.
Take two threaded castors and thread them into
the existing leg leveler holes. (image 2). Shims can
be used between castor and cabinet frame rail for
leveling (image 3). Use the tool provided to tighten
the threaded castors (image 4).
D.
Repeat process for the other side of the cabinet.
WARNING
Display case must be leveled accurately to ensure front
glass door seals properly.
E.
The unit should be leveled front to back and side
to side with a level. Place the level in the interior
floor of the unit
and check all four
sides.
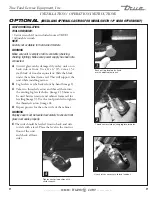
OPTIONAL
(installing optional castoRs foR moDels with 12" coRD option onlY)
Back out leg levelers by hand,
or with adjustable wrench.
Thread castors into existing leg leveler holes.
Tighten castor in position with
castor wrench.
1
2
3
4
Use shims as necessary to level cabinet.
Summary of Contents for TCGD-50
Page 2: ......