background image


20 


Preparing the IR Camera


Using an Externally Mounted Shooting Lamp   


The shooting lamp (supplied) can be connected to the camera to illuminate 
the dark areas. You can produce clear, high-quality visual images to do 
compliment your inspections. 


Turn off the IR camera. 
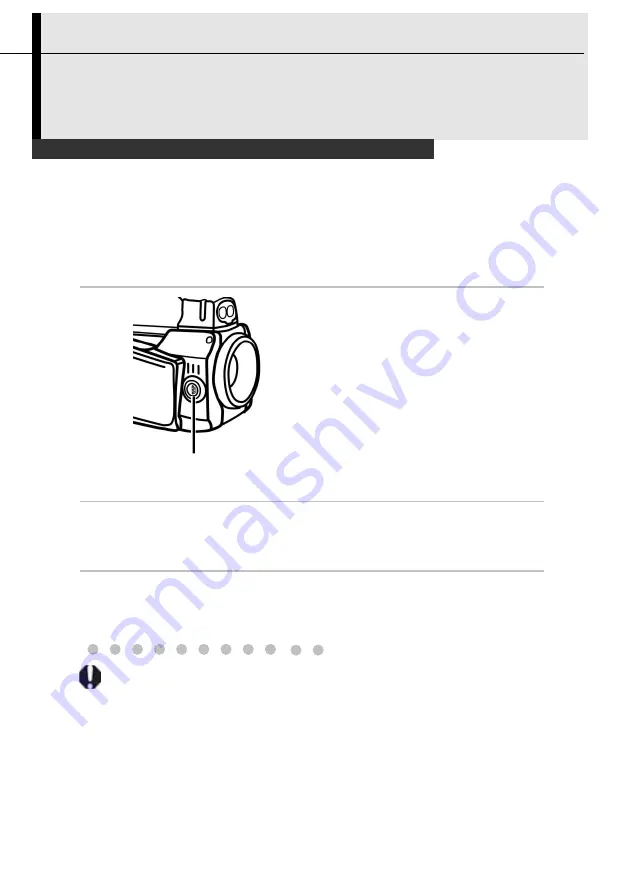
 

2


Attach the shooting lamp to the 
shooting lamp terminal on the camera 
body.


Turn on the IR camera.


Select [Setup]-- [Others]--[Control]-[Lamp] to turn on the 
illuminator. You can also turn on the lamp in the shortcut (P.27 
Shortcut settings). 


If you use the optional lens when the shooting lamp is attached, a portion of the 
visual image will be blocked by the optional lens and will appear dark.


Shooting lamp 

terminal 

Summary of Contents for ICX640

Page 1: ...uide mean Information displayed on the LCD Monitor p 22 Trademark Acknowledgments TROTEC is trademark of TROTEC GmbH Co KG Microsoft Windows and Windows logo is either registered trademarks or trademarks of Microsoft Corporation in the United States and or other countries Other names and products not mentioned above may be registered trademarks or trademarks of their respective companies Copyright...

Page 2: ...nd LCD monitor Basic function Describes working with the camera from each of the analysis settings to using the camera s various analysis tools Shooting Explains how to review recorded images erase images and playback voice memos Playback and erase Explains how to transfer images or video to a computer You must read this section before connecting your camera to a computer Connection and download ...

Page 3: ...ed Shooting lamp 20 Using a headset 21 Checking the Information 22 Basic Functions 24 Setting the Date Time 24 Local Settings 25 Toolbar Shortcut Settings 27 Appearance Settings 28 Checking the memory card capacity 29 Blue tooth Settings 30 Selecting Menus and Settings 31 Resetting to the Default Settings 32 Shooting 34 IR Camera Adjustment 34 Focus Adjustment 34 Digital zoom 35 Display Modes 36 D...

Page 4: ...ecording thermal video 62 Playback and Erase 63 Opening Images videos 63 Erase Images videos 64 Downloading Images 65 Downloading images 65 Connection 66 Connecting to Wi Fi 66 Connecting to a Monitor 68 Connecting to a computer 69 Connecting to a computer 69 Transfer Video via USB 70 Troubles shooting 71 Using the blue tooth headset 72 Troubles Shooting 74 Appendix Loading the packet program 75 7...

Page 5: ...era or accessory that results in the failure of an image to be recorded or to be recorded in a format that is not machine readable Warning Against Copyright Infringement Safety Precautions Before using the camera please ensure that you read and understand the safety precautions described below Always ensure that the IR camera is operated correctly The safety precautions noted on the following page...

Page 6: ... Confirm that smoke and fume emissions have ceased Stop operating immediately if it is dropped or the casing is damaged Failure to do so may result in fire or electrical shock Immediately turn the IR camera s power off remove the IR camera battery or unplug the power cord from the power outlet Do not use substances containing alcohol benzene thinners or other flammable substances to clean or maint...

Page 7: ...not place the batteries near a heat source or expose them to directly to flame or heat Neither should you immerse them in water Such exposure may damage the batteries and lead to the leakage of corrosive liquids fire electrical shock explosion or serious injury Do not attempt to disassemble alter or apply heat to the batteries This is serious risk of injury due to an explosion Immediately flush wi...

Page 8: ... camera and power outlet after recharging and when the IR camera is not in use to avoid fires and other hazards Continuous use over a long period of time may cause the unit to overheat and distort resulting in fire Do not use the battery charger or compact power adapter if the cable or plug is damaged or if the plug is not fully inserted into the power outlet The battery charger varies according t...

Page 9: ... temperature changes slowly before removing it from the case If Condensation Forms Inside the IR Camera Stop using the camera immediately if you detect condensation Continued use may damage the IR camera Remove the power cord and battery or a household power source from the IR camera and wait until moisture evaporates completely before resuming use Extended Storage When not using the IR camera for...

Page 10: ...10 Component Guide Front View Remote Controller Lens Shooting Lamp LCD Monitor Helix Cable Visual CCD Camera Laser Pointer Battery Cover ...

Page 11: ...onent Guide Back Bottom View Viewfinder Remote Control Terminal DC in Terminal RS 232 Terminal USB2 0 Terminal Video Out Terminal Headset Terminal Terminal Definition Battery Cover lock Diopter Adjustment Dia ...

Page 12: ...12 Component Guide Controls Freeze Live Key Cancel Key Left Arrow Down Arrow Lower left Arrow Upper left Arrow Up Arrow Auto Adjust Key Upper right Arrow Lower right Arrow Menu Enter Key Right Arrow ...

Page 13: ...ttery charger and plug the other end into a power outlet After charging unplug the battery charger and remove the battery pack This is a lithium ion battery pack so there is no need to discharge it completely before recharging It can be recharged at any time However since the maximum number of charge cycle is approximately 300 battery life you are recommended to only charge the battery pack after ...

Page 14: ...wer is off and slide the battery cover lock in the direction of the arrow the battery cover opens automatically 2 Insert the battery pack The battery terminal side should face leftward Insert the battery pack all the way in until the battery lock clicks To remove the battery pack push the battery lock 3 Insert the SD card The no label side of the SD card should face the battery To remove the SD ca...

Page 15: ...amera is not in use You must format the SD card in FAT32 format Otherwise the IR camera may not recognize the SD card Battery Status Symbols The following icons indicate the battery status on the LCD screen Sufficient battery charge Low battery Replace or recharge battery ...

Page 16: ...ered on Powering the IR camera 1 Press and hold the power switch for 3 seconds The power indicator lights green Connect the remote controller if needed 2 After a few seconds a startup image will appear on the screen Turning the Power Off 1 Hold the power switch for 3 seconds The power indicator goes off ...

Page 17: ...he camera body You can view capture and analyze images while the IR camera is positioned in hard to reach areas 1 Turn off the IR camera 2 Attach the helix cable of the remote controller to the remote control terminal on the camera body 3 Turn on the IR camera You can implement all the functions of the IR camera through the remote controller Remote control terminal ...

Page 18: ...he LCD monitor for shooting playing back thermal images and adjusting menu settings follow the instruction below 1 Attach the remote controller to the camera body 2 Aim the IR camera at the subject Do remember to make the subject in center of the image that is shown on the LCD monitor or the viewfinder ...

Page 19: ... the surrounding light is too bright you can use the viewfinder 1 Turn on the viewfinder P 27 Shortcut settings 2 Adjust the angle of the viewfinder 3 Aim the IR camera at the subject You can use the Diopter Adjustment Dia to suit your eyesight Diopter Adjustment Dia ...

Page 20: ...ions 1 Turn off the IR camera 2 Attach the shooting lamp to the shooting lamp terminal on the camera body 3 Turn on the IR camera 4 Select Setup Others Control Lamp to turn on the illuminator You can also turn on the lamp in the shortcut P 27 Shortcut settings If you use the optional lens when the shooting lamp is attached a portion of the visual image will be blocked by the optional lens and will...

Page 21: ...dset can be connected to the camera to record and replay voice comment You can save an image with voice comment 1 Turn off the IR camera 2 Attach the cable of the headset to the headset terminal the camera body 3 Turn on the IR camera Headset terminal ...

Page 22: ...nitor has a field of vision of 100 of the actual shooting image The following information is displayed Upper limit of color scale Span Environment temperature Humidity Color scale Lower limit of color scale Level Emissivity Max temperature Min temperature Distance Menu Sub menu Item ...

Page 23: ...ture of the color scale Level The brightness of the image Span The contrast of the image Emissivity Depending on the emissivity of the object set the emissivity accordingly Distance Depending on the distance to the object set the distance accordingly Environment temperature The ambient temperature Humidity The ambient humidity ...

Page 24: ...e Setup 2 Use the direction key to select Others then press the ENTER key 3 Setting Date and Time Use the direction key LEFT or RIGHT to select Date time Use the direction key UP or DOWN to select an item to change Use the direction key LEFT or RIGHT to set the values 4 After adjusting the settings press the ENTER key to save changes or press the C key to go back to upper menu without saving ...

Page 25: ... then use the direction key to select Setup 2 Use the direction key to select Others then press the ENTER key 3 Local Setup Use the direction key LEFT or RIGHT to select Local Use the direction key UP or DOWN to select an item to change 4 After adjusting the settings press the Enter key to save changes or press the C key to exit without saving ...

Page 26: ... unit metre or foot Video output Set the video output to off or on Video Mode Sets the format of the video output of the camera PAL or NTSC are available Lamp Turn on off the lamp Laser Turn on off the laser OLED Turn on off the viewfinder OLED USB mode Select the USB mode USB disk download the files from camera to the computer Transfer transfer the real time video from the camera to computer ...

Page 27: ... direction keys to select Setup 2 Use the direction keys to select Toolbar then press the ENTER key 3 Toolbar Settings You can add spot area line open video open record to each shortcut icon on the bottom left of the screen About the shortcut icons Press up down key to enter shortcut Toolbar Wi Fi SD card TV output Laser Viewfinder on off Lamp Toolbar shortcut Bluetooth ...

Page 28: ...en use the direction keys to select Setup 2 Use the direction key to select Theme then press the ENTER key 3 Appearance Setup Use the direction key LEFT or RIGHT to select Color or Wallpaper Use the direction key UP or DOWN to select an item 4 After adjusting the settings press the Enter key to save changes or press the C key to exit without saving ...

Page 29: ...d capacity before saving an image or recording video 1 Press C key to enter the menu then use the direction keys to select Setup 2 Use the direction keys to select SysInfo and press Enter 3 Use the direction key to select Storage and Memory to check the capacity RED USED GREEN FREE ...

Page 30: ... ENTER key 2 Select Setting then select Start Bluetooth and press ENTER OK At the same time turn on the blue tooth headset You need to press the power switch for seconds until the indicator lights red and blue 3 Use the direction key to select search devices Then select Search Select Bind after searching the blue tooth 4 You can attach voice annotation now Please refer to P57 ...

Page 31: ...er exit menu All the menus details will be introduced in later chapters 3 Press enter to enter a submenu or press C key to exit menu 1 Press C key to enter menu mode Analysis menu Image menu Camera menu File menu 2 Use the direction keys to select menu Bluetooth menu Setup menu ...

Page 32: ...e set to default About Emissivity Inside outside shutter and Compare Emissivity Object emissivity table Inside outside shutter In some cases the camera may suffer from non uniformity problems due to a temperature difference inside the camera body and the environment If you encounter such problem please use the outside shutter to adjust the camera to the best status Normally except in this special ...

Page 33: ...tion Turn on the laser first select this item and press Enter then you can use the direction keys to move the laser point on the screen Compare Temperature comparison temperature difference between object 1 object 2 ...

Page 34: ...autofocus may not work well on the following types of subjects Subjects with extremely low contrast to the surroundings Subjects mixing with close and far objects Subjects that are moving quickly Subjects with horizontal stripes To Shoot these objects you can focus an object at a similar distance first after that focus on the subject object You may also use manual focus Manual focus 1 Aim the IR c...

Page 35: ...or lower left key to fulfill the digital zoom After that you can follow the steps below to view the whole image 1 Press C key to enter menu then use the direction keys to select the Image 2 Use the direction keys LEFT or RIGHT to select Adjust then select Zoom and press enter Use the direction keys left right up down to view the image ...

Page 36: ...mera records visual images with its built in digital camera You can capture a visual image as a reference to the thermal image 1 Press C key to enter menu then use the direction keys to select Image 2 Use the direction keys to select Duo Vision 3 Use the direction keys to select display mode then press ENTER key ...

Page 37: ...You see the image with pseudo color CCD visible In this mode you can see the image with full color But you can not use any analysis tools to analyze the target Merge Duo Vision In this mode you can see the background image is full color visible image And the thermal image fuses on it in the center square You can use any analysis tools to analyze the target Only image Hide the analysis tools and di...

Page 38: ...ove the fusion area 1 Use the direction keys to move the fusion square Use the direction key UP Use the direction key DOWN Use the direction key LEFT Use the direction key RIGHT 1 About the merge settings Merge Percent Sets the ratio of IR image and Visual image The value is from 1 to 100 The item above is activated only in Merge mode ...

Page 39: ...by the IR camera manually or automatically Auto adjust The IR camera will automatically adjust the brightness and or contrast and calibrate when you press the A key How to use Auto adjust in menu 1 Press C key to enter the menu then use the direction keys to select Image 2 Use the direction keys LEFT or RIGHT to select Adjust ...

Page 40: ...40 3 Use the direction keys UP or DOWN to select Auto Adjust then press the ENTER key You can also enter Auto Adj to set Level and Span ...

Page 41: ...the image manually in the built in menu system Manual adjust in the menu 1 Press C key to enter the menu then use the direction keys to select Image 2 Use the direction keys LEFT or RIGHT to select Adjust 3 Use the direction keys UP or DOWN to select an item Max temp Min temp level span to change Use the direction keys LEFT or RIGHT to change the values then press the ENTER key ...

Page 42: ...minimum temperature of the color scale Level Adjust the brightness of the image Span Adjust the contrast of the image About the auto calibration You can set the period of auto shutter The shutter takes action in every period 1 Use the direction keys UP or DOWN to select Auto Cal and press Enter then set the period ...

Page 43: ... 2 Use the direction keys LEFT or RIGHT to select Palette Then use the direction keys UP or DOWN to choose the palette 3 After this operation press the ENTER key to save changes or press the C key to close the menu without saving The camera provides 6 kinds of palettes Iron Iron inverted Rainbow Feather Grey and Grey inverted ...

Page 44: ...ures though the standard filter supplied or high temperature lens optional 1 Press C key to enter the menu then use the direction keys to select Analysis 2 Use the direction keys LEFT or RIGHT to select Settings 3 Use the direction keys UP or DOWN to select Setting then press the ENTER key ...

Page 45: ... DOWN to select Filter and select On 5 Select the filter Off On to change the temperature range When Filter is Off the temperature range is 20 150 When Filter is On the temperature range is 120 600 The range can be up to 2000 optional ...

Page 46: ...ection keys LEFT or RIGHT to select Settings 3 Use the direction keys to select setting and press Enter Use the direction keys UP or DOWN to select an item to change Use the direction keys LEFT or RIGHT to set the values 4 After this operation press the ENTER key to save changes or press the C key to go back to the upper menu without saving ...

Page 47: ...ccordingly Amb Temp Input ambient temperature Refl Temp Reflection temperature depending on the reflection of the object set the reflection temperature accordingly Humidity Input ambient humidity Offset Corrects the measured temperature value of the camera to ensure the measurement accuracy under special circumstances Background Show hide the black background of reading on screen ...

Page 48: ...ad Pressing the S key again will activate the image Or you can freeze an image in the menu mode 1 Press C key to enter the menu then use the direction keys to select Camera 2 Use the direction keys LEFT or RIGHT to select Snapshot Then use the direction keys UP or DOWN to select Frozen To activate the image please select Activate again ...

Page 49: ...e thermal image Spot analysis 1 Press C key to enter the menu then use the direction keys to select Analysis 2 Use the direction keys LEFT or RIGHT to select Spots then use the direction keys UP or DOWN to select a spot and press ENTER key 3 Setting the spot analysis Use the direction keys UP or DOWN to select an item to change ...

Page 50: ...t will track the lowest temperature on the screen automatically Temp On Display the spot temperature reading Off Hide the spot temperature reading Background Add background to the spot reading Alarm Mode Set the alarm mode off above below equal Alarm Temp Set the alarm temperature About Emissivity Distance Ambient Temp Humidity and Offset settings please refer to Global setting ...

Page 51: ... the menu then use the direction keys to select Analysis 2 Use the direction keys LEFT or RIGHT to select Areas then use the direction keys UP or DOWN to select an area and press ENTER key 3 Setting the analysis area Use the direction keys UP or DOWN to select an item to change ...

Page 52: ...st temperature in the area Min Display the lowest temperature in the area Average Display the average temperature in the area You can select an area and use the direction keys up down left right to move the area or use the upper left right lower left right to change the size of the area ...

Page 53: ...N to select Horizontal and press ENTER key A line and its temperature distribution will be displayed on the screen 4 Moving the line analysis and spot Start from step 1 to set or select a line analysis Use the direction keys UP or DOWN to move the line Use the direction keys LEFT or RIGHT to move the spot The temperature of the spot will change in real time Select Horizontal again then press Enter...

Page 54: ...alysis 2 Use the direction keys LEFT or RIGHT to select Isotherm then use the direction keys UP or DOWN to select Isothermal 1 3 Setting isotherm Use the direction keys UP or DOWN to select an item to change Use the direction keys Left or Right to set the value About the isotherm settings Display Show or hide the isotherm analysis ...

Page 55: ...terval Dual Above Display the isothermal interval in a color and the parts with the higher temperatures than the upper limit of the isothermal interval in a different color Dual Below Display the isothermal interval in a color and the parts with the lower temperatures than the lower limit of the isothermal interval in a different color Above Display the isothermal interval and the parts with the h...

Page 56: ...reezing an image 1 Press C key to enter the menu then use the direction keys to select Camera 2 Use the direction keys LEFT or RIGHT to select Snapshot then use the direction keys UP or DOWN to select Save and press the ENTER key The display mode decides the save image type 3 The message of saving image will display on the screen The image will be saved in the current folder ...

Page 57: ...C key to enter the menu then use the direction keys to select Camera 2 Use the direction keys LEFT or RIGHT to select Snapshot Then use the direction keys UP or DOWN to select Type then press the enter key 3 Use the direction keys UP or DOWN to select the type of image and press the enter key ...

Page 58: ... CCD image IR and CCD Save an IR image and CCD image together at the same time Timing saved Users can set the IR camera saves images automatically For example save an image in every 3 minutes LED The lamp will turn on when saving the image Prompt The prompt will pop up when saving image ...

Page 59: ...ttach a voice memo to an image 1 Install the headset or Bluetooth headset 2 Freeze an image by pressing S key 3 Press C key to enter the menu then use the direction keys to select Camera 4 Use the direction keys LEFT or RIGHT to select Video then use the direction keys UP or DOWN to select Save voice and press Enter ...

Page 60: ...60 5 Select Record and speak toward the microphone of the headset To stop recording press the C key or select Cancel 6 Save the image How to connect blue tooth headset please refer to P30 ...

Page 61: ...he menu then use the direction keys to select Camera 3 Use the direction keys LEFT or RIGHT to select Snapshot then use the direction keys UP or DOWN to select Text note and press Enter 4 Use the keypad on the screen to input text to the image then press Enter Press C key or Esc to exit the keypad 5 Save the image ...

Page 62: ... to enter the menu then use the direction keys to select Camera 2 Use the direction keys LEFT or RIGHT to select Video then use the direction keys UP or DOWN to select Record and press Enter 3 Use the direction keys UP or DOWN to select Stop and press Enter to stop recording 4 Use the direction keys Up or Down to select Play and press Enter to play the video ...

Page 63: ...n use the direction keys to select File 2 Use the direction keys up down to select SD Card User Data 3 Use the direction keys up down to select folders then use the direction keys left right to select a file to open 1 You can analyze and attach memos to a recorded image when you open it 2 Please connect the headset when you play back voice annotation ...

Page 64: ...sing images videos 1 Press C key to enter the menu then use the direction keys to select File 2 Follow the steps above to open a file image video 3 Use the direction keys to select the trash icon and press Enter to delete the file About the icons Home Back Delete Rename New folder Cut Copy Paste Refresh Save the file path ...

Page 65: ...rd reader 1 Open the battery SD card cover 2 Press the SD card lightly then the SD card will pop up automatically 3 You can download the IR images via the supplied SD card reader You can also connect the camera to the computer via the USB cable Select Setup Others Control USB mode U disk press Enter Then you can open the file in the camera SD card ...

Page 66: ...nd E mail functions 1 Press the direction keys to enter shortcut and select the Wi Fi icon You can also enter the Wi Fi in the menu mode 2 Select Wlan and select Search to search the Wi Fi network 3 Select the address and set the password After that select Connect You can set the ID password and IP in Wireless Dev Wi Fi Shortcut ...

Page 67: ...67 4 After the Wi Fi connection Select Ftp and login the FTP server to upload or download the files 5 After the Wi Fi connection is made you can also login the email to receive or send email ...

Page 68: ...can be used to view and analyze images 1 Turn off the IR camera 2 Attach the video cable to the video out terminal on the IR camera 3 Plug the other end of the video cable to the video in jack on the monitor 4 Turn on the monitor and camera Select Setup Others Control Vide o output On To the Video in jack ...

Page 69: ...l on the camera You do not need to turn off the computer or camera when making this connection Please refer to your computer manual for information regarding the location of the USB port USB CABLE To disconnect the cable from the IR camera Hold the cable connector firmly at both sides and pull it straight out USB PORT ...

Page 70: ...y the optional real time software 1 Power on the camera 2 Connect the USB terminal on the camera and computer via USB cable 3 Select Setup Others Control USB mode Transfer press Enter 4 Run the software You can analyze the real time video and save it in your computer s disk Transfer Video via USB ...

Page 71: ...Is the camera correctly connected to the computer 3 Is the battery charged sufficiently You should use a household power source to power the camera when it is connected to a computer If the Problem Is Not Mentioned Above If the USB Driver is not correctly installed it is possible that Windows is not recognizing the USB Driver Please contact your motherboard s manufacturer for the latest driver The...

Page 72: ...era is preparing to pair to the Bluetooth headset 4 Press the power button of Bluetooth headset to pair the headset and camera When the pairing is successful the blue indicator of the headset flashes slowly The Bluetooth icon on is the screen Make sure that the camera is not too far away from the Bluetooth headset If possible try to have the Bluetooth headset close to the camera in step 4 5 After ...

Page 73: ...73 6 Wearing the headset you can record vioce memos or play back the memos Press C key and Enter key together to free the Bluetooth headset ...

Page 74: ... some space Internal memory not formatted correctly Format the internal memory in FAT32 format Battery pack consumed quickly Battery pack capacity reduced because of disuse for one year or more after being fully charged Replace the battery pack with a new one Battery life exceeded Replace the battery pack with a new one Battery pack will not charge Poor contact between battery pack and battery cha...

Page 75: ...pdate the packet program 1 Turn on the camera Copy the packet program to the SD card and insert the card into camera 2 Press C key to enter menu then use the direction keys to select Setup 3 Select Update and press enter to enter the update mode 4 Select Update and press enter ...

Page 76: ...ating message will show on the screen 6 The updating operation is finish now If the core board is loaded with the packet program for the first time please backup the packet program first in step 4 then press update ...

Page 77: ...ra body Injury from glass shards can occur if the lens loosens and falls off 48 Wide angle lens 12 Tele lens This lens is for taking wide angle shots The lens changes the focal length of the camera body s lens by a factor of 0 5x This lens is for taking telephoto shots The lens changes the focal length of the camera body s lens by a factor of 2x ...

Page 78: ...nt optional lens 1 Turn off the IR camera p 16 2 Attach the lens to the camera body 3 Screw on the lens in the direction of the arrow 4 The camera will change the type of lens automatically when you replace the lens Please see the measurement range ...

Page 79: ...ing the lens lightly with soft cloth Never use synthetic cleaners on the camera body or lens LCD monitor Use a lens blower brush to remove dust and dirt If necessary gently wipe the LCD monitor with soft cloth or an eyeglass lens wiper to remove stubborn dirt Never rub or press forcefully on the LCD monitor These actions may damage it or lead to other problems Never use thinners benzene synthetic ...

Page 80: ...c chromeplate alumina 25 600 0 55 Mild alumina 25 600 0 10 0 20 Strong alumina 25 600 0 30 0 40 Brass Brass mirror highly polished 28 0 03 Brass oxide 200 600 0 61 0 59 Chrome Polished chrome 40 1090 0 08 0 36 Copper Copper mirror 100 0 05 Strong copper oxide 25 0 078 Cuprous oxide 800 1100 0 66 0 54 Liquid copper 1080 1280 0 16 0 13 Gold Gold mirror 230 630 0 02 ...

Page 81: ...Completely rusty surface 22 0 66 Rolled iron plate 100 0 74 Oxidized steel 198 600 0 64 0 78 Cast iron Oxidizing at 600 C 198 600 0 79 Steel Oxidizing at 600 C 125 520 0 78 0 82 Electrolytic ferric oxide 500 1200 0 85 0 89 Iron plate 925 1120 0 87 0 95 Cast iron heavy ferric oxide 25 0 80 Tempered iron ferric oxide 40 250 0 95 Melting surface 22 0 94 Melting cast iron 1300 1400 0 29 Melting mild s...

Page 82: ...0 20 Hg 0 100 0 09 0 12 Nickel Electroplate polishing 25 0 05 Electroplate 20 0 01 non polishing Nickel wire 185 1010 0 09 0 19 Nickel plate oxidized 198 600 0 37 0 48 Nickel oxide 650 1255 0 59 0 86 Nickel alloy Nickel chrome heat resistance alloy wire shining 50 1000 0 65 0 79 Nickel chrome alloy 50 1040 0 64 0 76 Nickel chrome heat resistance 50 500 0 95 0 98 Nickel silver alloy 100 0 14 Silver...

Page 83: ...ommercial tin plate 100 0 07 Strong oxidization 0 200 0 60 Zinc Oxidizing at 400 C 400 0 01 galvanized shining iron plate 28 0 23 Ash zinc oxide 25 0 28 Non metal materials Brick 1100 0 75 Fire brick 1100 0 75 Graphite lamp black 96 225 0 95 Porcelain enamel white 18 0 90 Asphaltum 0 200 0 85 Glass surface 23 0 94 Heat resistance glass 200 540 0 85 0 95 Calcimine 20 0 90 Oak 20 0 90 ...

Page 84: ...0 87 Porcelain enamel products 0 90 Porcelain enamel designs 0 83 0 95 Solid materials 0 80 0 93 Ceramics vase type 0 90 Film 0 90 0 93 Mica 0 94 0 95 Flume mica 0 90 0 93 Glass 0 91 0 92 Semiconductor 0 80 0 90 Transistor plastics sealed 0 30 0 40 Transistor metal Diode 0 89 0 90 Transmitting loop Pulse transmission 0 91 0 92 Level chalkiness layer 0 88 0 93 Top loop 0 91 0 92 ...

Page 85: ...rial Temperature C Emissivity approximation Electric materials Epoxy glass plate 0 86 Epoxy hydroxybenzene plate 0 80 Gilded sheet copper 0 30 Solder coated copper 0 35 Tin coated lead wire 0 28 Brass wires 0 87 0 88 Block talcum terminal 0 87 ...

Page 86: ...vity 0 06 C 30 C Detector type UFPA Resolution 640x480 Spectral range 8 14um Focus Motorized Auto focus Image presentation Image mode IR CCD Duo vision LCD Display 5 TFT screen Digital camera 1280 x 960 full color Viewfinder 800 x 480 full color Digital zoom 10X Video output NTSC 60Hz or PAL 50Hz composite video Temperature measurement Measurement range 20 600 up to 2000 optional Accuracy 2 2 of r...

Page 87: ... SD card File format Thermal JPG File format Visual JPG Thermal video record MPEG Format Annotation Voice annotation via Bluetooth Battery system Working voltage DC 8V 11V Battery operating time 2 5 hours Environment specification Operating temperature range 20 C to 50 C Storage temperature range 40 C to 70 C Humidity 10 to 95 non condensing Encapsulation IP54 Shock 25G Vibration 2G Physical chara...

Page 88: ...88 Weight 1740g Size 327mm X 143mm X 170mm Tripod mounting 1 4 _20 Other Illuminator Yes Laser pointer Yes USB2 0 transfer real time thermal data Yes Bluetooth Yes Available optional lenses 7 12 48 ...

Reviews: