background image

2-20

Before Using the Fax Machine > Registering Destinations in the Address Book

Adding a Destination on One Touch Key

Add a new destination (contact or group) on One Touch Key.

Adding a Destination

Add a new destination (contact or group). A maximum of 100 destinations can be registered.
To register a destination to a One Touch Key, it must first be registered in the Address Book. Register one or more 
destinations as needed before proceeding.

1

Display the screen.

1

Press the [

System Menu/Counter

] key.

2

Press [

], [Address Book/One Touch], and then [One Touch Key].

2

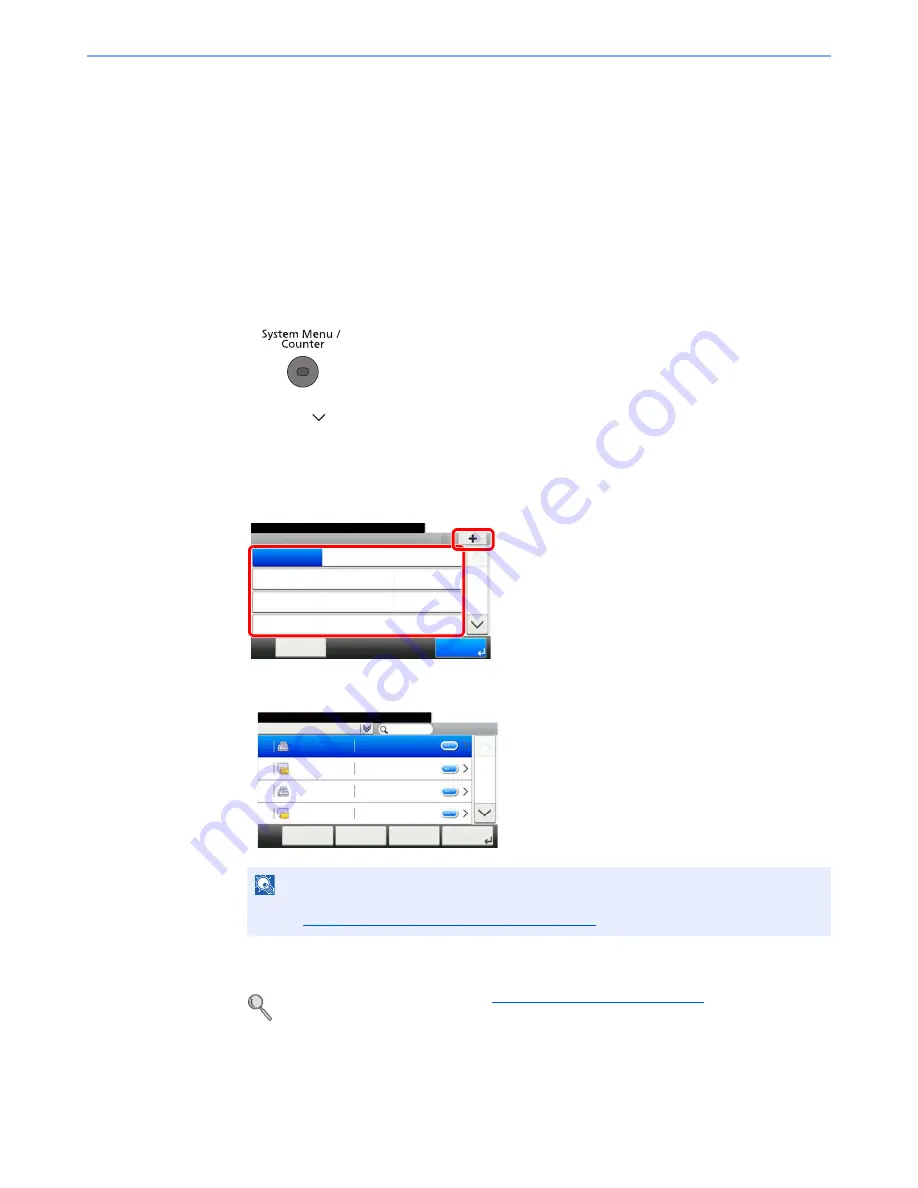
Add a One-Touch Key.

1

Press the One-Touch key to be added and press [+].

2

Select one destination (contact or group) from the Address Book.

3

Enter the One Touch Key name (up to 24 characters) displayed in the send base screen, 
and press [Next >].

For details on character entry, refer to 

Character Entry Method on page 10-2

.

4

Check if the destination entry is correct and press [Save]. The destination is added to the 
Address Book.

NOTE

Destinations can be sorted or searched by destination name or address number. For details, 
refer to 

Choosing from the Address Book on page 3-10

.

Address Book/One Touch - One Touch Key

10:10

System Menu/Counter.

None

None

None

None

None

None

None

None

None

None

None

None

1/9

End

001

004

007

010

011

008

005

002

012

009

006

003

Menu

1

2

Address Book (All)

10:10

Select the address.

Sales department 1

Menu

1/2

Next >

0123456

Sales department 1

abc

Support department 0234567

Support department BOX

Cancel

< Back

001

002

003

004

Summary of Contents for P-4035i

Page 1: ...User Manual Fax System P 4035i P 5035i MFP P 6035i MFP P 4035i MFP P 5035i MFP P 6035i MFP Fax System Copy Print Scan Fax A4 EN...

Page 2: ...tup items 2 7 Fax setup procedure 2 8 Setting Date and Time 2 9 PBX Setting Europe only 2 11 Registering Destinations in the Address Book 2 12 Adding a Destination Address Book 2 12 Adding a Destinati...

Page 3: ...ia Type for Print Output 4 7 5 Using Convenient Fax Functions 5 1 Forward Settings 5 2 Type of Forwarding Destination 5 2 Setting Forwarding 5 2 Registering Forwarding Destination 5 2 Changing and Del...

Page 4: ...he Driver Default Settings 6 10 Default Settings Dialog Box 6 11 Changing Transmit Settings 6 14 Using Cover Pages 6 18 Cover Page Registration Default Settings 6 23 Transmission Control 6 28 7 Managi...

Page 5: ...19 Unusable Time 8 20 Account Management 8 22 9 Troubleshooting 9 1 Indicators During Sending Receiving Operation 9 2 Responding to an Attention Indicator Flashes 9 2 Precautions When Turning Power O...

Page 6: ...ains the general methods for receiving faxes and reception functions 5 Using Convenient Fax Functions Explains convenient fax functions such as storing received faxes in boxes in the memory forwarding...

Page 7: ...d on the touch panel or computer screen Ready to copy appears You can select from the Print size menu Click to move from the current page to the previously displayed page This is convenient when you w...

Page 8: ...ated in this guide Press the System Menu key Press Press Common Settings Press Sound Press the System Menu key Common Settings and then Sound System Menu Counter System Menu Quick Setup Wizard 10 10 L...

Page 9: ...llowing topics Notice 1 2 Safety Conventions in This Guide 1 2 About this Operation Guide 1 3 Legal Notice 1 3 IMPORTANT SAFETY INSTRUCTIONS 1 3 IMPORTANTES MESURES DE SECURITE 1 3 Declarations to Eur...

Page 10: ...oints of attention are indicated inside the symbol General warning Warning of high temperature The symbol indicates that the related section includes information on prohibited actions Specifics of the...

Page 11: ...mple near a bath tub wash bowl kitchen sink or laundry tub in a wet basement or near a swimming pool 2 Avoid using a telephone other than a cordless type during an electrical storm There may be a remo...

Page 12: ...f measurement for radio interference characteristics of information technology equipment EN55022 Class B Limits for harmonic currents emissions for equipment input current 16A per phase EN61000 3 2 Li...

Page 13: ...ion IBM and IBM PC AT are trademarks of International Business Machines Corporation All other company and product names in this Operation Guide are trademarks or registered trademarks of their respect...

Page 14: ...Panel 2 4 Touch Panel 2 5 Enter key and Quick No Search key 2 6 Quick Setup Wizard Fax Setup 2 7 Fax setup items 2 7 Fax setup procedure 2 8 Setting Date and Time 2 9 PBX Setting Europe only 2 11 Reg...

Page 15: ...Operation panel Perform the fax operation with this panel 2 Power switch Set this switch to the ON side when performing the fax or copier operation The touch panel lights to enable operation 3 LINE c...

Page 16: ...jammed in the Document Processor 6 Original width guides Adjust these guides according to the original width 7 Original table Stack the sheet originals on this table 8 Original eject table Read origin...

Page 17: ...y the Address Book screen Displays the Copy screen Displays the FAX screen Touch panel Displays buttons for configuring machine settings Displays the System Menu Counter screen Authenticates user swit...

Page 18: ...play the information of the logged in user 3 Logout Logs out the current user This is displayed when user login administration is enabled 4 Desktop Displays a maximum of 40 function icons including th...

Page 19: ...ff Close 10 10 Original Size A4 1 sided Top Edge on Top Original Orientation Duplex 1 4 Add Edit Shortcut Ready to send FAX On Hook Chain Check Address Book Add Dest Direct Ext Address Book Functions...

Page 20: ...x ID can limit other parties with which you can communicate Enter the four digit local FAX ID number 8 7 TTI Select whether or not to print the local fax information on the fax on the receiving system...

Page 21: ...es to the next item without setting the current item Next Advances to the next screen Back Returns to the previous screen System Menu Counter System Menu Quick Setup Wizard 10 10 Language Report Count...

Page 22: ...Daylight Savings Time Setup screen will be displayed Press On or Off 3 Set the date 1 Press Date Time NOTE Be sure to set the time difference before setting the date and time The date and time are se...

Page 23: ...ach of Year Month and Day 3 Press Next 4 Set the time 1 Press or to set each of Hour Minute and Second 2 Press OK Date Timer Energy Saver Date Time 10 10 System Menu Counter Month Cancel Next Year Day...

Page 24: ...recommended to contact the company that installed the PBX system to request connection of this machine Note that correct operation cannot be guaranteed in environment in which this machine is connect...

Page 25: ...registered for each destination 1 Display the screen 1 Press FAX on the Home screen 2 Press Address Book Menu Add and then Contact 2 Enter the destination name 1 Enter the destination name up to 32 ch...

Page 26: ...ailable number Key Description Pause Pressing this key adds about three seconds of waiting time during dialing For example when dialing the receiving system on an external line you can use this method...

Page 27: ...be used ECM ECM is a communication mode specified by the ITU T International Telecommunication Union that retransmits data when an error occurs Fax machines that have ECM mode check for errors as they...

Page 28: ...maximum of 50 groups can be added in the Address Book Before adding a group in the Address Book the contacts to be included in the group must be added first 1 Display the screen 1 Press FAX on the Hom...

Page 29: ...e address number the address is registered under the lowest available number NOTE Press the checkbox to select the desired destination from the list The selected destinations are indicated by a checkm...

Page 30: ...e screen 2 Press Address Book Menu and then Edit 3 Select the destination contacts or group to edit NOTE Destinations can be sorted or searched by destination name or address number For details refer...

Page 31: ...destination from the group select the destination and press Delete the trash can icon Press Yes in confirmation screen 4 To add the destination press Select the members to be added to add them 5 After...

Page 32: ...u can sort the list in the order of index or address numbers of the destinations 1 Display the screen 1 Press the System Menu Counter key 2 Press Address Book One Touch and then Print List 2 Print 1 S...

Page 33: ...n contact or group from the Address Book 3 Enter the One Touch Key name up to 24 characters displayed in the send base screen and press Next For details on character entry refer to Character Entry Met...

Page 34: ...OK 3 To change the name of the One Touch Keys displayed on the basic screen press Name then enter the name and press OK 4 Press Save The destination is registered to the One Touch Key To delete 1 Sele...

Page 35: ...Login Logout 3 16 Logging in when User Accounting has been Enabled 3 16 Logging in when Job Accounting has been Enabled 3 17 Fax transmission functions 3 18 Quiet Mode 3 19 Original Size 3 19 Origina...

Page 36: ...led and communication starts before the original is scanned Press Direct to change the transmission method to direct transmission The key will be highlighted on the touch panel If the Direct is presse...

Page 37: ...originals placed in the document processor are scanned and stored in the memory the receiving system is dialed When originals are placed on the glass surface After originals placed on the glass surfa...

Page 38: ...other fax jobs are moved down in the transmission queue If a broadcast transmission job is in progress If a fax job to multiple destinations broadcast transmission is in progress the priority overrid...

Page 39: ...ancel on the touch panel Scanning of originals is canceled and the originals are ejected When originals remain in the document processor take them out from the original output table Cancelling Memory...

Page 40: ...hen communication is disconnected transmission stops To cancel direct transmission refer to Cancelling Direct Transmission on page 3 21 To cancel a delayed transmission or send a fax by immediate tran...

Page 41: ...ving system press Recall and you can call the receiving system you dialed on the destination list 1 Press Recall 2 Press the Start key The transmission will start NOTE Recall information is canceled i...

Page 42: ...creen Key Description Pause Pressing this key adds about three seconds of waiting time during dialing For example when dialing the receiving system on an external line you can use this method to inser...

Page 43: ...bps NOTE Normally this should be used with the default setting ECM ECM is a communication mode specified by the ITU T International Telecommunication Union that retransmits data when an error occurs F...

Page 44: ...destinations in the Address Book refer to Registering Destinations in the Address Book on page 2 12 For details on the external address book refer to Embedded Web Server RX User Guide FAX On Hook Chai...

Page 45: ...e of registered destination All FAX or Group Search Name and Search No Searches by destination name or address number Sort Name and Sort No Sorts the list by destination name or address number 3 Press...

Page 46: ...ons NOTE For more information on adding One Touch keys refer to Adding a Destination on One Touch Key on page 2 20 NOTE You can specify a one touch key by one touch number by pressing the Quick No Sea...

Page 47: ...ick No Search key 2 Enter the one touch key number speed dial number with the numeric keys 3 Press OK The entered destination is selected 4 Press OK Accept the destinations NOTE For more information o...

Page 48: ...ion You can use this function together with sub address communication and delayed transmission When direct transmission has been selected it changes to memory transmission at the time of transmission...

Page 49: ...he One touch keys 1 Press One Touch Key 2 Select all destinations and press OK 10 10 OK Menu 1 1 001 123456 123456 Cancel Back 789012 789012 ABCDEF 567890 GHIJKL 111111 002 003 004 Address Book All On...

Page 50: ...s Password to enter the login password and press OK 2 Press Login Simple Login If this screen is displayed during operations select a user and log in Refer to Simple Login on the machine s Operation G...

Page 51: ...and press Login 2 Proceed to complete the rest of the steps Logout When the operations are complete press the Authentication Logout key to return to the account ID entry screen NOTE If you entered a w...

Page 52: ...job is complete 3 27 FAX Delayed Transmission Specify a time for transmission 3 23 FAX Direct Transmission Connect to the destination first and then scan the original 3 21 Polling Communication Initi...

Page 53: ...Envelope 6 Envelope Monarch Envelope DL Envelope C5 Hagaki Oufuku Hagaki Youkei 4 Youkei 2 or Custom For instructions on how to specify the custom original size refer to the machine s Operation Guide...

Page 54: ...ion 200 200 dpi Fine when sending originals with relatively small characters and thin lines Typical character size 8 point example Resolution Resolution 200 100 dpi Normal when sending originals with...

Page 55: ...inals remain in the document processor take them out Setting for Direct transmission Description On Starts direct transmission Dials the receiving system and after the communication has started origin...

Page 56: ...Start key When you hear the fax tone the telephone line has connected to the receiving system Press the Start key Transmission begins NOTE Connecting a telephone set commercially available product to...

Page 57: ...elayed transmissions are set for the same time the communication will start in the order that the delayed transmissions have been set When delayed transmissions have been set in reverse order however...

Page 58: ...re below 1 Display the screen 1 Press the Status Job Cancel key 2 Press Scheduled Job 2 Canceling a job and immediate transmission Canceling a job 1 Select the job you want to cancel and press Cancel...

Page 59: ...e originals 3 Select the destination and set transmitting functions if you want to use any 4 Press the Start key Scanning of the originals starts and the next transmission is scheduled 5 When the comm...

Page 60: ...ill start when transmission becomes possible 5 When the interrupt send is completed the canceled communication and standby transmission will automatically resume NOTE When the total number of standby...

Page 61: ...le name Additional information such as Job No and Date and Time can also be set For details refer to the machine s Operation Guide FAX TX Report You can check whether FAX was transmitted properly by p...

Page 62: ...nations For the procedure for selecting a destination in the address book refer to Choosing from the Address Book on page 3 10 Select fax number from One touch key 1 Press One Touch Multiple destinati...

Page 63: ...n press Menu and then Next Destination When all destinations have been entered press OK NOTE When On is selected in Entry Check for New Dest a confirmation screen is displayed for the entered FAX numb...

Page 64: ...Press Favorites on the Home screen 2 Select a favorite When using the wizard mode 1 The registered screens are displayed in order Make the desired settings and press Next When all the settings are co...

Page 65: ...and Changing the Reception Method 4 2 Flow of reception 4 3 Canceling reception Disconnection of communication 4 3 Manual Reception 4 4 Flow of reception 4 4 Fax reception functions 4 5 Fax reception...

Page 66: ...s Reception Method The methods for receiving faxes on the machine are shown below Auto Normal Auto FAX TEL Refer to 5 31 Auto Answering machine Refer to 5 33 Manual Refer to 4 4 Auto DRD Refer to 5 35...

Page 67: ...stored During memory reception FAX Reception Printing Jobs are displayed on Printing Jobs of the Status screen To print the received originals supply paper or remove jammed paper For the Status screen...

Page 68: ...ok to establish the connection 3 Press Manual RX Reception will start NOTE To use Manual Reception you need to change the receiving mode to Manual Reception To change to manual mode refer to Reception...

Page 69: ...time of reception and other information Reception Date Time page 4 6 Restrict the type of paper that can be used Media Type for Print Output page 4 7 Connection to PBX Private Branch Exchange Europe...

Page 70: ...e information about configuring settings refer to Default fax settings on page 8 2 Reception Date Time Reception Date Time function adds the reception date time sender information and number of pages...

Page 71: ...ou want to use for fax reception 2 Selecting the paper size 1 Press Paper Size 2 Select Metric or Inch and select the paper size 3 Selecting the paper type 1 Press Media Type 2 Select the paper type 4...

Page 72: ...11 Printing Originals from a Sub Address Box 5 12 Checking Details 5 13 Deleting Originals after Printing from a Sub Address Box 5 13 Deleting Originals from a Sub Address Box 5 14 Printing a Sub Add...

Page 73: ...ard the document to other fax machines or for e mail transmission or folder SMB or FTP transmission Setting Forwarding Use the procedure below to set forwarding 1 Display the screen 1 Press the System...

Page 74: ...ess Entry Folder 2 Enter the address to be registered as a forwarding destination If Address Entry E mail or Address Entry Folder is selected for the forwarding destination refer to the Operation Guid...

Page 75: ...enu Counter key 2 Press FAX Forward Settings and then Schedule 2 Configure the function 1 Select All Day or Preset Time If Preset Time is selected enter the Start Time and End Time 2 Enter the start t...

Page 76: ...unction 1 Select PDF TIFF or XPS File Separation When sending by e mail transmission folder SMB transmission or folder FTP transmission specify whether File Separation is performed 1 Display the scree...

Page 77: ...e Sender FAX No or Off FTP Encrypted TX Setting Specify whether to use FTP encryption when you send data 1 Display the screen 1 Press the System Menu Counter key 2 Press FAX Forward Settings and then...

Page 78: ...name information addition To add document information select Date and Time Job No Job No Date and Time or Date and Time Job No and set None Add No Addr to Front or Add No Addr to Back for sender name...

Page 79: ...rowser 2 In the Address or Location bar enter the machine s IP address as the URL e g 192 168 48 21 The web page displays basic information about the machine and Embedded Web Server RX as well as the...

Page 80: ...s These include confidential delivery sending originals to an original delivery box set up in the receiving system and polling communication reception of documents from a source machine that is contro...

Page 81: ...eges Sub Address Boxes can also be registered in the system menu NOTE You can use up to 20 digits including the numbers from 0 to 9 space and characters to enter a sub address Item Description Box No...

Page 82: ...the box name to be displayed on the touch panel Box No Enter the box number If you enter 00 the smallest number available will be automatically assigned Sub Address Enter the sub address Owner Displa...

Page 83: ...de 2 Press the Start key Printing starts NOTE When the password is set to a Sub Address Box you need to enter the password in the following situations If user login is disabled If user login is enable...

Page 84: ...lly delete the originals printed form the Sub Address Box use the following operation 1 Press Sub Address Box on the Home screen 2 Selecting the Originals 1 Select the box containing the document you...

Page 85: ...ave forwarded to a Sub Address Box 1 Press Sub Address Box on the Home screen 2 Deleting 1 Select the box containing the document you want to delete 2 Select the document you want to delete and press...

Page 86: ...oxes are described When there are originals in the Sub Address Boxes the number of pages is displayed 1 Display the screen 1 Press the System Menu Counter key 2 Press Document Box and then Sub Address...

Page 87: ...racters to enter a sub address 4 Press Password 5 Enter the sub address password using the numeric keys You can use up to 20 digits including the numbers from 0 to 9 space and characters to enter a su...

Page 88: ...he destination and press the Start key NOTE When On is selected in Entry Check for New Dest a confirmation screen is displayed for the entered FAX number Re enter the same FAX number and press OK For...

Page 89: ...to Deleting Originals After Polling Transmission on page 5 18 Deleting Originals After Polling Transmission Originals intended for polling transmission are automatically deleted after they have been s...

Page 90: ...ient Fax Functions Polling Communication 1 Display the screen 1 Press the System Menu Counter key 2 Press Document Box and then Polling Box 2 Configure the function 1 Press Overwrite Setting 2 Press P...

Page 91: ...original saved in the polling box For information on how to delete the saved original refer to Deleting Originals in a Polling Box on page 5 24 Function Description Duplex Select the type and binding...

Page 92: ...n for which encrypted communication is registered encrypted communication is disabled for polling reception To use polling reception you must first ensure that the sending machine is set up for pollin...

Page 93: ...tion To turn on polling reception refer to Polling Reception on page 5 21 3 Select the destination and entering the sub address For the procedure for setting a sub address refer to Sub Address Transmi...

Page 94: ...ch of the functions refer to the machine s Operation Guide 2 Press the Start key Printing starts NOTE When On is selected in Entry Check for New Dest a confirmation screen is displayed for the entered...

Page 95: ...elete 1 Select the document you want to delete and press Delete the trash can icon 2 Press Yes in confirmation screen NOTE If Delete Transmitted File is set to On originals are automatically deleted f...

Page 96: ...d Therefore the sending system and the receiving system need to have the same encryption key and 2 digit key No registered in advance Description of settings at sending and receiving systems IMPORTANT...

Page 97: ...ily 1 Display the screen 1 Press the System Menu Counter key 2 Press FAX TX RX Common and then Encryption Key Registration 2 Configure the function 1 Press for the unregistered encryption key 2 Enter...

Page 98: ...for the encryption key you want to change 2 Enter the new encryption key 3 Press OK Deleting 1 Select the encryption key you want to delete and press Delete the trash can icon 2 Press Yes in confirmat...

Page 99: ...d transmission 1 Press Detail Settings Encrypted Transmission Encryption and then On 2 Press Encryption Key No 3 Select the encryption key number that you used to register the encryption key that you...

Page 100: ...1 Press OK 2 Press OK 3 Press OK 8 Send Start 1 Press the Start key The transmission will start NOTE When On is selected in Dest Check before Send a destination confirmation screen is displayed when y...

Page 101: ...r the procedure for registering an encryption key refer to Registering an Encryption Key on page 5 26 2 Display the screen 1 Press the System Menu Counter key 2 Press FAX and then Reception 3 Turn on...

Page 102: ...phone set commercially available product to the machine After the telephone has made a ringing tone for the preset number of times the other party is required to pay phone line charges even if the rec...

Page 103: ...Answer the call When the call is from a telephone 1 The machine makes a ringing tone urging the user to respond Lift the handset of the telephone within 30 seconds 2 Talk to the other party When the...

Page 104: ...into operation and the machine switches to fax reception NOTE In order to use FAX Answering Machine Auto Switch Reception it is necessary to connect an answering machine equipped telephone set commer...

Page 105: ...answering machine plays a response message and starts recording the other party s message When the call is from a fax The machine starts receiving fax originals NOTE If you lift the handset while the...

Page 106: ...the telephone will ring NOTE Using DRD Reception to receive a telephone call is only possible if a separately purchased telephone is connected to the machine DRD reception is only possible if you sub...

Page 107: ...ll then ring using the predetermined ring pattern When the call is from a telephone Lift the handset and speak with the other party When the conversation is over fax reception can be initiated manuall...

Page 108: ...tem 3 Check if the telephone line has connected to the fax of the receiving system If the destination is a fax machine you will hear a long high beep sound If a person answers you can talk to that per...

Page 109: ...as connected to the fax of the sending system If the destination is a fax machine you will hear soft beep sounds If a person answers you can talk to that person 4 Press FAX on the Home screen and then...

Page 110: ...he handset When reception starts return the handset to its original position NOTE When using a telephone set that can send tone signals use the telephone to start the reception of originals with the r...

Page 111: ...hen you hear the fax tone from the handset enter the two digit remote switch dial number using the dial button on the telephone set The telephone line switches to the machine and reception starts NOTE...

Page 112: ...FAX Receiving 6 2 Setup 6 3 Installing the Fax Driver 6 4 Uninstalling the FAX Driver 6 6 Basic Transmission 6 7 Configuring the Driver Default Settings 6 10 Default Settings Dialog Box 6 11 Changing...

Page 113: ...nding Network FAX sending is performed in the following sequence Flow of Network FAX Receiving Network FAX receiving is performed in the following sequence Prepare a document using a PC networked to t...

Page 114: ...C using the network cable For details refer to the machine s Operation Guide Machine Registration Using the memory transmission function select the recipient PC or file format NOTE Use the memory tran...

Page 115: ...FAX Driver 1 Select Custom Install 2 Select the print system to be installed 3 Click NOTE Plug and Play is disabled on this device when in Sleep Wake the device from Sleep before continuing NOTE Inst...

Page 116: ...owing the screen prompts This completes the FAX driver installation procedure NOTE The machine cannot be detected unless it is on If the computer fails to detect the machine verify that it is connecte...

Page 117: ...re Place a check in the check box of the driver to be deleted and click Uninstall 3 Finish uninstalling If a system restart message appears restart the computer by following the screen prompts This co...

Page 118: ...log box for the application that you are using will appear 2 Select settings in the Print dialog box 1 Select the product name of the machine XXX XXX NW FAX to be used in the printer name list 2 Set t...

Page 119: ...eturn to the Print dialog box for the application Click OK The Transmit Settings dialog box will appear 4 Select settings in the Transmit Settings dialog box You can specify settings such as a transmi...

Page 120: ...on fax number in the Address Setting tab 2 Click Add to Destination List The destination information will appear in the address list To send to multiple destinations repeat this operation 3 To use the...

Page 121: ...eferences screen will open 2 Select settings The following settings can be specified Item Description Original Size Select the size of the document being transmitted from the drop down list Available...

Page 122: ...e time that your documents will be transmitted The desired time setting can be entered directly with the keyboard or by clicking on the and arrows IMPORTANT If the time that is shown in the message di...

Page 123: ...ered Login User Name and Password Prompt for Login User Name A screen for entering the Login User Name and Password will be displayed when attempting a transmission The Login User Name and Password mu...

Page 124: ...Number A maximum of 20 characters can be entered Entry is allowed for the characters 0 to 9 and spaces FAX Number A maximum of 20 characters can be entered Entry is allowed for the characters 0 to 9 a...

Page 125: ...x opens Maximum number of characters that can be entered 64 half width characters Characters that can be entered 0 to 9 space a space or CANNOT be entered as the first character NOTE There are three t...

Page 126: ...stination List click on the Delete all button NOTE To use the Windows Address Book select Windows Address Book For adding an Address Book for Network FAX data file fdt select the Refer to Address Book...

Page 127: ...ings dialog box 2 Enter the sub address and password as it is registered in the destination fax A maximum of 20 characters can be entered Entry is allowed for the characters 0 to 9 and spaces a space...

Page 128: ...r Cover Pages original templates can be created and used To attach and transmit a Cover Page place a check in the check box for Attach Cover Page in the Cover Page tab 4 Optional Settings The settings...

Page 129: ...can be selected from a template The Cover Page contains such destination information and sender information as that shown below Sample of English template 01 No Item 1 Recipient Name 2 Destination Co...

Page 130: ...the destination and go to Step 5 2 Enter the fax number In the Address Setting tab enter the destination fax number and click on the Option Settings button 3 Enter the recipient information When fini...

Page 131: ...4 Sender Information Tab on page 6 13 Item Description FAX Number The fax number cannot be changed Company A maximum of 32 characters can be entered Department A maximum of 32 characters can be enter...

Page 132: ...NOTE If the Cover Page is registered in the Default Settings then the action of selecting the Cover Page for each transmission can be omitted Refer to Cover Page Registration Default Settings on page...

Page 133: ...utton 8 Edit the Message 1 Click on the Edit Message button 2 Enter the message to be added to the Cover Page and click on the OK button 9 Transmit Click on the Send button to begin the transmission I...

Page 134: ...ettings The registration method is as follows 1 Open the Default Settings dialog box Perform the Default Settings Dialog Box procedure shown on page 6 11 open the Default Settings dialog box 2 Attach...

Page 135: ...the drop down menu at the top of the dialog box or click on the or button The template display magnification can also be changed within the range of 25 to 250 from the drop down menu 2 Click on the C...

Page 136: ...riginal Cover Page template 1 Open the Default Settings dialog box Perform the Default Settings Dialog Box procedure shown on page 6 11 open the Default Settings dialog box 2 Edit the Cover Page templ...

Page 137: ...ll not fit in the field box and some of the characters could be cut off When positioning the field box make it large enough and adjust the font point size so that the inserted information will fit in...

Page 138: ...and can now be selected Sender Company Sender Company Sender information company name Department Sender Department Sender information department name Name Sender Name Sender information sender name FA...

Page 139: ...on Once a fax transmission starts being processed a Transmission Control icon will be displayed in the Windows Task Bar 1 Double click on that icon to access the Transmission Control window which indi...

Page 140: ...Log Screen 7 3 Printing Administrative Reports Result Report Setting 7 4 Send Result Reports 7 4 Report for Job Canceled before Sending 7 5 FAX RX Result Reports 7 6 Activity Report Outgoing FAX Repor...

Page 141: ...results stored Any time 7 3 Send result report Receipt result report Report printing Latest send or receipt result Automatic printout after every sending or receiving operation No Print Output or Err...

Page 142: ...the job in the list that you want to check A screen showing details will appear 2 Press Close to exit NOTE Even when job accounting is enabled 50 each of send and receipt results are displayed regardl...

Page 143: ...Press Report Result Report Setting Send Result Report and then FAX 2 Configure the function 1 Press Off not to print On to print Error Only or Specify Each Job 2 If you selected On Error Only or Speci...

Page 144: ...red in the address book If Name or Destination is selected either the name destination name or the destination FAX No stored in the address book is shown If Name and Destination is selected both the n...

Page 145: ...1 Display the screen 1 Press the System Menu Counter key 2 Press Report Result Report Setting RX Result Report and then FAX 2 Configure the function 1 Press Off not to print On to print or Error and F...

Page 146: ...utomatic printout is selected a report is printed out automatically after every 50 faxes sent or received Printing Activity Reports The latest 50 sent or received fax data are printed as a report 1 Di...

Page 147: ...An activity report is printed out automatically after every 50 faxes sent or received 1 Display the screen 1 Press the System Menu Counter key 2 Press Report Admin Report Settings and then Outgoing FA...

Page 148: ...ated information includes the Local FAX Number Local FAX Name fax line setting etc You can print it out as necessary 1 Display the screen 1 Press the System Menu Counter key 2 Press Report and then Re...

Page 149: ...the destination from the Address Book and press OK NOTE This setting is displayed when the FAX RX Result Report setting is On or Error and Forward Only For details refer to FAX RX Result Reports on p...

Page 150: ...E mail address 1 Press E mail 2 Press 3 Press Address Entry 4 Enter the address of the destination and press OK For details on character entry refer to Character Entry Method on page 10 2 RX Result R...

Page 151: ...the destination you want to delete and press Delete 2 Press Yes in the confirmation screen The destination is deleted Add a destination 1 To add the destination press Cancel and then return to the de...

Page 152: ...ations 3 Press Check 1 When you have finished checking all destinations press Check 4 Press the Start key Start sending Destinations Check 10 10 Check the destinations and press Check Menu 1 2 123 333...

Page 153: ...stment Maintenance 8 10 Transmission Restriction 8 11 Registering Permit FAX No 8 13 Changing and Deleting Permit FAX No 8 14 Registering Reject FAX No 8 15 Changing and Deleting Reject FAX No 8 15 Re...

Page 154: ...Zone Auto Panel Reset 1 4 Back Displays available functions Return to the previous screen Scrolls up and down when the list of values cannot be displayed in its entirety on a single screen System Men...

Page 155: ...ng to the machine s Operation Guide for Administrator User Name and Password The factory default login user name and login password are set as shown below If function default settings have been change...

Page 156: ...Box Configures settings related to the Sub Address Box and Polling Box For details on Sub Address Box refer to Sub Address Box Function on page 5 9 and for details on Polling Box refer to Polling Com...

Page 157: ...he list of destinations registered in the Address Book You can sort the list in the order of names or address numbers of the destinations Refer to Printing Address List on page 2 19 Outgoing FAX Repor...

Page 158: ...RTANT Specify the paper size as follows for the multi purpose tray that you want to use for fax reception Inch models Letter Legal Statement Metric models A4 B5 A5 Folio Media Type Set the media type...

Page 159: ...this machine and you contact our service representative this feature enables our Service Center computer to access the machine over the phone and check the machine s status or look for problems NOTE T...

Page 160: ...izard Fax Setup on page 2 7 Dialing Mode Inch version only Select the telephone line according to the type you are contracted with Please note that selecting a wrong telephone line will prevent you fr...

Page 161: ...is set each page is printed as it is received Value On Off For details refer to Batch Print on page 4 6 Rings Normal If the reception method is fax automatic reception the number of rings until the ma...

Page 162: ...the line and other conditions Value On Off NOTE When there is a large amount of noise on the line communication may take slightly longer than when Off is selected RX Start Speed Change the RX Start S...

Page 163: ...rictions Register Permitted FAX numbers or Permitted ID numbers Refer to Registering Permit FAX No on page 8 13 or Registering Permit ID No on page 8 17 Send restriction settings are specified in Perm...

Page 164: ...ecified in Reject List in Reception Restrictions Refer to Setting Reception Restriction on page 8 19 If there are no Reject FAX numbers registered calls are only rejected from senders whose Local FAX...

Page 165: ...eys to enter Permit FAX No Up to 20 digits can be entered 3 Press OK 3 To register another permit fax number repeat Steps 2 1 to 2 3 NOTE Up to 25 Permit FAX numbers can be registered NOTE Press Pause...

Page 166: ...change and enter the new number 2 Press OK 3 Press Yes in confirmation screen Deleting 1 Select Permit FAX No you want to delete and press Delete the trash can icon 2 Press Yes in confirmation screen...

Page 167: ...register another Reject FAX No repeat Steps 2 1 to 2 3 Changing and Deleting Reject FAX No 1 Display the screen 1 Press the System Menu Counter key 2 Press FAX TX RX Restriction and then Reject No Lis...

Page 168: ...reen Deleting 1 Select Reject FAX No you want to delete and press Delete the trash can icon 2 Press Yes in confirmation screen NOTE For the procedure for entering a number refer to Registering Reject...

Page 169: ...he numeric keys to enter Permit ID No 0000 to 9999 3 Press OK 3 To register another Permit ID No repeat Steps 2 1 to 2 3 Changing and Deleting Permit ID No 1 Display the screen 1 Press the System Menu...

Page 170: ...the sending restriction follow the steps below 1 Display the screen 1 Press the System Menu Counter key 2 Press FAX TX RX Restriction and then TX Restriction 2 Configure the function To not use the se...

Page 171: ...nter key 2 Press FAX TX RX Restriction and then RX Restriction 2 Configure the function To not use the reception restriction press Off To restrict the other parties from which you receive originals on...

Page 172: ...erations are prohibited during the unusable time period including printing of copy jobs and printer jobs and printing from USB memory Faxes and print jobs received during the unusable time period are...

Page 173: ...y the code to temporarily cancel the unusable setting during unusable time 1 Press Unlock code 2 Use the numeric keys to enter Unlock Code 0000 to 9999 3 Press OK NOTE To use the machine temporarily d...

Page 174: ...dialed from this machine to the receiving system Polling reception Sending Faxes from PC Restriction of use function When you have enabled job accounting you need to enter an Account ID when performin...

Page 175: ...ding Faxes from PC When job accounting has been enabled batch transmission function works only for communication to be performed for the same Account ID The communication to be performed with a differ...

Page 176: ...hapter explains the following topics Indicators During Sending Receiving Operation 9 2 Responding to an Attention Indicator Flashes 9 2 Precautions When Turning Power OFF 9 3 Messages 9 4 Error Code L...

Page 177: ...ror message If the message is not indicated on the touch panel when the Status Job Cancel key is pressed or the attention indicator flashes for 1 5 seconds check the following Symptom Checkpoints Corr...

Page 178: ...a fax when the power switch is turned off Make sure that the Processing indicator and the Memory indicator are off before turning off the power switch NOTE When the Processing indicator or Memory indi...

Page 179: ...r source Press Continue to print on the paper in the currently selected paper source Box limit exceeded Is End displayed on the screen The specified box is full and no further storage is available Job...

Page 180: ...d again If you still have trouble reduce TX Start Speed and send again NOTE If the communication error occurs frequently change the default setting of TX Start Speed in System Menu U00900 U00910 Page...

Page 181: ...U03200 Sub address bulletin board reception was attempted and the other party s machine is an our brand model but the specified sub address box contained no data Check with the other party U03300 An e...

Page 182: ...cted by the recipient because communication requirements are not met due to the reception restriction set on the recipient machine Check with the recipient U14000 Reception to the Sub Address Box was...

Page 183: ...restriction activated Cancel the RX restriction 8 11 Cannot perform memory reception Is free space available in the memory Receive after the memory has free space or create free space in the memory Ca...

Page 184: ...tin board communication Does the other party s fax machine have the same sort of sub address bulletin board communication function If the other party s fax machine does not have the same sort of sub a...

Page 185: ...This chapter explains the following topics Character Entry Method 10 2 Specifications 10 5 Menu Map 10 7 Received FAX Sizes and Paper Priority Metric Model 10 13 Received FAX Sizes and Paper Priority...

Page 186: ...board Press the character to enter 3 ABC Symbol Select the characters that are entered To enter symbols or numbers select Symbol 4 A a a A Press to switch between upper case and lower case 5 Cursor Ke...

Page 187: ...een No Display Key Description 13 To enter a number or symbol not shown in the keyboard press the cursor key and scroll the screen to view other numbers or symbols to enter Input Limit Back Next Cance...

Page 188: ...r numbers or symbols press ABC to display Symbol 3 Register the characters you entered Press Next The entered characters are registered Input Limit Back Next Cancel L Del 1 32 ABC A a Add Name Input L...

Page 189: ...8 1 2 216 mm Max length 14 356 mm Automatic Document Feed Max 75 sheets with document processor Resolution Scan 200 100 dpi Normal 8 dot mm 3 85 line mm 200 200 dpi Fine 8 dot mm 7 7 line mm 200 400 d...

Page 190: ...ed on settings in the Network FAX Driver setting is possible to any 1 minute increment within the subsequent 24 hour period Transmit and Print Fax transmission and print out at the machine is availabl...

Page 191: ...ayed Transmission page 3 23 FAX Direct Transmission page 3 21 FAX Polling RX page 5 18 FAX TX Report page 3 27 Add Edit Shortcut refer to the machine s Operation Guide Sub Address Box page 5 9 Polling...

Page 192: ...Guide Paper Status refer to the machine s Operation Guide Removable Memory refer to the machine s Operation Guide USB Keyboard refer to the machine s Operation Guide SSD refer to the machine s Operati...

Page 193: ...refer to the machine s Operation Guide Admin Report Settings page 7 7 Outgoing FAX Report page 7 7 Incoming FAX Report page 7 7 Result Report Setting Send Result Report E mail Folder refer to the mach...

Page 194: ...e machine s Operation Guide Measurement refer to the machine s Operation Guide Low Toner Alert Level refer to the machine s Operation Guide Keyboard Input Method refer to the machine s Operation Guide...

Page 195: ...Rings Normal page 8 9 Rings Answering Machine page 8 9 Rings FAX TEL page 8 9 Reception Mode page 8 9 Remote SW Dial page 8 9 Encrypted Reception page 5 25 ECM RX page 8 9 RX Start Speed page 8 9 TX...

Page 196: ...hine s Operation Guide Sleep Level Except for Europe refer to the machine s Operation Guide Sleep Rules Europe only Sleep Timer refer to the machine s Operation Guide Power Off Rule refer to the machi...

Page 197: ...in the direction of the paper feed Paper Size 1 A5 Paper orientation is different from the received document The image is printed after being rotated 90 automatically A4 Folio A4 Folio 2 A4 Folio A4...

Page 198: ...inals Legal Long Originals Originals longer than Legal in the direction of the paper feed Paper Size 1 Statement Paper orientation is different from the received document The image is printed after be...

Page 199: ...Duplex Printing 4 6 8 9 E ECM RX 8 10 ECM TX 8 8 E mail Notice Job Finish Notice 3 27 Reporting FAX Receipt Result 7 10 Encrypted Communication 5 25 Encryption Communication Changing and Deleting Regi...

Page 200: ...9 Reception Date Time 4 6 8 9 Redial 3 7 Changing Retry Times 8 8 Reject Fax No Change Deletion 8 15 Registration 8 15 Remote Diagnostics 8 7 Remote Switch Function 5 40 8 9 How to Register 8 9 How t...

Page 201: ...ermit FAX No 8 13 Permit ID No 8 17 Prerequisites 8 11 Reception Rejection Requirements 8 12 Reception Restriction Setting 8 19 Reject FAX No 8 15 Send Restriction Setting 8 18 Unknown Number Receptio...

Page 202: ......

Page 203: ...First edition 2014 1 2P6GEEN500...

Page 204: ...TA Triumph Adler GmbH Ohechaussee 235 22848 Norderstedt Germany...

Reviews: