background image

Manual de usuario / User Manual | PAR ZOOM  TS120Z Triton Blue | Rev. May.2015 | www.triton-blue.com

Manual de usuario / User Manual | PAR ZOOM  TS120Z Triton Blue | Rev. May.2015 | www.triton-blue.com

8

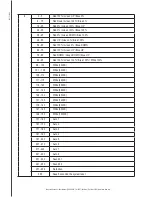
0 - 5

Red 100% / Green UP / Blue 0%

6 - 15

Red Down / Green 100% / Blue 0%

16 - 25

Red 0% / Green 100% / Blue UP

26 - 35

Red 0% / Green 100% / Blue 100%

36 - 45

Red 0% / Green DOWN / Blue 100%

46 - 55

Red UP / Green 0% / Blue 100%

56 - 65

Red 100% / Green 0% / Blue DOWN

66 - 75

Red 100% / Green UP / Blue UP

76 - 85

Red DOWN / Green DOWN / Blue UP

86 - 95

Red 100% / Green 100% / Blue 100% / White 100%

96 - 100

White (3200K)

101  - 105

White (3400K)

106 - 110

White (4200K)

111 -115

White (4900K)

116 - 120

White (5600K)

121 - 125

White (5900K)

126 - 130

White (6500K)

131 - 135

White (7200K)

136 - 140

White (8000K) 

141 - 145

White (8500K)

146 - 150

White (10000K)

151 - 160 

Auto 1

161 - 170

Auto  2

171 - 180

Auto 3

181 - 190 

Auto 4

191 - 200 

Auto 5

201 - 210

Auto 6

211 - 220

Auto 7

221 - 230

Auto 8

231 - 240

Sound 01

241 - 250

Sound 02

251 - 254

No funtion

255

Keep 5 seconds, the system reset

castellano

Summary of Contents for PAR ZOOM 19x10W

Page 1: ...nual contiene información importante Por favor leer antes de poner el dispositivo en funcionamiento This manual contains important information Please read before operating fixture Manual de usuario User Manual PAR ZOOM TS120Z Triton Blue Rev May 2015 www triton blue com ...

Page 2: ...AR ZOOM 19x10W If you follow the instructions given in this manual we are sure that you will enjoy this device for a long period of time This product is intended for indoor use only Always turn off unplug power and allow fixture to cool before servicing Ensure that fixture is properly grounded Please keep this User guide for future consultation To prevent risk of fire or stock do not expose fixtur...

Page 3: ...ng cleaned Only handle the power cord by the plug Never pull out the plug by tugging the power cord When installing the equipment must be careful Don t touch the exposed cord otherwise there is deadly electric shock When the equipment is in use please don t look at light source directly in order to prevent the eyes from damaging the equipment must be kept at least 0 5metre away from objects expose...

Page 4: ... 3 PIN male XLR and 3 PIN female XLR Power connection Powercon 3 control modes DMX512 sound control master slave Static mode Color temperature selection 3200K 10000K Black plastic LCD display Indoor operation temperature 20 C 40 C 2 DMX models 6 9 DMX channels Dimmer 0 100 Linear motorized zoom 11 58 Fan cooling Fan will change speed with temperature Max power consumption 250W Detaills 1 Motor 2 L...

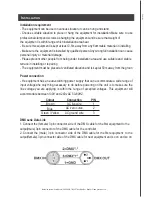
Page 5: ... use suitable and stable terrace in installing or repairing The equipment must be placed at ventilated situation and is kept at 50m away from the groun Power connection He equipment has an auto switching power supply that can accommodate a wide range of input voltages he only thing necessary to do before powering on the unit is to make sure the line voltage you are applying is within the range of ...

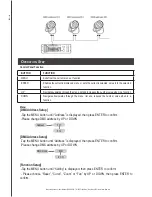
Page 6: ...ds through the menu list and reduces the number value when in a function Operation Step Control Panel Function Menu DMX Address Setup Tap the MENU button until Address is displayed then press ENTER to confirm Please change DMX address by UP or DOWN Address 001 512 DMX mode 6CH 9 CH DMX Address Setup Tap the MENU button until Address is displayed then press ENTER to confirm Please change DMX addres...

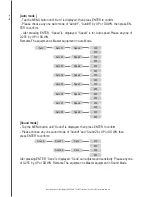
Page 7: ... choose anyone of Auto High and Low in total 3 kinds of different Fan model by UP or DOWN Auto can adjust Fan speed as per the temperature on LED board High is Fan high speed Low is Fan low speed Setting Yes Reset NO Curve 1 Curve Curve 2 Curve 3 Auto Fan High Low Static function setup Tap the MENU button until Static is displayed then press ENTER to confirm Please choose Red Green Blue White Zoom...

Page 8: ...uto 04 000 255 000 255 Speed Auto 05 Speed Auto 06 000 255 000 255 Speed Auto 07 Speed Auto 08 000 255 000 255 Sound mode Tap the MENU button until Sound is displayed then press ENTER to confirm Please choose any one sound mode of Sound1 and Sound2 by UP or DOWN then press ENTER to confirm Sound Sens Sound 1 Sens Sound 2 000 255 000 255 Afer pressing ENTER Sens is displayed Sens can adjust sound s...

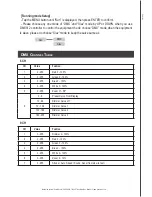
Page 9: ...tion 1 0 255 Red 0 100 2 0 255 Green 0 100 3 0 255 Blue 0 100 4 0 255 White 0 100 5 0 255 Zoom 11 58º 6 0 9 Preset Curve From Display 10 69 Dimmer Curve off 70 129 Dimmer Curve 1 130 189 Dimmer Curve 2 190 255 Dimmer Curve 3 DMX Channel Table 6 CH CH Value Funtion 1 0 255 Dimmer 0 100 2 0 255 Red 0 100 3 0 255 Green 0 100 4 0 255 Blue 0 100 5 0 255 White 0 100 6 0 255 Zoom 0 10 7 0 255 Strobe Auto...

Page 10: ...n UP Blue UP 76 85 Red DOWN Green DOWN Blue UP 86 95 Red 100 Green 100 Blue 100 White 100 96 100 White 3200K 101 105 White 3400K 106 110 White 4200K 111 115 White 4900K 116 120 White 5600K 121 125 White 5900K 126 130 White 6500K 131 135 White 7200K 136 140 White 8000K 141 145 White 8500K 146 150 White 10000K 151 160 Auto 1 161 170 Auto 2 171 180 Auto 3 181 190 Auto 4 191 200 Auto 5 201 210 Auto 6 ...

Page 11: ...69 Dimmer Curve off 70 129 Dimmer Curve 1 130 189 Dimmer Curve 2 190 255 Dimmer Curve 3 IMPORTANT INFORMATION In order to optimize the recovery and recycling of the materials that old appliances contain and reduce the impact on human health and the environment ensure that this product is recycled at the end of its life english ...

Page 12: ...ho y XLR 3 PIN hembra Conector alimentación Powercon 3 modos de control DMX512 control audio master esclavo Modo estatico Selección de temperatura de color 3200K 10000K Display LCD Rango de temperatura interior 20 C 40 C 2 modos de coltrol DMX 6 9 canales DMX Dimmer 0 100 Zoom lineal motorizado 11 58 Ventilador de enfriamiento El ventilado cambia la velocidad con la temperatura Maximo consumo 250W...

Page 13: ...en bajo el área de instalación y el uso de la escaleras u otros elementos adecuados y estables en la instalación o la reparación El equipo debe ser colocado en situación ventilada Conexión a la red El equipo dispone de una fuente de alimentación de conmutación automática que puede aco modar una amplia gama de voltajes de entrada él único que hay que hacer antes de encender la unidad es asegurarse ...

Page 14: ...ración Funciones del panel de control Menu Configuración de la dirección DMX Pulse el botón MENU hasta que aparezca Address se muestra a continuación pulse ENTER para confirmar Por favor cambie la dirección DMX con UP o DOWN Address 001 512 DMX mode 6CH 9 CH Configuración número de canales Pulse el botón MENU hasta que aparezca ADDRESS a continuación pulse ENTER para confirmar Por favor cambie el ...

Page 15: ...uto High o Low en toral 3 clases diferentes con UP o DOWN Auto puede ajustar la velocidad del ventilador según la temperatura a bordo del proyector High es elven tilador a alta velocidad Low es el ventilador a baja velocidad Setting Yes Reset NO Curve 1 Curve Curve 2 Curve 3 Auto Fan High Low onfiguración de la función estática Pulse el botón MENU hasta que aparezca Static en el display y pulse EN...

Page 16: ... Auto 01 Speed Auto 02 000 255 000 255 Speed Auto 03 Speed Auto 04 000 255 000 255 Speed Auto 05 Speed Auto 06 000 255 000 255 Speed Auto 07 Speed Auto 08 000 255 000 255 Modo audio Pulse el botón MENU hasta que aparezca Sound y a continuación pulse ENTER para confirmar Elija cualquier mode de Audio con Sound1 o Sound2 con UP o DOWN despues pulse ENTER para confirmar Sound Sens Sound 1 Sens Sound ...

Page 17: ... el mismo como esclavo CH Valor Función 1 0 255 Red 0 100 2 0 255 Green 0 100 3 0 255 Blue 0 100 4 0 255 White 0 100 5 0 255 Zoom 11 58º 6 0 9 Preset Curve From Display 10 69 Dimmer Curve off 70 129 Dimmer Curve 1 130 189 Dimmer Curve 2 190 255 Dimmer Curve 3 Tabla de valores DMX Modo 6 canales CH Valor Función 1 0 255 Dimmer 0 100 2 0 255 Red 0 100 3 0 255 Green 0 100 4 0 255 Blue 0 100 5 0 255 W...

Page 18: ... UP Blue UP 76 85 Red DOWN Green DOWN Blue UP 86 95 Red 100 Green 100 Blue 100 White 100 96 100 White 3200K 101 105 White 3400K 106 110 White 4200K 111 115 White 4900K 116 120 White 5600K 121 125 White 5900K 126 130 White 6500K 131 135 White 7200K 136 140 White 8000K 141 145 White 8500K 146 150 White 10000K 151 160 Auto 1 161 170 Auto 2 171 180 Auto 3 181 190 Auto 4 191 200 Auto 5 201 210 Auto 6 2...

Page 19: ...ve off 70 129 Dimmer Curve 1 130 189 Dimmer Curve 2 190 255 Dimmer Curve 3 INFORMACION IMPORTANTE Con el fin de optimizar la recuperación y reciclado de los materiales que los aparatos viejos contienen y reducir el impacto en la salud humana y el medio ambiente asegúrese de que este producto es reciclado al final de su vida útil CASTELLANO ...

Reviews: