background image

IP2032 Quick Reference Operating Guide 

Page 17 of 34 

the ENIP2032. 
Now, if the ENIP2032 is already connected to eNet660S, please see the following chapters 
on how to operate the phone. 
 
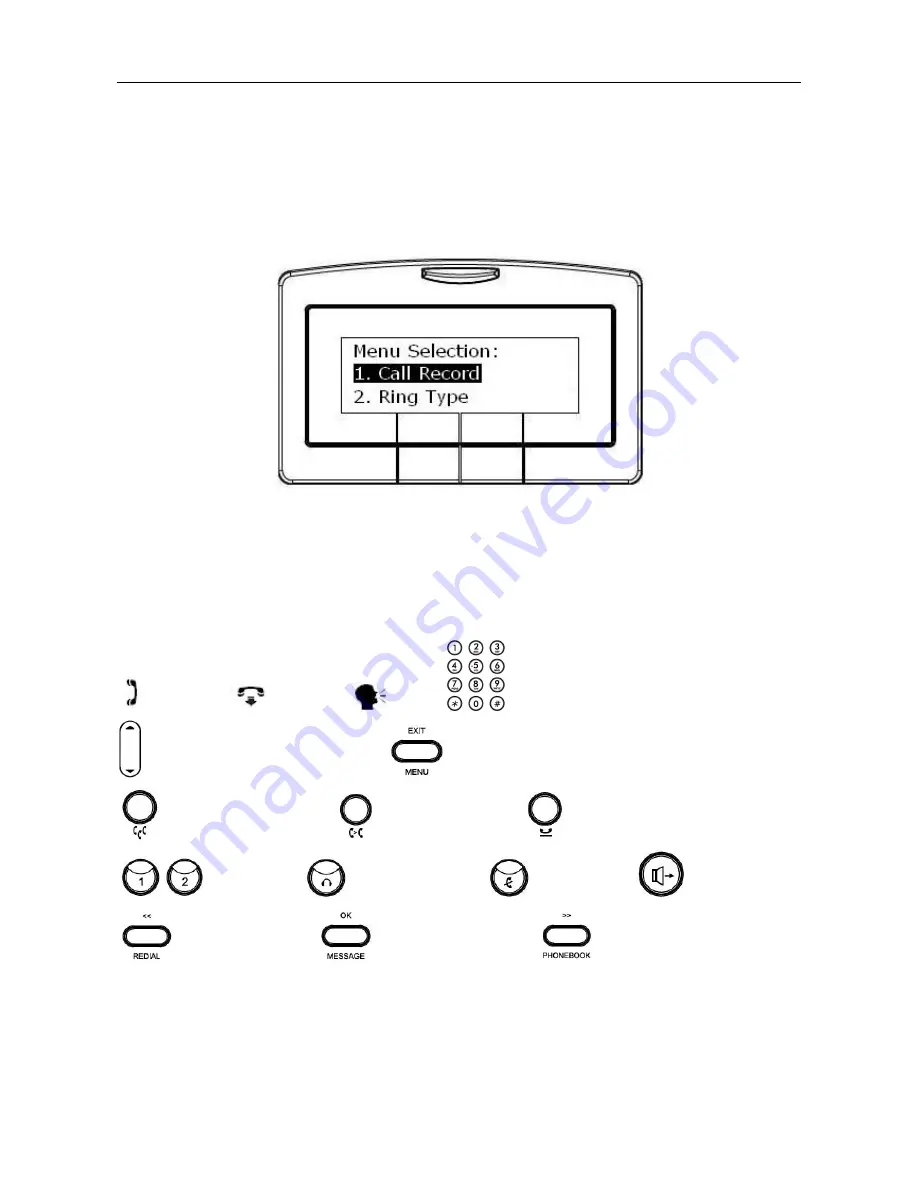
The configuration menu to configure ENIP2032 is as follows: 


You may navigate through the menu with the navigation keys. The following sections will 
describe how you can setup your ENIP2032 through this menu. 
 
The following lists several meanings of icons for you to easily understand the call features: 
Here lists several meanings of icons for you to easily understand the call features: 


Off-hook 


On-hook 


Talk   

  Keypad 

  Volume Control/Navigation key 

  MENU/EXIT key 

  CONFERENCE key   

  TRANSFER key   

  HOLD key   

  Line keys  

  HEADSET key   

  MUTE key   

SPEAKER key 

  REDIAL/<< key  

  MESSAGE/OK key 

  PHONEBOOK/>> key 


Summary of Contents for eNet660S-ENIP2032

Page 1: ...Copyright 2010 WIN Communications Corporation All Rights Reserved eNet660S ENIP2032 User Reference Manual ...

Page 2: ...2 class B for ITE and EN 50082 1 This meets the essential protection requirements of the European Council Directive 89 336 EEC on the approximation of the laws of the Member States relating to electromagnetic compatibility Copyright Notice All rights reserved No part of this publication may be reproduced transmitted transcribed stored in retrieval system or translated in to any language or compute...

Page 3: ...ed at least 1 meter from radio frequency equipment such as TVs radios hi fi or video equipments which radiate electromagnetic fields F 10 Do not connect the LAN PC port to any network other than an Ethernet network 11 Do not attempt to upgrade your IP phone in an unstable power environment This could cause unexpected damages 12 Do not work on the system during lightning storms Please disconnect al...

Page 4: ...e Your ENIP2032 for Service 16 Basic Call Features 18 Making a Call 18 Making a Call via Specific Trunk 18 Receiving a Call 19 Receiving a Call via Specific Trunk 19 Last Number Redial 19 Mute the Microphone 19 Adjust the Voice Volume During a Conversation 19 Call Record 20 Review Dialed Calls 20 Review Received Calls 20 Review Missed Calls 20 Information about the ENIP2032 22 View Information abo...

Page 5: ...rward 32 Auto Answer 32 DND 33 5 Web Configuration 34 Login Information 34 Configuration Pages Error Bookmark not defined Information Page Error Bookmark not defined Network Page Error Bookmark not defined Phone Page Error Bookmark not defined SW Upgrade Page Error Bookmark not defined SIP Page Error Bookmark not defined System Page Error Bookmark not defined Phonebook Error Bookmark not defined 6...

Page 6: ...f the ENIP2032 7 Understand the front view of the ENIP2032 8 Understand the LED indication 10 Understand the LCD indication 11 Understand the rear view of the ENIP2032 12 Understand the hardware installation 14 Make receive calls 19 Hold a call make a three way conference call or transfer a call 27 Use the phonebook 29 Use the Speed Dialing feature 31 Setup the ENIP2032 via web 35 Changing network...

Page 7: ...n transmit and receive voice via the IP network Therefore it can be deployed and connected at any location in the world between headquarters and remote branch offices Since it is a stand alone and always on terminal there is no need to have any active PC to allow it work The ENIP2032 equipped with a graphic LCD display traditional keypad several function keys handset I O ports and PoE Power over E...

Page 8: ...erating Guide Page 8 of 34 The Front View of the ENIP2032 The figure below illustrates the front view of the ENIP2032 Each number indicates a function or feature described in the table 2 3 4 6 5 1 7 8 15 17 16 10 11 12 13 9 14 ...

Page 9: ...so forth 10 The MENU EXIT key In idle state press it to go into phone s menu When in phone s menu press it to go back to previous menu level 11 The REDIAL key In idle state press it and choose a dialed number to redial In phone s menu press it to go to upper menu item The MESSAGE OK key In idle state press it to dial mailbox number to access voice messages from IG6600 In phone s menu it s used to ...

Page 10: ...e number to transfer a call to another IP phone The HOLD key press it to put the current call on hold Press again to resume the held call 15 1 2 9 0 The numeric keypad for dialing numbers 16 This HEADSET key It is used to activate de activate the headset Press HEADSET key first then press SPEAKER key to establish a call by headset A red LED is associated to indicate its status This MUTE key It is ...

Page 11: ...use Steady While in on hook dialing mode or hands free talking mode MUTE key Red Off The microphone is active for handset headset or hands free mode Steady The microphone is inactive for handset headset or hands free mode HEADSET key Red Off The headset mode is disabled Steady The headset mode is enabled Line keys Red Off The trunk line is un activated or idle Steady The trunk line is active diali...

Page 12: ...etting otherwise it will show the time passed since the last boot Message Indication If there are voice messages left on the eNet660S the phone will show the number of unread messages DND Indication If DND Do Not Disturb function is enabled the phone will show DND on LCD Extension Number and Status Indication There are three line statuses registered un registered and call forwarded For registered ...

Page 13: ...for PC to access the IP network 3 LAN port RJ 45 Jack 100 10Mbps Ethernet port for connecting to IP network It also support PoE the power can come from Ethernet cable instead using 5V power adaptor for power port Note PoE means Power over Ethernet IEEE802 3af standard 4 Power Jack To connect the power adaptor please use standard power adaptor supplied 5VDC 2A This device can support power auto swi...

Page 14: ...tallation steps below 1 If your Ethernet Switch can offer you PoE Power over Ethernet power Please connect an Ethernet cable to the Ethernet Switch from LAN port Then you will see the phone is powered and booting Please connect your PC with an Ethernet cable to PC port 2 If your Ethernet Switch doesn t support PoE function Please connect an Ethernet cable to the Ethernet Switch from LAN port Get t...

Page 15: ...ge stand Please press these two clips to out of the top dowels the wedge stand can be taken off If you want to place the phone on the wall please follow the steps bellow 1 After taking off the wedge stand please reverse it for 180 degrees please see the figure above 2 Place the wedge stand back to the phone Please align the clips to the bottom dowels 3 If needed please drill holes and drive nails ...

Page 16: ...egistered to make outgoing calls Users can also dial the trunk access number for making an outgoing call Users can hold one call and access to the other Therefore the ENIP2032 is said to support multiple call appearances Caller ID User ID If callers do not choose to hide their number and if the carrier supports the Caller ID feature the caller s phone number is shown on the screen when you receive...

Page 17: ...h the navigation keys The following sections will describe how you can setup your ENIP2032 through this menu The following lists several meanings of icons for you to easily understand the call features Here lists several meanings of icons for you to easily understand the call features Off hook On hook Talk Keypad Volume Control Navigation key MENU EXIT key CONFERENCE key TRANSFER key HOLD key Line...

Page 18: ...free mode and headset mode In this manual only handset mode is used for example In the following features you can replace to hands free mode by pressing key or headset mode by pressing and key When the conversation is over press key again to release call For headset mode please prepare a headset first Making a Call via Specific Trunk 1 Pick up the handset You will hear dial tone played 2 Press a l...

Page 19: ...king to caller party 3 Place the handset On hook when you finished the conversation Last Number Redial 1 Press the REDIAL key the LCD will show last 30 dialed numbers 2 Use the volume control key to select a dialed call and press Dial softkey to redial Mute the Microphone 1 While being engaged in a conversation handset headset or hands free mode you can mute the microphone by pressing the MUTE key...

Page 20: ...delete all records Press the Cancel softkey to exit the menu Review Received Calls 1 Press the MENU softkey Call Record 2 Use the volume control key to select the Call Record item Press ENTER key to validate the selection Received Calls 3 Select the Received Calls item and validate with the OK key 4 Use the volume control key to review the received calls You may choose to redial the number using t...

Page 21: ... item and validate with the ENTER key 4 Use the volume control key to review the missed calls You may choose to redial the number using the Dial softkey Press the Del softkey to delete the selected record Press the DelAll softkey to delete all records Press the Cancel softkey to exit the menu ...

Page 22: ...ENIP2032 Operation Description View Information about the IP2032 5 Press the MENU key Info 6 Use the navigation key to select the Info item and validate with the OK key 7 Use the volume control key to choose the information you would like to review The following information can be reviewed from the LCD screen of your ENIP2032 Model Name Firmware Number MAC Address Network Type IP Address Subnet Ma...

Page 23: ... 8 Press the MENU key Admin 9 Use the navigation key to select the Admin item Press ENTER key to validate the selection Type the administrator s password to get into Admin menu Network 10 Use the navigation key to select the Network item Press ENTER key to validate the selection The LCD displays the Network Settings menu Network Type 11 Select the Network Type item and press ENTER key Static IP 12...

Page 24: ...strator s password to get into Admin menu Network 18 Use the navigation key to select the Network item Press OK key to validate the selection The LCD displays the Network Settings menu Network Type 19 Select the Network Type item and press ENTER key DHCP 20 Use the navigation key to choose DHCP type and press OK key to validate You must reboot the phone to validate the network parameter changing P...

Page 25: ...and press ENTER key 28 Use the keypad to enter correct PPPoE username for PPPoE mode Press ENTER key to validate the input Note You could use the Backsp softkey to delete the last character Password 29 Go to previous menu choose Password item and press OK key 30 Use the keypad to enter correct PPPoE password for PPPoE mode Press OK key to validate the input Note You could use the Backsp softkey to...

Page 26: ...IP2032 will automatically switch to another channel 36 Use the keypad to dial the phone number Press OK key to validate the IP phone will call out the other party 37 You can talk with the second party prior to let him her join the conference 38 When you are ready to make the conference press the CONFERENCE key The LCD screen will show CONFERENCE that the two calls are in a conference Call Transfer...

Page 27: ...IP2032 will automatically switch to another channel 43 Use the keypad to dial the phone number Press OK key to validate the IP phone will call out the other party 44 You can talk with the transfer target prior to transfer the call 45 When you are ready to transfer the call press the TRANSFER key 46 You can hang up the phone now The call has already been transferred ...

Page 28: ...item and press OK key Then use navigation key to browse all phonebook data 51 When browsing certain phonebook data press Dial softkey to dial out the phonebook number Press Cancel softkey to exit the phonebook menu Phonebook Add or Edit a Number Phone Book 52 Press the MENU key 53 Use the navigation key to select the Phone Book item and press OK key 54 Or just press PHONEBOOK key to enter phoneboo...

Page 29: ... MENU key 58 Use the navigation key to select the Phone Book item and press OK key 59 Or just press PHONEBOOK key to enter phonebook menu Delete 60 Select Delete item and press OK key Then use navigation key to browse all phonebook data 61 When browsing certain phonebook data press Del softkey to delete ...

Page 30: ...d 9 64 You may enter the desired number directly using the keypad and press OK key to validate or use the navigation key to browse all the Speed Dialing numbers If you want to add a new number find an empty position then using keypad to enter a number Press OK key to validate If you want to edit an existing number find the number you would like to edit Use the Backsp softkey to clear the number an...

Page 31: ...and turn on or off the call blocking function Blocking List 69 Use the navigation key to select the Blocking List item to enter the Caller Blocking settings menu The LCD screen prompts you to enter a number between 0 and 9 70 You may enter the desired number directly using the keypad or use the navigation key to browse all the blocked Caller ID If you want to add a new number find an empty positio...

Page 32: ...tside or Both ICM means enable the call forward when the call comes from internal extension Outside means enable the call forward when the call comes from IP trunk PSTN trunk or IGW Group Both means enable the call forward when the call comes from internal extension IP Trunk PSTN trunk or IGW Group No Answer Forward 77 For No Answer Forward item there is one additional item No Answer Time for user...

Page 33: ...ming call will get busy tone when they make call to your phone number 1 Press the MENU softkey DND 2 Use the navigation keys to select the DND item and press ENTER key 3 Use the navigation keys to choose to turn On or Off the DND feature and press ENTER key to validate While enabling DND function it shows DND on the LCD at idle state Note If both DND and Call Forward are turned on the priority wil...

Page 34: ...ameter items are hidden 4 For user mode most SIP settings are hidden only Call Forwarding Caller Blocking Settings are kept for user to set 5 In System page of user mode only user s password time settings and reboot phone are kept for user to set Accessing the phone through web browser just simply enter the http phone ip address e g http 192 168 1 1 in the location field of the browser If you are ...

Reviews: