1
5
3
32
Fan Replacement
Under normal conditions, the original fan installation will last several years. The fan assemblies are replaceable. Replacements can be found
at tripplite.com/support.
CAUTION: The fan circuitry is not isolated from AC mains. Turn off power to the UPS prior to fan replacement. Fan
replacement must be performed only by qualified electrical service personnel.
Before removing the fan assemblies, note the fan orientation. For proper installation and connectivity, the fans must
remain in their original orientation.
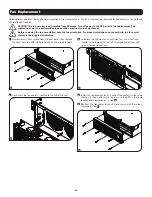
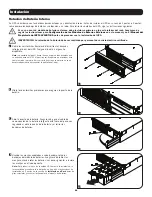
1
Remove the six front screws from the front bezel, then remove
the bezel from the UPS. Hang the bezel on the available hook.
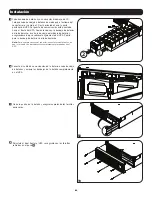
2
To replace the left-side fan or right-side fan, use a flat head
screwdriver to remove the top-left screw and the bottom-right
screw attached to each fan.
2
3
Disconnect the fan cable(s), located to the left of the fans.
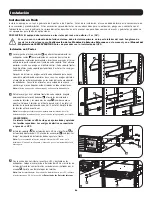
4
Install the replacement fan(s). Connect the cable(s) in the same
order as in step 3 and secure the fan(s) to the UPS in the same
location and orientation as in step
2
.
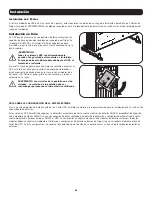
5
Reattach the front bezel to the UPS and secure with the screws
removed in step
1
.
Summary of Contents for SmartOnline AG-0358 Series
Page 106: ...106 0 3 smart Tripp Lite BP192V12RT3US...
Page 108: ...108 BP192V12RT3US 1 2 3 4 1 2 3 Smart Battery 4...
Page 109: ...109 1 2 5 7 6 8 5 6 7 8 1...
Page 122: ...122 0 5 60 60 0 5 50 60 50 0 5 FREQUENCY CONVERSION FREQUENCY CONVERSION...
Page 133: ...1 2 5 6 9 7 8 133 5 6 7 8 9 1...
Page 134: ...1 5 3 134 tripplite com support 1 2 2 3 4 3 2 5 1...

