7
Installation
(continued)
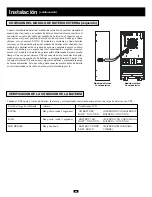
EXTERNAL BATTERY MODULE CONNECTION (required)
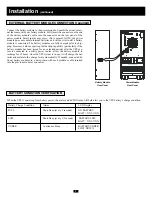
Connect the battery module to the power module. Consult the owner's man-
ual that came with your battery module. Fully insert the connector on the end
of the battery module's cable into the connector on the rear panel of the
power module. Small sparks may occur; this is normal. NOTE: the power
module does not contain internal batteries and will not start until a battery
module is connected. The battery modules are fully charged prior to ship-
ping. However, before expecting full backup capability (particularly if the
battery module has been stored for an extended period) after the UPS sys-
tem is connected to a utility power source, allow the battery module to
recharge for 12 hours. Once the UPS system is in use, it will charge the bat-
teries and maintain the charge level automatically. If needed, connect addi-
tional battery modules in a daisy-chain with each module's cable inserted
into the previous module's connector.
REFER TO USER'S MANUAL FOR TORQUING
SPECIFICATIONS, USE COPPER CONDUCTORS ONLY.
UTILISER SEULEMENT LES CONDUCTEURS DE CUIVRE.
Battery Module
Rear Panel
Power Module
Rear Panel
BATTERY CONDITION VERIFICATION
When the UPS is operating from battery power, the alarm and LCD Display will both alert you to the UPS battery’s charge condition.
Battery Charge Condition
Alarm
LCD Display
FULL
Short Beep (every 2 seconds)
ON BATTERY
BATT = XXV XX%
LOW
Short Beep (every 1/2 second)
BATTERY LOW
BATT = XXV XX%
UNDER
Continuous Beep
BATTERY UNDER
SHUT DOWN


