5
CAUTION:
In the case that re-
machining is necessary, be
sure to protect the stem during
turning. Insure concentricity of
the seat surface with the plug
stem (or outside diameter of the
seat ring, if machining the
seat).
7. To replace packing or change the packing
box configuration, push out the packing,
spacer, and guides with a dowel of a similar
size as the plug stem.
WARNING:
For valves equipped
with separable end flanges, do
not machine the body gasket
surfaces. Machining could
cause gasket leakage and
failure of the valve.
8. In the case that separable end flanges
need to be removed, file off tack welds or
pull rivets behind the flanges.
CAUTION:
If separable end
flanges and spiral wound
gaskets are used, use gaskets
with outer back-up rings.
Failure to do so could result in
excess stress in some
applications.
Note:
To prevent flanges from dropping off
during shipping, a tack weld or stainless
steel rivet has been installed behind the end
flanges.
Body Reassembly
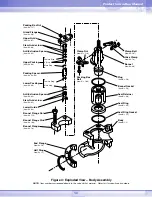
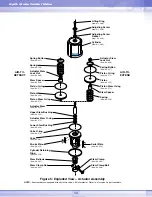
To reassemble the valve body, refer to Figure
4, and continue as follows:
1. In the case that packing was removed, refer
to Figure 2 and install new packing exactly
as shown. Be sure to leave at least 1/8-inch
at the top of the packing box for the top
guide to enter. Different spacer lengths
allow a wide variety of packing
configurations, such as twin seal and
vacuum pressure packing.
WARNING:
Valves with extended
bonnets or metal bellows seals
must not have lower packing
installed. Rather, lower packing
rings should be installed with
the upper set.
Wherever graphite guides are used, the
graphite liners should be replaced each
time the valve packing is replaced. Under
no circumstance, should the valve be
replaced without graphite liners and guides.
2. Insert the plug stem into the packing box,
being sure not to scratch the stem or
guides.
3. Turn actuator back onto the plug, without
turning the plug inside the bonnet. Be
certain that the gland flange and bonnet
flange are in place prior to engaging the
plug stem and actuator stem threads.
Note:
To prevent galling, do not let the gland
flange come into contact with the polished
plug stem.
Leave about three to four plug stem
threads exposed. Attach yoke clamp and
gland flange bolting. When working with
valves using a 2-inch spud, make sure that
the half rings are in place between the yoke
and bonnet. Tighten yoke clamp bolting
firmly.
4. Install new seat gaskets as well as a new
bonnet beveled edge up for Teflon gaskets.
5. Introduce the seat ring into the body with
the step side down. Place the seat retainer
into the body with the thin end of the
cathedral window down.
Product In
s
truction Manual


